Pages

Saturday, August 31, 2013

Banana Chocolate Chip Muffins


I'm going to be completely honest.  I've got no clue what to write about this post.  At this point I've probably written and then erased four different beginnings.  Sorry?  Though delicious, I've got no sentimental connection to these muffins, and nothing weird happened while baking them.  In fact, as my recipes go these guys are pretty darn normal.  Maybe that's it.  I've got no clue what to write when I actually make something that's not weird.


Forgive me if this is somewhat boring, but I've got to find some way to use up the space between pictures.

Soooo... muffins!  Muffins with sweet banana and melty chocolate chips.  Muffins that, providing you're a frozen banana hoarder like myself, you probably have every ingredient for in your kitchen already.  Muffins that no one will ever be able to tell are non fat, whole wheat, and healthy.  That's the best type of muffins.


Make them, eat them, and then freeze any leftovers for later snacking (although i doubt they'll be any because these muffins are delicious).  It really is that simple folks.


Banana Chocolate Chip Muffins

  • 1 3/4 cup spelt flour
  • 3/4 cup whole wheat flour
  • 1 tsp baking soda
  • 1/4 tsp salt
  • 1 cup mashed banana (3 large bananas)
  • 3/4 cup milk
  • 1/3 cup greek yogurt
  • 1/3 egg whites (2 egg whites)
  • 2 tbsp maple syrup
  • 1 tsp vanilla
  • 2/3 cup chocolate chips
Preheat oven to 350F.  Grease 2 muffins tins (you'll need all of one and one or two cups on the other).  Mix together flours, baking soda,  and salt in a large bowl.  In another bowl, mix together all remaining ingredients except chocolate chips.  Add wet ingredients to dry and mix until a smooth batter forms.  Mix in chocolate chips.  Scoop about 1/4 cup batter into prepared muffins tins.  You should get 12-14 muffins.  Bake in preheated oven for 16-18 muffins, until muffins are firm and a toothpick comes out clean (except for melted chocolate).  Store muffins in an airtight container for 3 days before freezing the leftovers.


Revisited Recipe of the Day:

Apple Currant Bran Muffins


Wednesday, August 28, 2013

Peanut Butter Banana Balls

It's snack time!


Snacks are super important, especially with back-to-school time just around the corner. There are times when I come home from school absolutely starving and all I can think is FOOD!  During those times it's nice to have healthy snacks to reach for instead of the chips, candy bars, and cupcakes others are eating at the time.  Some of my after school snacks include: yogurt/cottage cheese with fruit, toast with peanut butter and banana, a slice of some homemade healthy dessert, and as long as these Peanut Butter Banana Balls are around, they make a perfect afternoon pick-me-up.


This is one of the simplest recipes on this blog.  All you need is peanut butter, a banana, applesauce, kashi go lean cereal (or another favorite), and rolled oats.  Yep, that's it.  Mash the banana with the peanut butter and applesauce.  Measure the cereal and oats.  Mix it all together.  Stick it in the fridge for a bit and then roll into cute little balls.  Pop 'em into your mouth and enjoy the deliciousness.


Yay for Peanut Butter Banana Balls!  You so want these as your afterschool/afterwork snack!


Peanut Butter Banana Balls
  • 1 1/2 cups kashi go-lean cereal (or try your favorite type)
  • 1 cup rolled oats
  • 1 large bananas (1/2 cup mashed)
  • 1/4 cup peanut butter
  • 1/3 cup applesauce (you may need slightly more or less depending on size of bananas)
Measure cereal and rolled oats into a large bowl.  In another bowl, mash banana.  Add peanut butter and applesauce and mix until incorporated.  Add banana mixture to dry ingredients and mix until combined.  Place mixture in a container and chill in fridge for at least an hour.  Once chilled, roll into balls.  Store in fridge until serving time.  Recipe makes about 25 small balls.


Revisited Recipe of the Day:

Chocolate Peanut Butter Sandwiches


Saturday, August 24, 2013

Vacation In Portland, Oregon

This week I've been on vacation in the beautiful state of Oregon, so I've decided to take a break from the usual recipe posting and share a bit about the food I've been eating while I'm away.  I've got LOTS to share, so I'm gonna get right to it.

{I apologize in advance for the lack of pictures for some things.  I'm still getting used to the whole take pictures of everything thing.}

We started our trip in Portland.  I'd been to Portland one other time, and there was one restaurant that I just had to visit again.  It's called The Laughing Planet and we stopped in for lunch on our first day. Everyone was starving, so I didn't catch any pictures, but I'll do my best to explain things.

My favorite thing about the laughing planet is their bowls.  They basically consist of grains (or veggies if you're paleo), a protein source, some vegetables, and a great sauce to pull it all together.  I got a Thai bowl with tofu, beans, and peanut sauce, and it was totally delicious.  I shared a vegan oatmeal cookie with my dad for dessert, and that was great as well.
Clockwise from top left: Rhubarb soda, black plum, oregon sea salt, a variety of pluot, local hot sauce, and another type of pluot

Later that day, I walked around the city a bit with my mom and we stopped into a store that carried fresh produce and locally made food products.  We picked up a bunch of stuff including black plums, plouts, rhubarb soda, and some sea salt and hot sauce to bring home to a friend.   The plums were yummy, but not unlike normal plums, and the soda was totally unique and pretty good.


I also made a quick stop at whole foods before heading to our hotel room.  There I picked up some nut butter packets to have in the road.  So far I've tried the two wild friends ones.  Both were pretty tasty, but the cinnamon raisin peanut butter was definitely my favorite.

The next morning, our whole family headed down to breakfast at the Ace Hotel, where we were staying.  If you ever stay there, the breakfast is a must.  It's so unique and sososo delicious.  Pretty much everything is made locally and it's all super fun and tasty.


Some foods they had:

  • Pickled veggies - beets, fennel, onions.  I'm not a huge fan of pickled things, but everyone else said they were really good.  And the lady behind the counter told us everything was pickled by the girl who worked there most of the time.
  • Smoked trout - I'm not usually one to have meat with breakfast (I'm more of a sweet breakfast girl), but I tried a piece of the trout and it was really good.  Like seriously tasty.
  • Bread + jams + chocolate hazelnut butter - this was pretty much my breakfast, and I loved all of it.  The bread was a great vehicle for the awesome jams (strawberry rhubarb was my favorite) and, of course, who can turn down chocolate hazelnut butter?  It was a perfect breakfast.

After that we headed out of the city to go hiking.  While on the freeway, we were met with a nice surprise.  There was a cute little fresh produce stand which had not only apples, blackberries, and tomatoes, but pick-your-own blueberries as well.  It was one of those leave your money in a box places and I couldn't help but stop.  Using the old metal cans provided, we picked blueberries from the endless blueberry patch, eating our fair share.  They were amazing blueberries.  Small, sweet, and full of blueberry flavor.  We also picked up some apples from the farm stand and those were super juicy and crisp.  I'm so glad we found that little farm because it was just so cool to pick blueberries on the side of the road. (pictures below)

That night we stopped at Clyde Common, a restaurant situated right next to the ace hotel, for dinner.  If I had to describe that place in one word, I would use the word unique.  There were dishes there that I would never in a million years come up with. From black rice to beet greens to pickled corn, there were tons of new foods to try and nothing disappointed.

I so wish I had gotten some photos because the food was gorgeous, but my phone was dead leaving me with nothing to take pictures with.  Oh well, I'll just try to describe everything to you as best I can.

I got beet green and ricotta ravioli with pickled corn.  It was really fresh and green, and probably the lightest ravioli I've ever had.  It was great because it left room for dessert (which i'll get to in a minute) which of course I was planning on getting.  That being said, it would still be satisfying if you don't plan on getting dessert, I just have a big appetite.

As for the other dishes ordered, my dad got salmon with squash, black rice, and fried oysters and my mom got pork with corn and chanterelles.  I tried bites from each and the pork was nice and juicy, and everything on the salmon dish was really good.

Next it was time for dessert.  I split a crepe with sweet corn ice cream, lemon buttermilk pudding, and strawberries with my mom.  I've been seeing sweet corn ice cream popping up a lot lately so I was excited to try it.  What surprised me most was how much it actually tasted like corn.  Sometimes with somewhat weird things like that, the weird flavor gets lost, but not with this.  Overall, all the different parts of the dessert worked really well together, despite sounding a bit strange.  My favorite thing on the plate was the lemon pudding which was just tart enough and silky smooth.

And that, my friends, is the end of my food adventures in Portland, Oregon.  I'm in Bend, Oregon right now, and I might do another food post about it so keep your eyes peeled.

Have a great day!

Wednesday, August 21, 2013

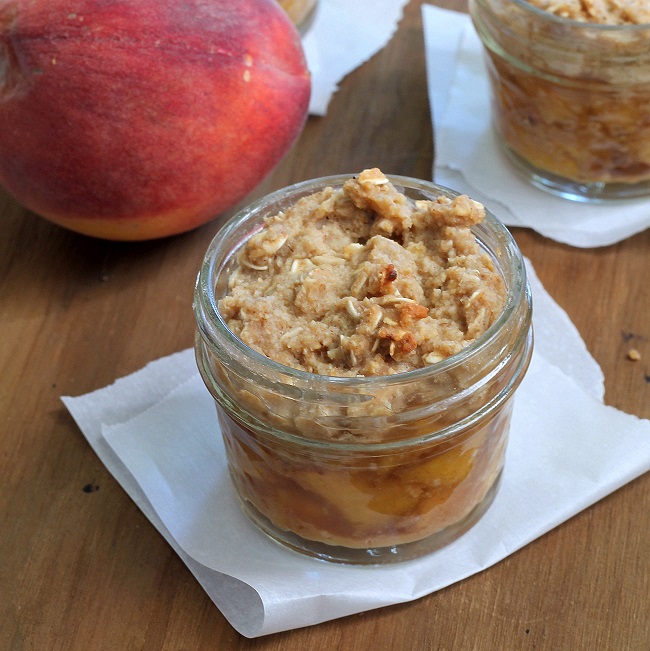
Peach Ginger Crumbles in a Jar

Two of my favorite things are featured in this post: peaches and jars.


It's recipe redux time yet again, and I was super excited about this months theme, so I can't wait to share my recipe with you guys.

First things first, let me tell you about the theme.  It was, and I quite, "raising the bar on food in a jar".  How fun and catchy is that? Basically, the idea was to take anything people put in jars to the next level.  Jams, sauces, portion controlled desserts, you know what I mean.  Like I said, I loved the idea and was determined to make a great recipe for y'all.


It's mid August (where has summer gone??), so peaches are in full swing, at least where I live.  Everywhere I go, it seems we pick up more.  I'm not complaining though, I adore peaches and love how abundant they become this time of year.  If only it could be like that year round.

With peaches coming out of our ears, it seemed perfect you make a peach dish for this months Recipe ReDux.  I decided to go with a simple peach crumble, but I made it extra special by lightening it up and adding ginger to the peach filling.

Baked into small jars and bursting with juicy peach, this is one recipe that is sure to please.  It's cute, tasty, and perfect for summer!


Peach Ginger Crumbles in a Jar

Filling:
  • 3 large, ripe peaches, pitted and chopped
  • 2 tbsp oat flour
  • 1 tsp ground ginger (if you want a less strong ginger flavor, use only 1/2 tsp)
  • 1 tsp cinnamon
  • 2 tbsp honey
Crumble:
  • 1/2 cup oat flour
  • 1/2 cup rolled oats
  • 1/4 tsp salt
  • 1/2 tsp cinnamon
  • 3 tbsp honey
  • 1/4 cup + 2 tbsp applesauc
Preheat oven to 325F.  Grease the insides of 6 small mason jars.  In a large bowl, combine all ingredients for filling.  Divide evenly between prepared jars.  In another bowl, mix together oat flour, rolled oats, salt, and cinnamon,  Add honey and applesauce and mix until completely incorporated.  Again, divide mixture evenly between jars, creating a layer above peach filling in each jar.  The jarss should be full, or almost full.  Bake in preheated oven for 16-20 minutes, or until oat mixture is firm and baked through.  Serve warm or cold, with whipped cream if desired.  Makes 6 individual sized servings.  Store leftovers in fridge.


Monday, August 19, 2013

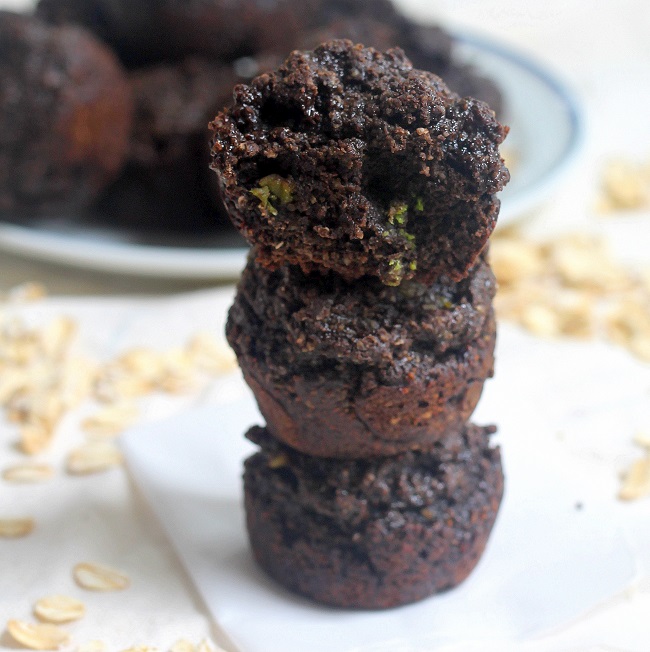
Dark Chocolate Brownie Bites

I'm positive that I will never get tired of brownie recipes.


When I search the word "brownie" on the search bar on this blog, there are five pages of results.  Five pages!!  That should be proof enough that I love me some brownies.

Some of my favorite recipes include my Waterfall Brownie Bites, Healthy Brookies, and Fudgy Pumpkin Crownies.  I can now gladly add this recipe to that list.


Despite the absurd amount of brownie recipes, each one is different in some way or another.  Some use oil, some use avocado, and some are fat free.  Some use rolled oats and some use flour.  Some are sweetened with honey, some maple syrup, and some banana.  The point is, each brownie recipe is special, and this one is no different.

I don't want you thinking that I'm just throwing a recipe you've already seen at you!


So what's different about these brownies?

I decided to experiment with using melted chocolate as well as cocoa powder to add chocolate flavor.  It worked great, and the chocolate chips definitely helped lend a rich chocolate flavor.  I also used oat flour, so these brownie bites are gluten free.

Aaaand these brownies are super duper delicious.  I know you're gonna love them!

You can see a couple avocado chunks in this one.  Don't worry, you can't taste them!

Dark Chocolate Brownie Bites

  • 1 1/2 cups oat flour
  • 1/4 cup special dark cocoa powder
  • 1/2 tsp baking soda
  • 1/4 tsp salt
  • 1/4 cup applesauce
  • 1/4 cup honey
  • 1/4 cup chocolate chips, melted
  • 2 tbsp mashed avocado
  • 2 tbsp milk
  • 1 tsp vanilla
Preheat oven to 350F.  Grease a mini muffin tin or a donut hole pan.  Combine flour, cocoa powder, baking soda, and salt in a large bowl.  Add applesauce, honey, melted chocolate, avocado, milk, and vanilla and mix until a thick batter forms.  Scoop about 1 tbsp of batter at a time into prepared pan.  You will probably need to use two pans, or make two batches.  I used one mini muffin pan and a donut hole pan as well.  Bake in preheated oven for 10 minutes, until brownies are firm and a toothpick inserted comes out clean.  Recipe makes 18-20 brownie bites.  Store leftovers in the fridge.


Revisited Recipe of the Day:

Oatmeal Raisin Cookies


Saturday, August 17, 2013

Quinoa Avocado Sushi

{I received free samples of California Avocado mentioned in this post. By posting this recipe I am
entering a recipe contest sponsored by California Avocado and am eligible to win prizes associated
with the contest. I was not compensated for my time.}


I used to dislike avocados.  They were too mushy, and too boring, and I just didn't find them appealing at all.  It's fair to say that times have definitely changed.

As it turns out, the reason I never likes avocado was because I'd never had a really good one.  I was used to store bought guacamole, and the browned chunks in a salad, not fresh, green, avocado with a creamy texture and delicious taste.


I tried my first real avocado when our family was on vacation in California.  I remember going on hikes through groves of avocado trees, and then driving to a nearby farm to table restaurant and savoring the avocado dishes that were made with the freshest avocados you could ever eat.  And then we would stop at a farm stand on the side of the road and buy even more avocados, paying by placing wadded up money in a rusted metal box.

That was the trip I learned how amazing California avocados can be.


Obviously, when I heard about the recipe contest centered around California avocados that the Recipe ReDux was sponsoring, I knew I had to be a part.

I thought long and hard about what I was going to make.  I wanted something simple, but also complex enough to call a recipe, and I wanted it to show off the avocado in the best way.  I finally decided on making avocado sushi.

I'd been wanting to make some sushi for a while now, and this was the perfect opportunity.  Who doesn't love some great avocado sushi?  To add an extra special twist, I added cucumber and spinach, and used quinoa instead of rice.  I couldn't have been happier with the result.  This is one delicious and nutritious avocado dish.


Quinoa Avocado, Cucumer, and Spinach Sushi

  • 1 cup quinoa
  • 2 cups water
  • 3 tbsp brown rice vinegar
  • 1 tsp maple syrup
  • pinch salt
  • 1 small cucumber
  • handful of spinach
  • 1 california avocado
  • 4 sheets nori sushi wrap
Place quinoa and water in a saucepan.  Bring to a boil, then reduce heat and let simmer until all water has been absorved and quinoa is fluffy.  While quinoa cooks, cut avocado and cucumber into thin strips.  Once quinoa has finished cooking, place it on a large plate.  Mix together vinegar, maple syrup, and salt in a small bowl.  Pour a bit of vinegar mixture on quinoa at a time, mixing around quinoa as you go.  Lay out one nori wrap on a sushi mat.  Spread quinoa on all but the last two inches on wrap.  Place spinach on quinoa and top with cucumber and avocado slices.  Roll up tightly, wetting the end of the nori wrap to make it stick.  Repeat to make a total of 4 rolls.  Use a sharp knife to cut into rolls.  Store rolls in fridge.  Recipe makes 4 servings of 1 roll each.


Wednesday, August 14, 2013

Zucchini Raisin Muffins

You know what's weird?  I'm crazy about putting weird stuff in my desserts, but when it comes to vegetables that are commonly used in sweets (zucchini, carrots, etc), the recipes on this blog are seriously lacking.


I'm 90% sure the absence of carrot cake and/or zucchini bread has to do with my aversion to grating vegetables.  It's just so annoying.  If I had that handy-dandy shredding blade for a food processor then everything would be super easy, but I lost that thing so now I'm stuck doing everything by hand.

It really throws a damper in dessert baking.


But anyway, with zucchini in abundance this time of year, I decided to suck it up and make some zucchini muffins.  And... they were really yummy!

It's been a while since I posted a recipe that's specifically meant for breakfast (as supposed to a dessert that's healthy enough for breakfast, I mean), so I'm glad to present you with some muffins that will definitely spice up your mornings.


Things you should know about these muffins:

  • They're hard-core muffins.  They're not petite little muffins that won't keep you full.  Nope, these guys are whole wheat, dense, and packed with zucchini and raisins.
  • This isn't one of those recipe where you can't believe it's healthy.  After all, you've got whole wheat flour staring you in the face.  Instead, this recipe is one that makes you rethink how delicious healthy can taste.  Like "Oh my god, even though these are whole wheat and have a vegetable in them, they taste super duper good!"
  • Just 24 hours after making these muffins, only 4 were left.  They. Were. Devoured!
  • Minimal vegetable grating is required.  Yay!!
Basically, this is an awesome use for zucchini and you should make these muffins this instant.


Zucchini Raisin Muffins

  • 1 cup spelt flour
  • 1/2 whole wheat flour
  • 1 tsp cinnamon
  • 1 tsp baking soda
  • 1/4 tsp salt
  • 2 cups shredded zucchini, drained of excess liquid
  • 4 egg whites (12 tbsp if using egg whites from a carton)
  • 1/4 cup maple syrup
  • 2 tbsp applesauce
  • 1 tsp vanilla
  • 1/3 cup raisins
Preheat oven to 350F.  Grease a muffin tin.  Mix together dry ingredients in a large bowl.  In another bowl, combine zucchini, egg whites, maple syrup, applesauce, and vanilla.  Add wet ingredients to dry and mix until a thick batter forms.  Do not overmix.  Gently mix in raisins until incorporated.  Distribute batter between grased muffin tins untiul all batter has been used.  Bake in preheated oven for 10-15 minutes, until muffins have browned and a toothpick comes out clean.  Store in fridge.  Recipe makes 10-12 muffins. 


Revisited Recipe of the Day:

Mini Carrot Cake for One


Sunday, August 11, 2013

Chocolate Greek Yogurt Cheesecake

We had a bit of a greek yogurt mishap at my house recently.  It's a funny story, really.


So basically I went to the grocery store to pick up Chobani.  No surprise there, right?  Everyone knows I'm a big greek yogurt fan.  But guess what?  There was no chobani!  Cleary, I was no going to leave the store without my beloved greek yogurt, so I grabbed a different brand, Cabot to be exact, and rushed out of the store and headed home.

Everything seemed normal, but it wasn't.  Little did I know, our family was in for a surprise.


Boy, am I being dramatic about this or what?  Sorry about that.  I love me a good story, and I couldn't pass up the opportunity to make this just a wee bit exaggerated.  So without further ado, I shall continue.

The big discovery was made one morning when my mom decided she wanted yogurt for breakfast.  She scooped it into her bowl, topped it with berries and a drizzle of honey, and dug in.  Seconds later, her face took on a crazy expression and she was staring down at her yogurt bowl in confusion.  In all honesty, it was quite funny.  Then my mom ran over to the fridge, grabbed the container of Cabot greek yogurt, and shoved it into my face.  What percent fat is this?  She asked urgently.  I turned over the container, and when I found the answer, I realized her shock.  It was 10% fat greek yogurt!  That is way more than what we're used to at my house.  Apparently, my mom has taken one bite and then was overcome by how incredibly rich the greek yogurt was.  There was no way to eat a whole bowl of that stuff with a spoon without entering a yogurt food coma.


So what to do?

Bake with it, of course.  The first order of buisness?  Cheesecake!  I've tried making greek yogurt cheesecake before, but without the addition of tofu, it's never been as creamy as I would like.  I thought using a high fat yogurt would help solve the problem, and I was right.

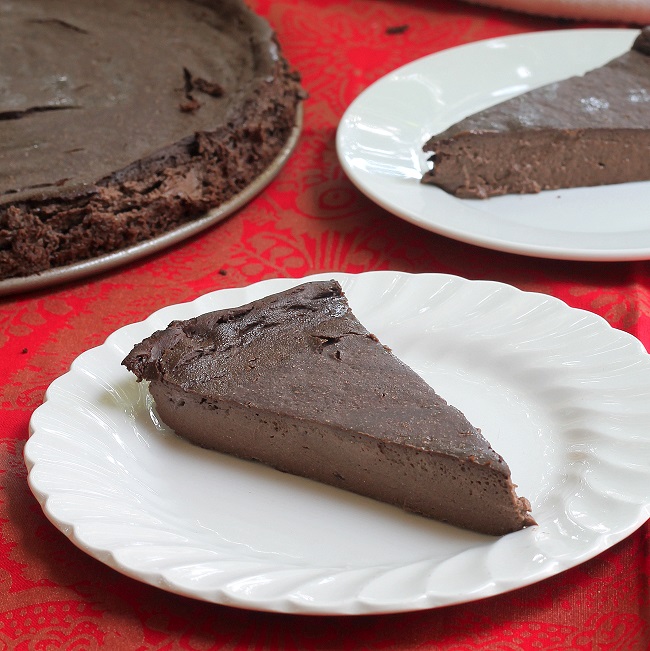
Using the greek yogurt, I baked up a super creamy Chocolate Cheesecake.  It's so rich, so chocolatey, and so darn delicious.  What a great way to use up unwanted 10% fat greek yogurt.


Chocolate Greek Yogurt Cheesecake
  • 2 1/2 cups 10% greek yogurt (I used cabot)
  • 3 egg whites (9 tbsp from the carton)
  • 1/3 cup special dark cocoa powder
  • 1/2 cup + 2 tbsp honey (you can try to replace some with stevia if you prefer)
  • 1/4 cup arrowroot starch
  • 1 tsp vanilla
  • 1/4 tsp salt
Preheat oven to 350F.  Grease a 9in round pan.  Place all ingredients in a large bowl.  Mix until completely incorporated with no cocoa powder clumps.  Scoop into prepared pan and spread into an even layer.  Bake in preheated oven for 30-35 minutes, until firm.  Remove from oven and let cool.  Once cooled, chill in fridge for at least 3 hours.  Slice into 12 thin slices (cheesecake is very rich) and serve with whipped cream, fruit, or plain.  Store in fridge.


Revisited Recipe of the Day:

Chocolate Chip Cranberry Biscotti


Thursday, August 8, 2013

Mini Chocolate Chip Cookies

You know what they say:  Everything is better when it's mini.


I can assure you that these cookies are no exception.  Chewy, soft, and bursting with melty chocolate.

But I know what you're thinking.  Why would I want a mini cookie instead of a big cookie?  I have the answer, my friends.


Not taking the cuteness factor into consideration (because I already mentioned that), there are many reasons that mini cookies can be better than big cookies.  First of all, get ready for a cookie rant.  I put lots of thought into my cookies, and I've decided to share all that with you today.  Really, you should feel honored.

So anyway, point one.  It's usually only considered "OK" to eat two big cookies.  More and you start looking a bit weird, like you've got some crazy cookie obsession (not that that's always a bad thing, but some people tend to give you strange looks, trust me, I know).  However, with mini cookies you can eat so many.  Five, six, seven, twenty-two!  So maybe not twenty-two, but you get the idea.  Way more cookies to eat!


Also, mini cookies make a good topping.  For what you ask?  Everything!  Ice cream, yogurt, toast, more cookies.  You can pretty much throw them on anything that you wish was more cookie-ish.  Although maybe adding these cookies to your broccoli is a bad idea... let's keep the veggies, veggies, k?  I'm one to talk though, with my cauliflower brownies and beet cakes.  Whoops?

Just make mini cookies will you?  I'll love you if you do.  See, look below.  The heart cookie says it all!


Mini Chocolate Chip Cookies

  • 1 cup oat flour
  • 1/4 tsp baking soda
  • pinch salt
  • 2 tbsp turbinado sugar
  • 2 tbsp honey
  • 3 tbsp milk
  • 2 tbsp applesauce
  • 1 tsp vanilla
  • 1 tbsp coconut oil, melted
  • 1/3 cup chocolate chips
Preheat oven to 350F.  Mix together first four ingredients in a large bowl.  Add honey, milk, applesauce, vanilla, and oil, and mix to form a dough.  If dough seems too thick, add a bit of milk.  Mix in chocolate chips.  Drop about 1 tsp of dough onto a lined baking sheet, and repeat until all dough has been used.  There should be about 24 cookies when all the dough is gone.  Bake for 5-7 minutes, keeping a close eye on the cookies to avoid burning.  They are done when the tops are firm and golden, and the bottom are slightly browned.  Let cool completely before removing from baking sheet.  Store cookies in an airtight container.


Revisited Recipe of the Day:

Chocolate Cookie Dough Baked Oatmeal Bars