Pages

Friday, August 31, 2012

Honey Flax Bread

I love love love freshly baked bread.


Just one slice of any kind is enough to make me smile, and when the bread has an extremely delicious taste to match, well, I'm usually sent to heaven in an instant.

There's just something that happens when you combine warm, soft, comforting, and tasty. I think it's probably something magical.

Because, c'mon, how on earth could anything taste so good otherwise?


This Honey Flax Bread is no exception. I nearly fainted waiting for my photoshoot to end so I could eat some.

This is, until I discovered that I could sneak pieces from the bottom of the loaf without anyone noticing. After that, everything was fine. Except, maybe, the underside of the bread, which ended up looking a little like Swiss cheese.

Sorry bread, you just tasted too yummy.


Honey Flax Bread - original recipe can be found here
(makes one 2 lb loaf)
  • 1 2/3 cup 1% milk (or skim, or almond, or soy)
  • 1/4 cup honey
  • 1 1/2 tsp salt
  • 3 3/4 cup all-purpose flour
  • 1 cup flaxmeal (ground flaxseed)
  • 2 1/4 tsp bread machine yeast
Add ingredients to bread machine pan in order listed, select appropriate settings, and wait for your delicious bread to be ready.

A warning:  The smell is ahhh-mazing.


I'm honestly not quite sure why anyone would still be reading right now.

You have the recipe, mostly likely all of the necessary ingredients, and I've told you how delcious this bread smells and tastes.

So, why are you still sitting at your computer?  Go make some bread!


Alright, maybe that was a bit pushy.

I bet some of you have a really great reason for why you can't make bread this instant (yes, "I'm too lazy" counts).  What I meant was, maybe you should consider pinning/bookmarking/scribbling down onto a random scrap of paper this recipe, because, when the perfect time comes around, I swear you'll be glad you did.

P.S. Don't forget to enter the giveaway!  You earn some tea to enjoy with your fresh bread!


Revisited Recipe of the Day:

Strawberry Banana Bread


Wednesday, August 29, 2012

Apple Cinnamon Oatmeal Muffin + giveaway

Free stuff is good, right?

And yummy breakfast muffins?


Hopefully, you answered yes and yes to the two questions above, because that means that this post is totally perfect for you.

A Single Serving Muffin recipe and a chance to win some tea!

Awesome.


You know the other great thing about today's post?

It could result in the ultimate healthy and delicious breakfast. Tea, which contains antioxidants, and an oatmeal muffin, which contains, well, oats, my favorite breakfast food ever.

So, you see, hidden in this post could very well be the recipe for the perfect morning.  And that is a very valuable recipe, my friends.  I suggest you read on.


Let's get into the details, shall we?

First, the giveaway.

The people from Celestial Seasonings (remember, they're awesome) have kindly supplied 3 boxes of tea and a cute little teapot.  Those gifts will go out to one lucky person.


(oh, look, peach blossom is a flavor. I wonder what you could do with that... )

The giveaway is now closed.

Congratulations to Gena, our winner!

Gena, please contact me at beautiful.food.lover(at)gmail(dot)com within a week with your shipping information.  If you do not do so, a new winner will be selected.  Thanks!


Now, onto the yummy stuff.

You don't have to wait 2 weeks for this delcious breakfast (thank god), you can whip it up in just 2 minutes!


Apple Cinnamon Oatmeal Muffin
(makes 1 serving)
  • 3 tbsp old-fashioned oats
  • 1 tbsp flaxmeal
  • 1 tbsp whole wheat flour (or protein powder)
  • 1 or 2 tsp sugar (When I made this for breakfast, I left out the sugar all together)
  • pinch baking powder
  • 1/4 tsp vanilla extract
  • 1/2 bag Celestial Seasonings Apple Cinnamon Tea (any type of tea should work.  I made a cherry flavored muffin too, and it was delicious)
  • 4-5 tbsp water
Mix together oats, flaxmeal, flour, sugar, and baking powder in a small bowl.  Add in half the contents of the tea bag (actually open it up and pour in the leaves, as this adds tons of flavor) and mix again.  Pour in vanilla extract and water and stir well.  Spray a small microwave safe dish or ramekin and pour batter in.  Microwave for 1 to 1 1/2 minutes or until muffin is firm to the touch.  Let cool before trying to remove from dish.  Top with whipped cream or fruit and enjoy!


Alright guys, that's it for today.

Enter the giveaway, make a muffin, and have a wonderful day :)


Revisited Recipe of the Day:


Monday, August 27, 2012

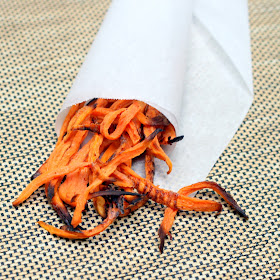
Baked Sweet Potato Fries

Let's face it, everyone loves french fries.


After all, it's hard not to when they're everything one wants in a snack. Crunchy, salty, crisp, and oh, so delicious. I could eat french fries by the bucketful they're so addicting.


But I don't.  Because, along with their extreme tastiness, fries are also pretty darn unhealthy.  In fact, usually when I have them at some restauran, I end up regretting it a couple hours later, when I start to feel like a big, heavy zombie.

However, that did not mean I was going to give up fries all together.  Heck no.  I was still going to enjoy my fries, just in a healthier way.


Sweet Potato Fries became that way.  I found a recipe that makes them in the oven without a drop of oil, so they're much better for you than most of the fries out there.

And the best part?  They're just as heavenly as the fast-food fries I love!  Crunchy and crisp and totally awesome.  Everything that makes a french fry, a french fry, minus the unhealthy factor.  Yum!


Baked Sweet Potato Fries - original recipe can be found here

  • 2 medium sized sweet potaoes
  • 1 egg white
  • sea salt, to taste
  • optional: herbs or other spices to season fries with (I actually only used salt when I made these)

Peel sweet potatoes and cut into strips of even thickness.  It doesn't matter how thick they are, but make sure each fry is around the same size, so none burn.
Soak your fries in a bowl of cold water for at least 30 minutes*.  Drain and pat totally dry.
Preheat oven to 425F and line 1 or 2 large baking sheets with parchment paper.
In a large bowl, whisk egg white until slightly foamy.  Add potato pieces, and any seasonings you want on your fries.  Toss around, making sure to coat every piece.  Spread potato pieces onto prepared baking sheets in a single layer with as few as possible touching.
Bake for 15 minutes in preheated oven, venting the oven around every 5 minutes or so to let steam escape (you don't have to do this if you have a convection oven).
After 15 minutes, take out fries, flip them over, and return to oven to finish cooking.  This should take around 15 minutes, but it really depends on the thickness of your fries, so keep an eye on them (mine only took 10-12 minutes).
Once fries look ready, reduce heat to 200F and let crisp for 10-20 minutes (I only did it for 10 because I was short on time).  Season with more salt (or other seasonings), if desired, and serve fries as soon as possible so they don't loose their crisp.  If you have any leftovers, store them in an airtight container.

* The potatoes can soak for up to 2 days, so, if you want the fries to come together faster, you can peel and soak your potatoes the day (or morning) before and leave them in the fridge soaking until your ready to continue on with the recipe.


Believe me when I sat that being able to shove french fries into your mouth without feeling guilty is one of the best feelings in the world.

It's something you need to experience.


Lucky for you, these fries are super simple, and along with a few sweet potatoes, you probably have every ingredient needed to make them lying around your kitchen.  So, you see, a healthy french fry really isn't that hard to acheive.  I bet you could even make these in time for dinner tonight!

(P.S.  Don't forget about the giveaway!  It's coming soon, so stay tuned)

Revisited Recipe of the Day:


Cheesy Star Chips


Friday, August 24, 2012

Ginger Peach Sorbet

I have a confession.


I may be the slightest bit obsessed with peaches.

At first I thought my newly found love was just because of all the perfect peaches available this time of year, but, then, when I automatically reached for peach tea over every other flavor, I knew that, maybe, that wasn't it.

Let me explain.


A couple days ago, I received a whole bunch of tea samples for the awesome folks at Celestial Seasonings (seriously, they're so nice).


There were tons of different teas to try, and I immediately began brainstorming up different ideas on how to use them in new and unique ways.

Smoothies, muffins, ice cream.  I had tons of ideas, all of which could have used any one of the tea flavors.  But you know which one I decided to try first?  That's right, peach blossom.


So, you see, I might have a teensy-tiny problem.

I think I can come to terms with it, though.  I mean, there are worse obsessions than peaches.  What if I was obsessed with mushrooms?  Now, that would be weird.


Now that I think about it, it's actually a good thing that I decided to use the flavor tea I did, because my peach blossom tea choice resulted in a really delicious Peach Ginger Sorbet.

It's light, with a subtle peach flavor, and a hint of ginger.  This is not a sorbet that's going to smack you in the face, but one that has just a enough flavor to make you want more... and more... and more.

Yeah, it's that good.


Ginger Peach Sorbet
(makes about 3 cups)
  • 3 cups water
  • 3 bags Celestial Seasonings Peach Blossom Green Tea (you could probably also use another brand of peach flavored tea)
  • 1/4 cup sugar (or to taste)
  • 1 1-inch cube fresh ginger root, sliced into small pieces
  • 1 peach, fresh
In a small saucepan, boil ginger in water.  Once water has boiled, turn off heat, and add tea bags and sugar.  Let cool to room temperature, then transfer to a jar, or other container, and refrigerate at least overnight so that as much flavor can come from the tea bags as possible.  When your tea mixture has been sitting for long enough, cut up one peach (leave skin on).  Blend your peach in a blender.  Once blended add the tea mixture, but make sure not to include the tea bag or any ginger pieces.  Blend until smooth.  Next, transfer your "juice" to an ice cream maker and let the machine do it's thing.  Once the sorbet is done, freeze for at least and hour, and enjoy!

Note: If you don't have an ice cream maker, you can try just freezing your sorbet without churning it first, and then blending in a blender or food processor once it's frozen.  I haven't tries this, however, and am not sure how well it would work.


Just a warning:  This is not the last peach recipe you'll be seeing.  I've still got lots coming (pizza and ice cream to name a few).  So, if you're a peach lover like me, you'll want to keep a look out.

And you know what else you should keep your eyes peeled for?  A chance to win some tea!  That's right, there's a giveaway coming soon.  Stay posted!


Revisited Recipe of the Day:

Chili Glazed Cod (to have for dinner, before this sorbet)


Thursday, August 23, 2012

Chocolate Zucchini Cake

Please tell me I'm not the only one up higher than my ears in zucchini.


It seems like even when I have absolutely no recollection of buying it, that green squash somehow appears in my fridge, staring at me, and waiting to be the star in yet another dish.

I'm not complaining, though.  I love zucchini and would never turn it down.


I especially love zucchini when it's in desserts.  Perhaps that's a bit strange, but it's true.

A good zucchini bread is something that can make my mouth water by just thinking about it!  And cake... you don't even want to know.

I'll just say that this Chocolate Zucchini Cake had be licking the mixing bowl clean.


Chocolate Zucchini Cake - original recipe can be found here

  • 2 eggs
  • 1 tbsp vanilla extract
  • 1/2 cup honey
  • 2 tbsp applesauce
  • pinch salt
  • 1 cup whole wheat flour
  • 1/2 cup cocoa powder
  • 1 1/2 tsp baking soda
  • 2 tsp cinnamon
  • 1/2 tsp cardamom
  • 2 cups shredded zucchini, patted dry with paper towels
Preheat oven to 325 degrees.  In a large bowl, combine eggs, vanilla, honey, salt, and applesauce.  In another bowl, mix together the flour and cocoa powder until no lumps remain.  Add the baking soda, cinnamon, and cardamom to the flour mixture.  Add the wet ingredients to the dry and combine until all the dry ingredients are incorporated.  Add shredded zucchini and mix again.  Pour batter into a 8 or 9 inch round  greased  pan.  Bake in preheated oven for around 30 minutes, or until a toothpick inserted comes out clean.  Let cool before cutting and serving.


You really can't go wrong with chocolate cake.  I think it's impossible.

The only thing that's better than a big slice of chocolate cake is a big slice of healthy chocolate cake.  Or two.

That's right, this cake is so healthy you can have two pieces.  It's got veggies in it, remember?


I seriously need to thank the person who came up with idea to put zucchini in cake.  That person is a genius. Same with the person who invented chocolate cake.  And the person who created chocolate.

Man, there are a lot of foodie geniuses out there.  Maybe I'll hunt a few down and and send them thank you's.


Anyway, enjoy the recipe!

(and if anyone's interested this chocolate timeline is actually really interesting)


Revisited Recipe of the Day:


Tuesday, August 21, 2012

Banana Split Bowl with Cinnamon Cake Crumble

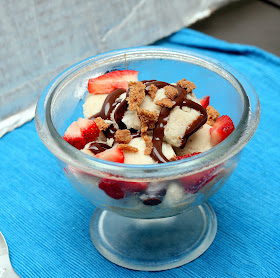
Take a good look at the Banana Split Bowl below.


Do you see the cake crumble on top? How about the creamy ice cream base? Or maybe you're eyes are drawn to the drizzle of chocolate sauce, just waiting for a spoon to run through it.

However you see it, this banana split looks pretty darn good, right?

Now, what if I told you it was healthy?


It's true.

This banana split bowl is actually so good for you, it could even qualify as breakfast.

I know, I know. It's hard to believe. But I'm not lying. This indulgent dessert really is guilt-free, even if it doesn't look or taste it.


Banana Split Bowl with Cinnamon Cake Crumble
(makes enough for 2-3 relatively big servings)

Ingredients:
  • 3 bananas, frozen
  • 1 tbsp flour (use a gluten free type if you like)
  • 1 tsp brown sugar
  • 1/8 tsp baking powder
  • 1/4 tsp cinnamon
  • 1/4 tsp vanilla extract
  • chocolate sauce (use vegan brand for vegan split, or make your own)
  • about 1/2 cup strawberries chopped
Method:
  1. Blend your frozen bananas in a food processor (not blender) until smooth.  It may take a while, but eventually the bananas will turn into an soft-serve ice cream like consistency.  Pour blended bananas into a shallow container and freeze until hard.
  2. Once blended bananas have hardened, start making cake crumble.  To do this, combine flour, sugar, baking powder, cinnamon, and vanilla in a small bowl and mix to combine.  Spread batter thinly onto a sprayed microwave safe dish, or a piece of wax paper, and microwave for 90 seconds.  If cake is still not cooked, microwave in 30 second rounds until there are no more wet spots of uncooked batter.  Let cake cool and then crumble into small pieces.  Set aside.  
  3. Now, it's time to assemble your banana split bowl.  Take banana ice cream out of freezer.  Allow to thaw a bit if desired, and then scoop like you would normal ice cream, into serving dish.  Drizzle chocolate sauce over ice cream, and top with strawberries and cookie crumble.  Serve Banana Split Bowl as this time, or freeze, and let thaw before later serving.  Enjoy!


Since this recipe is so easy, and so healthy, and soooo delicious, I'm not really sure why anybody wouldn't make it.  But, if for some reason you're hesitant, I know something to give you that boost you need.

This Saturday is Banana Split Day!


See?  You totally have an excuse to make this.

Plus, a healthy banana split, especially a delicious and healthy one, is so much better than any old banana split.  Because, c'mon, isn't it everyone's dream to eat a whole banana split without feeling guilty?


So, you guys, please make this.

It's super simple, and certainly pays off.  I'm sure it will put a smile on your face, and whoever else you serve it too.

And remember, there's nothing better than the feeling you get when you make someone smile (whether it's from a healthy banana split or not).


Revisited Recipe of the Day:

5 Minute Bread Pudding


Monday, August 20, 2012

Minty Tabbouleh

I'm one of those people who can spend hours in various stores, just roaming through the aisles.  I'm sure I annoy the heck out of the owners, seeing as I rarely buy more than a few items, but I just love looking.


There's something so cool about all the unique items that can be found in those tiny shops that most peoples eyes just skip over.

My favorite stores are the ones that sell useless knick-knacks and exotic food items.  I bet I could live in those shops and never get bored.


Anyway, it was when I was wandering through one of those food stores that I picked up some coarse Bulgar.  Not the most exotic of foods, I suppose, but definitely a wonderful ingredient.

And wonderful it was.  I used it first to make tabbouleh, and I was not disappointed.


Minty Tabbouleh - original recipe can be found here
(makes around 8 side dish size servings)

Ingredients:

  • 1 cup coarse Bulgar
  • 2 cups boiling water
  • 2 lemons, juiced
  • 1/4 cup olive oil
  • 1 1/2 tsp salt
  • 1 bunch green onions
  • 1 bunch parsley
  • 1 bunch mint
  • 2 cups cherry tomatoes, halved
  • 1/4 red wine vinegar
  • 1 tbsp soy sauce
  • Salt and pepper to taste
Put bulgar in a large bowl, pour in boiling water, and add juice from lemons, olive oil, and 1 1/2 tsp salt.  Stir, then let stand for around 1/2 hour.  Add green onions, parsley, mint, and tomatoes.  Mix well.  Add in the red wine vinegar and soy sauce, then season with salt and pepper.  Mix again and serve, or refrigerate and cover until serving time.


Not only does this tabbouleh make a great dinner, it is also amazing as leftovers.

I swear I liked it ever more the second day when I was enjoying it for lunch.  I'm sure I would have happily eaten for dinner that day too, except that there was none left to eat.

I guess I wasn't the only one to like the dish.


Of course, that's not a problem.

When a dish is so easy and so delicious, I'm sure it's something I'll be making a lot.

Revisited Recipe of the Day:

5 Ways to use Celery