Showing posts with label bread. Show all posts

Monday, November 11, 2013

Spiced Banana Bread

Chilly fall mornings call for tea and warm banana bread.


In my opinion, Banana Bread is one of the most comforting foods ever.  It's warm and sweet and this version is full of spices that will just wrap you up on a cold day.


Plus, this bread is super easy and made with natural ingredients which will keep you feeling good all day.  Dig in!


Spiced Banana Bread

  • 2 cups oat flour (packed)
  • 1 tbsp ground flax
  • 2 tsp baking powder
  • 1 tsp cinnamon
  • 1/2 tsp baking soda
  • 1/2 tsp ginger
  • 1/4 tsp salt
  • pinch nutmeg
  • 3 large bananas, mashed (about 1 1/4 cups)
  • 1/2 cup date paste
  • 1/2 cup milk
  • 1 tsp vanilla
Preheat oven to 350F.  Grease a loaf pan.  In a large bowl, mix together all dry ingredients.  Set aside.  In another bowl, mix together mashed banana, date paste, milk, and vanilla.  Add wet ingredients to dry and mix until a smooth batter forms.  Pour into loaf pan and spread into an even later.  Bake in preheated oven for 30-35 minutes, until a toothpick comes out clean.  Slice and serve.  Store in fridge.


Pin It!

Monday, September 9, 2013

Peach Quick Bread

Does anyone remember when I put tea in all my recipes?  If ya do, I'm totally doing it again.


I tend to forget about tea during the summer months.  Except for the Passion fruit Iced Tea from Starbucks (love that stuff), I never really crave a cup of tea when it's so hot out.  But now that the weathers cooling down, I'm visiting my special tea drawer much more often.  The peach flavor caught my eye last weekend.  And then the peaches sitting on the counter captured my attention.  After I spotted the loaf pan in the pantry, I knew what had to be done.

Peaches + Peach Tea + Loaf Pan = some peach bread that's packed with flavor!


Last year I made Apple Cinnamon Bread.  This recipe is based on that one, with some small changes.  It's like the summer version (because summer is still here)!

A slice of this Peach Bread is soft, slightly sweet, and filled (and I mean filled) with peach flavor, thanks to both peach tea and chopped peaches.  This is a great way to keep the summer mood going, although it would be great on a cold day too.  Really this bread is just good for anytime.  By the way, that includes right now.  Get baking!


Peach Quick Bread

  • 1 cup spelt flour
  • 1 cup oat flour
  • 1/2 tsp cinnamon
  • 1 tsp baking powder
  • 1/2 tsp baking soda
  • the leaves of one bag peach flavored tea (caffeine free)
  • 1/3 cup egg whites (2)
  • 1/2 cup applesauce
  • 1/4 cup honey
  • 2/3 cup milk
  • 3/4 cup chopped peaches
Preheat oven to 350F.  Mix together dry ingredients in a large bowl.  Add egg whites, applesauce, honey, and milk.  Mix together until a smooth batter forms.  Fold in chopped peaches.  Pour into a greased loaf pan.  Bake in preheated oven for 20-25 minutes, until a toothpick comes out clean.  Slice when cooled, and then serve.


Pin It!

Thursday, April 4, 2013

Date Cinnamon Rolls


Cinnamon rolls used to be my favorite.  As in, more than chocolate cake, more than candy bars, and more than just about any other dessert you can think of.

It was partly about the smell, partly about the taste, and a whole lot about the ooey gooey filling and the super soft, fluffy bread.  And those times when you get to eat it while it's still warm?  Don't even get me started!


A little while ago, I decided it was high time for me to create a "health-ified" Cinnamon Roll recipe.  After some rising, some kneading, and some a lot of eating, I knew I had created a winning dish.

First of all though, I want to make it clear that this recipe will not yield a classic Cinnamon Roll.  Instead, this recipe will yield a Cinnamon Roll that's low fat, low sugar, and actually acceptable for breakfast.   A Date Cinnamon Roll, if you will.


The filling for these guys is 100% butter and oil free.  The yummy gooey-ness that still remains is because of the maple syrup and dates used.  Yummm...

The bread part of these rolls is part whole wheat and all delicious.  I will admit it's a bit denser than you may be used to, but this isn't a bad thing at all.  It actually makes the rolls a ton more filling!

If you don't believe me, just give the recipe a try for yourself.  It may look complicated, but I promise it's much easier than it sounds.


Date Cinnamon Rolls
Bread:
  • 1 cup milk
  • 1 tbsp vegetable oil
  • 1 tbsp sugar
  • 1/4 tsp salt 
  • 2 tbsp lukewarm water
  • 1 tbsp dry active yeast
  • 1 1/4 cup whole wheat flour
  • 1 1/4 cup spelt flour
Filling:
  • 6 dates, pitted
  • 2 tbsp soaking liquid (see below for clarification)
  • 2 tsp cinnamon
  • 2 tbsp maple syrup
  • 1 tbsp sugar
  • 2 tbsp milk
  • optional: 1 tsp orange zest
Instructions:
  1. Stir together milk, oil, sugar, and salt in a small saucepan and heat to lukewarm.  
  2. Place lukewarm water in a small bowl and pour yeast on top.  Let sit 5 minutes.
  3. Stir yeast/water mixture into lukewarm milk mixture.  Transfer to a large bowl.
  4. Beat in half of flour (you can start with whole wheat or spelt) with an electric mixer or by hand.  Continue adding flour until a soft dough forms.  You may not use the entire amount of flour listed above.
  5. Let dough rest 10 minutes before kneading well.  After kneading, let rest another 10 minutes.  
  6. Grease a large bowl, place dough inside, and cover with a damp cloth.  Allow dough to rise until doubled in size, about 1 hour.
  7. Turn dough onto a floured surface and roll into a 12inx10in rectangle.  
  8. Place dates in small bowl.  Cover with water, and let sit at least 5 minutes.  Transfer dates to another bowl, but don't get rid of soaking liquid because you will use some as part of the filling.
  9. Add remaining filling ingredients to bowl with dates.  Fork mash until mixture is mostly smooth and spreadable.
  10. Spread filling evenly onto rolled out dough.  Roll up tightly like a jelly roll and slice into 12 pieces.  
  11. Place each slice in a greased 9 in round pan.  Cover and let rise another hour.
  12. Preheat oven to 350F.  Bake 25-30 minutes, until slightly browned.  If possible, serve while still warm.  Recipe makes 12 Cinnamon Rolls.

Sunday morning breakfast?  Sounds great to me!

Revisited Recipe of the Day:  

Date Sweetened Nutella


Pin It!

Tuesday, March 5, 2013

Honey Cinnamon Pretzel Twists

Today is about pretzels.


I like pretzels.  I like the crunchy ones, the gigantic ones, and the ones dipped in chocolate.

I also like the healthier whole wheat once covered in honey and cinnamon that you can make entirely from scratch.


But c'mon, honey and cinnamon and carbs and the promise of no guilt.  Who wouldn't love these guys?

Plus, they're totally do-able to make at home.  As long as you keep yeast and whole wheat flour handy, you probably have everything you need to make them in your kitchen now.  Oh yeah, and don't let the bit of yeast in these pretzels scare you.  It's nothing to worry about, and you don't even have to wait for the dough to rise in this recipe.  How awesome is that?


Let's talk about the glaze now.  It's pretty yummy.  All ya do is mix some honey, cinnamon and water together, and then pour a bit on top of the pretzels when they're done baking.  If you wait to eat them long enough, the mixture sort of dries and creates a sweet coating.  So. Good.  Or you can eat them right after adding the glaze.  That's good to.

Actually, pretty much everything about these pretzel twists is good.  Soooo... I think all just stop talking and give you all the recipe.  How does that sound?


Honey Cinnamon Pretzel Twists

  • 3/4 cup warm water (lukewarm)
  • 1 1/8 tsp active dry yeast (1/2 package)
  • 1/2 tbsp honey
  • 1 - 1 1/2 cups whole wheat flour (see notes below for substitutions)
  • 1/4 tsp salt
Glaze:
  • 1/2 tbsp honey
  • 1/4 tsp cinnamon
  • 1 1/2 tbsp water
Preheat oven to 425F.  In a large bowl, mix together water and yeast.  Let sit a couple minutes, until yeast is dissolved.  Mix in honey and salt.  Slowly add in 1 cup flour and mix until combined and sticky.  Continue adding flour, a bit at a time, until dough is no longer sticky.  If the dough bounces back when poked, it's time to knead.  Turn onto a floured surface and knead for roughly 5 minutes, you want a smooth ball to form (see first picture below).  To make 'twists', cut off a small piece of the dough.  Cut that in half and roll out each half into a log shape (the thinkness/length is up to you).  Twist the logs together and pinch at the ends.  Repeat until all dough has been used.  Bake for 5 minutes, then change oven to broil and broil another 3-5 minutes, watching carefully to avoid burning.  Meanwhile, make glaze by whisking together all ingredients in a small bowl.  When pretzels are done, pour a bit of glaze on each one.  Glaze can also be used as a dip if desired.  Makes 18 twists.


A few notes:

1. These pretzels are whole wheat, and they use whole wheat flour.  However, if you'd prefer you can use all purpose or even spelt as a substitute.  With all purpose the pretzels will obviously be lighter in color, and they'll probably also be a bit fluffier as well (the whole wheat ones are fluffy too, though).

2. Not into sweet pretzels?  No big deal.  Though the honey glaze on these guys is delicious, you can easily leave it out if it's not your thing.  How about an egg wash and salt instead?  The choice is yours.  Just make the base pretzel recipe above and add whatever else you like.

Enjoy the recipe everyone!

Revisited Recipe of the Day:

Whole Wheat English Muffins


Pin It!

Saturday, February 16, 2013

Whole Wheat English Muffins

If I learned one thing from this recipe, it's that toasted English Muffins taste really good with warm peanut butter.  Really good.


Call me crazy, but I've always overlooked English Muffins.  I mean, they're sorta boring, right?  People always put jam on them to make them good, and I'm not really a jam person, so I didn't really know what to do with them.  Well, I know now.

Two words: Peanut Butter.


Oh my god, so good.   It's all melty, and sticky, and just plain yummy.  Can you guess where all my homemade English Muffins went?

Yeah, along with all my Peanut Butter.


Ok, so let's talk about the actual recipe I'm sharing today.  It's one for Whole Wheat English Muffins.

They're tasty, they're healthy, they're surprisingly easy.  You should make them and then slather peanut butter on top.  Enough said.


Whole Wheat English Muffins

  • 1/2 cup warm water (115F)
  • 1 tbsp honey
  • 2 tsp active dry yeast
  • 2 cups spelt flour (or all purpose)
  • 3/4 cup whole wheat flour
  • 1/4 cup rolled oats
  • 1/4 cup wheat bran
  • 1 tsp coarse salt
  • 2 tsp ground flax
  • 1/2 cup buttermilk
  • cooking spray
  • 1/4 cup cornmeal
  1. Combine warm water, honey, and yeast in a large bowl.  Let stand for 5 minutes or so, until yeast has dissolved.  In another bowl, mix together flours, oats, wheat bran, salt, and flax
  2. Add dry ingredients to bowl with yeast.  Pour buttermilk into yeast bowl.  Mix until flour is almost completely incorporated.
  3. Turn mixture onto a well floured surface and knead until a smooth ball of dough forms.  
  4. Lightly coat a large bowl with cooking spray.  Place dough in bowl, cover with a damp cloth, and let rise until doubled in size, 1-2 hours.
  5. Turn out dough onto a lightly floured surface and knead for another 1-2 minutes.  Roll out dough to a 1/2" thickness.  Use a 3-inch round cutter (I used the top of a cup) to cut out rounds of dough.  Continus to roll out and cut the scraps until all dough has been used.
  6. Place rounds on a baking sheet, cover with plastic wrap, and let rise until puffy, about 20 minutes.
  7. Heat a large griddle or 12 inch skillet over low heat.  Dust rounds with cornmeal before placing on griddle in batches of 3-4.
  8. Cook for 8-10 minutes on each side, until dry anf slightly browned.  Let cool at least 30 minutes before slicing.
  9. English muffins will keep for about a week in the fridge.
Revisited Recipe of the Day:

Lemon Zucchini Bread


Pin It!

Tuesday, February 5, 2013

Good Ol' Banana Bread

Oh, Banana Bread, how I love you.


I believe I've mentioned it before, but banana bread has a special place in my heart.  A place containing memories of surprise after school treats, dad humming to himself as he mixes the batter, and bananas so black speckled I was afraid to go near them.


So, when I entered the kitchen a couple days ago, and was faced with bananas so brown they might as well have been chocolate bars, I knew just what to do.

It was banana bread time!


I started with those dark brown bananas I mentioned earlier, the kind no one would dare eat, unless they've been mashed and baked into bread.  As you may know, those are the absolute sweetest.

I then added all of your basic banana bread ingredients.  Flour, salt, baking powder, you know, the usual.  I skipped the fat and sugar, however.  No need for that when the bananas are so creamy and sweet themselves.


After baking away in the oven for a bit, my banana bread came out looking better than ever.  I could not wait to take pictures and slice into that thing!

Sure enough, when it came time to take my first bite, it was more than delicious.  Slightly chewy, with the perfect texture, and just the right amount of sweetness.  It was everything a classic banana bread should be.  I definitely helped myself to a second serving.

What can I say?  I love banana bread.


Classic Banana Bread

  • 2 cups oat flour (make your own by grinding rolled oats in a blender until they form a flour, measure after blending)
  • 1 1/2 tsp baking powder
  • 1/2 tsp baking soda
  • 1/4 tsp salt
  • 1/2 tsp cinnamon
  • 1/8 tsp nutmeg
  • 1/4 tsp ginger
  • 3 large bananas, mashed (as ripe as possible)
  • 1 tsp vanilla extract
  • 2 egg whites (or 1 egg or 1 flax "egg")
Preheat oven to 350F.  In a medium bowl, mix together flour, baking powder, baking soda, salt, and spices.  In another large bowl, whisk together bananas, vanilla, and eggs until smooth and a bit bubbly.  Add dry ingredients to wet slowly and mix until just combined.  Scoop batter unto a parchment paper lined loaf pan.  Bake for 30-35 minutes, until a toothpick inserted comes out clean.

Revisited Recipe of the Day:


Pin It!

Thursday, January 31, 2013

Cinnamon Pita Chips with Lemon Yogurt Dip

Sometimes I buy foods, but then never eat them.  They end up going sour, stale, or moldy.  Bleh.


I mean, really, where on Earth did that bag of pita bread come from?  I swear I did not buy it.  But, yet, there it was, sitting in the kitchen drawer, dangerously close to going stale.

What to do?


I don't know if I've mentioned how much I hate wasting food, but it's true.  It drives me nuts.  But at the same time, I don't want eat food that's already gone bad.  Who wants to do that?

So, you see, I was in a bit of a pickle that day.  I had a big bag of pita bread going stale and nowhere to use it.  Until, I came up with an idea.


It was time to make pita chips.  And so I did.

They came out just fantastic!  Never more shall bread go stale at my house, not when something so delicious can come out of it!

And, thus, my no waste self is satisfied.  I hope you will be too.


Cinnamon Pita Chips with Lemon Yogurt Dip
For Chips:

  • 130 g pita bread
  • 1 tsp cinnamon
  • 1/4 tsp vanilla extract
  • 1 tsp coconut oil, melted
For Dip:
  • 1/2 cup plain or vanilla greek yogurt
  • zest of 1 lemon
  • 1 tsp lemon juice
  • 1 tsp honey, or to taste
Preheat oven to 400F.  Cut pita bread into triangles.  In a small bowl (a ramekin works well) mix together cinnamon, vanilla, and coconut oil.  Brush a bit of the mixture onto each pita bread triangle.  Place pita bread on a lined baking sheet.  Bake for 12-15 minutes, until slightly browned and crisp.  Store chips in an airtight container.  
To make dip, combine all ingredients in a small bowl, and mix until well combined.  Taste, and add more honey if needed.  Store dip in fridge.


If you're ever in a situation when you've got some pita bread, and nowhere to use it, then chips are definitely the way to go.  They're mega easy, mega yummy, and mega healthy as well.  Seriously, best almost stale bread experience ever.  And the dip?  It just takes it to the next level!  You've gotta make 'em, whether your pita bread's old or not.

P. S. It also works with tortillas :)


Revisited Recipe of the Day

Cheesy Star Chips  (a great use for tortillas)


Pin It!

Tuesday, January 15, 2013

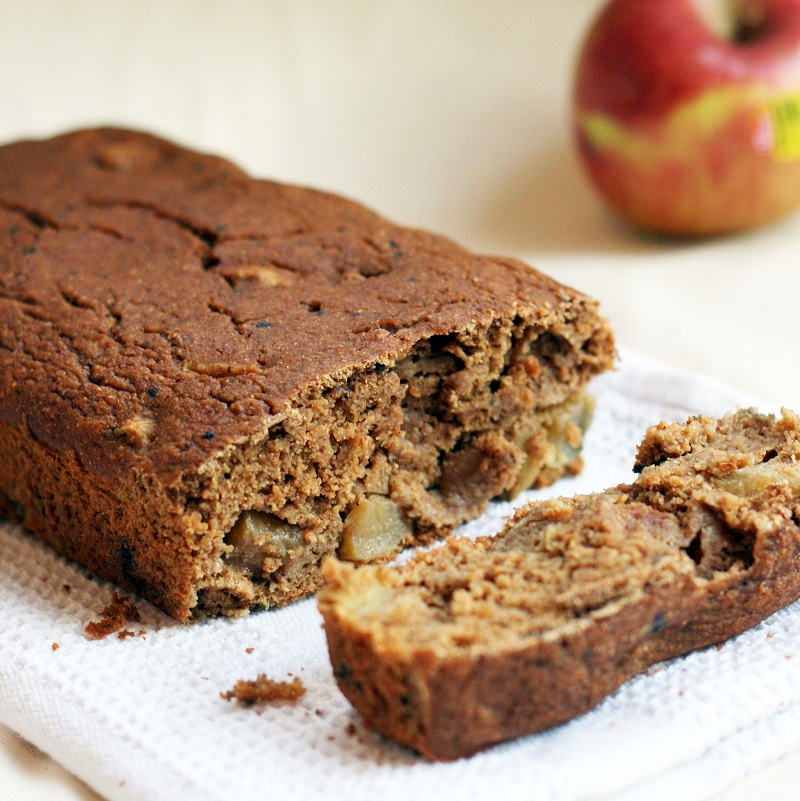
Apple Cinnamon Bread

I miss strawberries.  And blueberries and blackberries and raspberries.


Winter where I live is terrible in terms of fresh fruit.  There are apples, oranges, and pears and that's about it.  Don't get me wrong, I love the fruit we have, but I epecially love berries.

The frozen kind doesn't count.


Lately, I've started to see the berries I miss so much appear in the grocery store again.  Except now it's almost worse.  Because they cost way too much.  I absolutely hate buying things for too much money.

So now, I'm stuck in one of those "so close yet so far" situations.  Yeah, it stinks.


But let's start talking about the good.

I finally decided that I should just try to make the best of the fruit I've got.  You know, instead of drooling over the $10 packages of strawberries.  So I used a couple of the apples sitting on my counter to make Apple Cinnamon Bread.

You wanna know how awesome it was?  So awesome it made me forget about blueberries.  And in case you're not aware of my love for blueberries, that's pretty darn awesome.


Apple Cinnamon Bread

  • 1 cup spelt flour
  • 1/2 cup whole wheat flour
  • 1/2 cup oats, ground into a fine flour (oat flour)
  • 1/8 tsp nutmeg
  • pinch cloves
  • 1/2 tsp cinnamon
  • 1/4 tsp ginger
  • 1 tsp baking powder
  • 1/2 tsp baking soda
  • the leaves of 1 bag apple cinnamon tea (caffeine free)
  • 1/3 cup egg whites (2)
  • 1/2 cup + 2 tbsp applesauce
  • 1/2 tsp vanilla
  • 1/4 cup molasses
  • 2/3 cup apple cider
  • 1 medium/large apple, cut into small chunks
Preheat oven to 350F.  In a large bowl, combine first 10 ingredients.  Whisk together.  Add in egg whites, applesauce, vanilla, molasses, and apple cider, and mix until a smooth batter forms (it will be runny).  Fold in apple chunks.  Pour batter into a greased loaf pan and bake in preheated oven for 30 minutes, or until a toothpick comes out clean.  Let cool completely before slicing or removing from pan.


Ok, so I just want to clarify one thing before you run off into your kitchen to make this (because that's obviously what you're dying to do).

It says tea in the ingredients.  That does not mean the liquid that tea has been steeped in.  No, no, no.  It literally means the tea leaves.  Like in my Mixed Berry Oatmeal and Apple Cinnamon Muffin this helps to add a ton of flavor in a very easy way.  If you don't happen to have apple cinnamon tea, then you have to go buy some this instant because it's the best thing ever I suppose you could make the bread without, but I'd definitely add some spices and taste the batter to make sure it's got enough flavor for your liking.

Alright, now you can sprint to your kitchen.

Revisited Recipe of the Day:

Honey Flax Bread


Pin It!

Wednesday, December 26, 2012

P28 Bread Review

It's time to Mix it Up.

(see what I did there?)

Classic french toast made with P28 bread and topped with maple syrup
Today, instead of my usual recipe, I'm going to be reviewing some products that was very kindly sent to me so I could try them out.  Those products are P28 Bread and Bagels.  You can read more about the products by clicking on the link, but for now I'll just tell you that they're very high protein breads to help you reach all your fitness goals in a tasty way.

To review them, I've decided to split up this post into 3 parts.  The good, the bad, and the other things worth mentioning.  There will also be random pictures all the over the place with captions that will (hopefully) help you figure out what the heck is pictured.

A protein pizza.  Half a P28 bagel toasted and topped with cottage cheese and salsa, with a side of lettuce.
Alright, let's get started.  First...

The Good:
  • The Protein Content - This may seem obvious, but it's totally a plus.  I often struggle with getting enough protein into my diet and these bread/bagels have been really helpful.  Two pieces of bread or one bagel contains 28 grams protein (hence the name, P28).  You can just grab one slice of bread, spread it will cottage cheese, and BAM 20 grams protein.  It's pretty cool.
  • The Taste - I didn't mind the taste at all, and If you like whole wheat bread I don't think you will either.  Sure, it's not the best bread or bagel I've even tasted in my whole entire life but when you consider the nutrition you're getting, I think it tastes pretty darn amazing.
  • The Texture - I've never had any other brands of high protein baked goods, but for some reason I have this feeling that texture could be an issue.  It's not with P28.  The texture of both the bread and bagel is very nice and spongy, much like the "normal" product.  One thing that may be worth mentioning is that it you freeze the bread (which I did) and then reheat it in the microwave it get's really spongy, and sort of floppy.  If you lightly toast it, it firms up fine though.
  • The Versitility - Much like regular bread, P28 can be used for a variety of things, not just sandwiches.  It doesn't taste funny or anything if you have it with eggs, as french toast, or as a mini pizza with cottage cheese and salsa (my favorite).
I made the Pumpkin Cranberry Bread Pudding recipe on this blog with P28 bread.  It worked great! 
And now...

The Bad:
  • The Size -  Each slice of bread is big (the bagels are just normal so this isn't a problem with them).  I guess this could be considered a good thing, but when trying the bread I ran into a couple problems because of the size.  When I eat sandwiches, I prefer to have them with very thin bread, unless they're really substancial.  When you make a sandwich with P28  bread slices, there'a a lot of bread.  Some people don't mind this, but personally, I do.
  • The Taste -  Yes, taste is also in the "good" catagory.  This is because I liked the taste, but some others didn't.  If your not used to healthy foods, you may be one of the people who does not.  It does have a bit of that "healthy" taste that can be undesirable for some.  Another possible problem is that the bread has a bit of a fermented taste.  My guess is this comes from the protein source in it, but I'm not sure.  Again, though, I didn't find this as a problem and am only quoting another taste tester.
One slice of bread.  Half eaten plain, and the other half toasted (see how black it is?) and topped with applesauce. Celery stalk on the side (sorry for bad picture).
The Other Things Worth Mentioning:
  • Freezing - As mentioned earlier, these products freeze very well.  Which is good because the folks at P28 were really generous and sent me way more bread than I could ever finish before it went stale or got moldy.  To reheat a frozen slice of bread or bagel, just pop it in the microwave for 30 seconds - 1 minute.  After that, it's as good as fresh, and very fluffy.  Perfect to dip into soup!
  • Toasting - It may just be my toaster acting up, but for some reason whenever I put a slice of bread or half bagel in my toaster it seems to brown really fast.  As in, I set it for level 2 of heat and it came out completely black (you can see this in some of the pictures).  I'm not sure why this happened, but it didn't make the bread taste burnt so it's not much of a problem for me.  If you want your toast to look pretty, though, you should be aware.
  • Usage - Because I didn't like to use the products I revieved to make sandwiches, I found a whole bunch of other ways to use them.  Most of these are featured in pictures throughout this whole post, but I though I'd list a couple here too.  First, my favorite way to have P28, a mini pizza.  Spread half a bagel, or one slice of bread with cottage cheese (or another type), and salsa.  Greens on top are optional.  You can also make french toast with the bread, dip some of the just reheated (and therefore super spongy) bread/bagel into a bowl of soup, or spread peanut butter on top.  Another idea is simply throwing a bagel with cream cheese into a plasic bag and turning it into a super easy lunch on the go.  I did this when I went apple picking and it made a great meal along with a juicy apple!
Another protein pizza.  This one is made with a bread slice and also topped with cottage cheese and salsa.
Overall, I think all the P28 products are really great.  At least, for my lifestyle.  If you're someone who eats healthy and mostly vegetarian, and wants to add some protein to your everday diet, then I definitely reccommend P28.  However, if you're someone who's just getting started eating healthy, or maybe someone who doesn't need to worry about their protein intake, than maybe P28 isn't the right match for you.  It's a bit different than the usual, and some people don't like that.

But... you never know.  I could be wrong!  Go by your instinct and the facts/opinions I've given you in this post, and YOU decided whether or not it's a product you'd like to try.

Oh, and one more thing.  I hope everyone who celebrated had a wonderful Christmas!

*I was sent bread and bagels to review by the P28 company, but all opinions are not affected and are entirely my own.

Revisited Recipe of the Day:

 5 Minute Bread Pudding (could probably be made with P28)


Pin It!