Showing posts with label protein. Show all posts

Sunday, August 11, 2013

Chocolate Greek Yogurt Cheesecake

We had a bit of a greek yogurt mishap at my house recently.  It's a funny story, really.


So basically I went to the grocery store to pick up Chobani.  No surprise there, right?  Everyone knows I'm a big greek yogurt fan.  But guess what?  There was no chobani!  Cleary, I was no going to leave the store without my beloved greek yogurt, so I grabbed a different brand, Cabot to be exact, and rushed out of the store and headed home.

Everything seemed normal, but it wasn't.  Little did I know, our family was in for a surprise.

Boy, am I being dramatic about this or what?  Sorry about that.  I love me a good story, and I couldn't pass up the opportunity to make this just a wee bit exaggerated.  So without further ado, I shall continue.

The big discovery was made one morning when my mom decided she wanted yogurt for breakfast.  She scooped it into her bowl, topped it with berries and a drizzle of honey, and dug in.  Seconds later, her face took on a crazy expression and she was staring down at her yogurt bowl in confusion.  In all honesty, it was quite funny.  Then my mom ran over to the fridge, grabbed the container of Cabot greek yogurt, and shoved it into my face.  What percent fat is this?  She asked urgently.  I turned over the container, and when I found the answer, I realized her shock.  It was 10% fat greek yogurt!  That is way more than what we're used to at my house.  Apparently, my mom has taken one bite and then was overcome by how incredibly rich the greek yogurt was.  There was no way to eat a whole bowl of that stuff with a spoon without entering a yogurt food coma.


So what to do?

Bake with it, of course.  The first order of buisness?  Cheesecake!  I've tried making greek yogurt cheesecake before, but without the addition of tofu, it's never been as creamy as I would like.  I thought using a high fat yogurt would help solve the problem, and I was right.

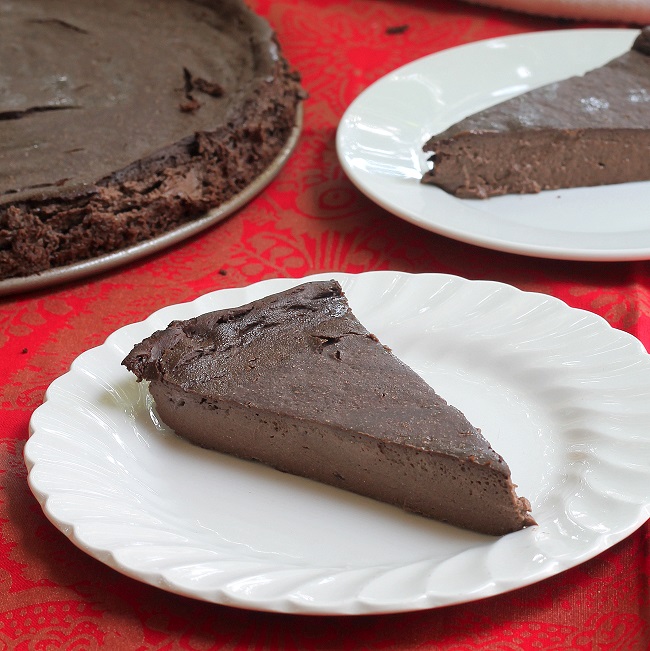
Using the greek yogurt, I baked up a super creamy Chocolate Cheesecake.  It's so rich, so chocolatey, and so darn delicious.  What a great way to use up unwanted 10% fat greek yogurt.


Chocolate Greek Yogurt Cheesecake
  • 2 1/2 cups 10% greek yogurt (I used cabot)
  • 3 egg whites (9 tbsp from the carton)
  • 1/3 cup special dark cocoa powder
  • 1/2 cup + 2 tbsp honey (you can try to replace some with stevia if you prefer)
  • 1/4 cup arrowroot starch
  • 1 tsp vanilla
  • 1/4 tsp salt
Preheat oven to 350F.  Grease a 9in round pan.  Place all ingredients in a large bowl.  Mix until completely incorporated with no cocoa powder clumps.  Scoop into prepared pan and spread into an even layer.  Bake in preheated oven for 30-35 minutes, until firm.  Remove from oven and let cool.  Once cooled, chill in fridge for at least 3 hours.  Slice into 12 thin slices (cheesecake is very rich) and serve with whipped cream, fruit, or plain.  Store in fridge.


Revisited Recipe of the Day:

Chocolate Chip Cranberry Biscotti


Pin It!

Sunday, August 4, 2013

Chocolate Layer Cake with Peanut Butter Banana Frosting

It's Sunday, tomorrows Monday, and do you know what will make your Monday like a billion times better?  This cake.


Early last week I got back from vacation.  It was a great break from normal life, and I loved lounging around outside without a care in the world.  The only problem was that at the place we were vacationing, it was significantly harder to bake, and even harder than that to take decent pictures.  I did bake one thing during the trip, but by the time we arrived home, I was itching to get back in the kitchen.

Naturally, the first thing I made had to be spectacular.


And what's more spectacular than a gorgeous Chocolate Layer Cake?  Not much, I can tell you that.

I took my Chocolate Beet Cake recipe, and modified it so that it didn't use beets. I added in some banana as well.  Once that was baking I made a quick frosting out of tofu, banana, and peanut butter.  Gah, so good!


If you decide to make this, which you totally should, I can guarantee that you won't be able to tell at all that this cake is healthy.  Nope, it looks and tastes like anything from a bakery, without the butter, without the oil, and without the multiple cups of sugar.

Yay!  How's that for a great start to the day?


Chocolate Layer Cake with Peanut Butter Banana Frosting
For Cake:

  • 1 1/4 cup spelt flour
  • 1/2 cup cocoa powder
  • 1/4 cup arrowroot starch/flour (or cornstarch)
  • 1 tbsp baking powder
  • 1 1/2 tsp baking soda
  • 1/2 tsp cinnamon
  • 1/2 tsp salt (don't skip)
  • 1 3/4 cup applesauce
  • 3/4 cup buttermilk
  • 3/4 cup egg whites
  • 2/3 cup date paste
  • 1/2 cup yogurt
  • 1/2 banana, mashed
  • 1 tsp vanilla
For Frosting:
  • 1 package shelf stable tofu (can buy ar trader joes or online as Mori-nu tofu)
  • 2 large bananas
  • 2 tbsp salted peanut butter (if you don't use salted, add some salt)
  • 1 tsp vanilla
For Cake:
  1. Preheat oven to 350F.  Grease 2 8-in circle pans, and line a muffin tin with 3-5 cupcake liners.
  2. Combine dry ingredients (flour, cocoa, arrowroot, baking powder and soda, cinnamon and salt) in a large bowl.
  3. In another bowl, mix together remaining ingredients for cake.  Add wet ingredients to dry ingredients and mix until a smooth batter forms.
  4. Fill both greased 8-in circle pans a little less than 3/4 full with batter.  Distribute the extra batter betweem prepared cupcake liners for some extra cupcakes
  5. Bake in preheated oven for 20-22 minutes, until a toothpick inserted into the center of the pan comes out clean.  The cupcakes may require a bit less baking time.
  6. Remove cakes from oven and let cool in pan completely.
For Frosting + Preparing Cake:
  1. Place tofu, bananas, peanut butter, and vanilla in the bowl of a food processor.  Blend until completely smooth, with no banana or tofu clumps remaining.  It may look thin, but thats ok as the frosting will firm up once it's on the cake.
  2. Prepare serving dish for cake (keep in mind that the cake must be stored in the fridge).  Once (8-in) cakes have cooled completely, flip one of them onto the prepared serving dish.  Spread a layer of frosting on top.
  3. Carefuly flip the other cake out of the pan and on top of the layer of frosting.  Use remaining frosting to cover the outside of the cake.  Again, it may seem thin, but it will firm up in the fridge.
  4. Place cake in fridge until serving time.  When it's time to serve, cut into 8-10 pieces and garnish with chocolate chips or chunks.  Extra cupcakes can be eaten with another frosting of choice (I don't reccommend eating them plain, because it won't be quite sweet enough without a frosting)
  5. Store leftovers in fridge.


Revisited Recipe of the Day:

Chocolate Beet Layer Cake - another great recipe for chocolate cake!


Pin It!

Monday, March 25, 2013

Peanut Butter Glazed Cookies

I glazed a cookie with peanut butter.  And it was one of the best decisions I've ever made.


Chocolate chip cookies are great on their own, don't get me wrong, but sometimes I'm craving just a bit more.  Enter the thought of peanut butter.

It's no secret that peanut butter is one of the most amazing flavors in the whole entire world.  It can be sweet, it can be savory, it can be paired with fruit, it can be paired with chocolate.  Today we're pairing it with a cookie.


Originally the idea for this recipe was a chocolate chip cookie with a peanut butter frosting.  However, someone, perhaps the person who is writing this right now, adding a bit too much liquid and it came out too thin.  No worries, though, I fixed it.  The peanut butter frosting was turned into a peanut butter glaze.

I think it's even better that way because you get to be messy!


These cookies are delicious, there's no doubt about that, but I don't think they're for everyone.  The chocolate chip cookies themselves are on the cakey side, and the peanut butter glaze isn't the super sweet peanut butter flavor you may be expecting.

However, if you're up for something a little bit different, you have to give these cookies a try.  No really, you have to.


Peanut Butter Glazed Chocolate Chip Cookies
Cookie:

  • 1 egg white
  • 2 tbsp applesauce
  • 2 tbsp yogurt
  • 1 tsp vanilla extract
  • 2 tbsp maple syrup
  • 1 tbsp turbinado or brown sugar
  • 1/2 cup whole wheat flour
  • 1/2 cup spelt flour
  • 1/2 tsp baking soda
  • pinch salt
  • 1/2 tsp cinnamon (If you like cinnamon in your cc cookies)
  • 2 tbsp milk
  • 3 tbsp water (or more milk)
  • 1/2 cup mini chocolate chips
Peanut Butter Glaze:
  • 1/2 cup plain greek yogurt
  • 1/4 cup peanut flour or PB2 or regular peanut butter
  • 3 tbsp milk
  • 1/2 banana
  • 2 tbsp water (or more milk)
For Cookies:
  1. Preheat oven to 350F.
  2. In a small bowl, mix together egg whites, applesauce, yogurt, vanilla, maple syrup, and sugar.
  3. Place all dry ingredients, except chocolate chips, in a large bowl.  Mix together.
  4. Pour egg white mixture into flour mixture.  Add in milk and water and mix until a thin cookie dough forms.
  5. Fold in chocolate chips.
  6. Line a baking sheet with a Silpat mat or parchment paper.  Drop cookie dough, in 1 tsp amounts, onto baking sheet.  Spread out dough to form a cookie shape.
  7. Bake for 7 minutes.  Let cookies cool a few minutes on pan before transferring to a drying rack to cool completely.
For Glaze:
  1. Place all ingredients in a food processor or blender.  Blend until completely smooth.
  2. Just before serving time, pour a bit of glaze on top of each cookie.  This can get messy :)
  3. If you have any leftovers, store them in a container in the fridge.
  4. Recipe makes 20-25 cookies.


Enjoy the recipe, guys!

Revisited Recipe of the Day:

Peanut Butter Chocolate Fudge Bites


Pin It!

Wednesday, February 6, 2013

Food Processor Chocolate Cupcakes

I have some pretty complicated recipes on this site, and while they're delicious, sometimes it's best to just keep things simple, especially when a cupcakes like these is the result.


Introducing the super simple, super delicious, super healthy Food Processor Chocolate Cupcake!

Packed with chocolate, protein, and yumminess these cupcakes are definitely not something you want to miss out on.  A healthy valentines dessert, perhaps?  Or maybe even breakfast?


After all, these guys are made mainly from oats, banana, yogurt, and egg whites.  If that doesn't scream breakfast then I don't know what does!

And then, with some chocolate thrown in, you're guaranteed a good day.  Chocolate does that, you know.


So, go ahead.  It's ok to indulge in one of these.  In fact, I'm not sure I'd even call it indulging.  What with the pretty healthy ingredients list and all.  But, I can tell you, when you bite into one of these cupcakes, it sure tastes like indulgence.

A cupcake so chocolate-y, you would believe it's meant to be eaten for breakfast.  You didn't think it was possible, did you?


Food Processor Chocolate Cupcakes
  • 1 1/2 bananas
  • 1 3/4 cup rolles oats
  • 3 egg whites
  • 3/4 cup cocoa powder
  • 1/2 cup applesauce
  • 1/2 cup greek yogurt
  • 1 tsp vanilla
  • 1 1/2 tbsp balsamic vinegar
  • 1 tsp baking powder
  • 1 1/2 tsp baking soda
  • pinch salt
  • 1/2 cup chocolate chips, plus more for the tops
Preheat oven to 350F.  Combine all ingredients except chocolate chips in a food processor.  Blend until completely smooth with all oats broken up.  Mix in chocolate chips.  Scoop batter into cupcakes liners.  Bake for 10 minutes, then remove cupcakes from oven and place a couple chocolate chips on top of each one.  Return to oven to bake for another 3-5 minutes, until a toothpick comes out clean.  Store in an airtight container.


Revisited Recipe of the Day:

Single Serving Mocha Fudge Cake


Pin It!

Wednesday, December 26, 2012

P28 Bread Review

It's time to Mix it Up.

(see what I did there?)

Classic french toast made with P28 bread and topped with maple syrup
Today, instead of my usual recipe, I'm going to be reviewing some products that was very kindly sent to me so I could try them out.  Those products are P28 Bread and Bagels.  You can read more about the products by clicking on the link, but for now I'll just tell you that they're very high protein breads to help you reach all your fitness goals in a tasty way.

To review them, I've decided to split up this post into 3 parts.  The good, the bad, and the other things worth mentioning.  There will also be random pictures all the over the place with captions that will (hopefully) help you figure out what the heck is pictured.

A protein pizza.  Half a P28 bagel toasted and topped with cottage cheese and salsa, with a side of lettuce.
Alright, let's get started.  First...

The Good:
  • The Protein Content - This may seem obvious, but it's totally a plus.  I often struggle with getting enough protein into my diet and these bread/bagels have been really helpful.  Two pieces of bread or one bagel contains 28 grams protein (hence the name, P28).  You can just grab one slice of bread, spread it will cottage cheese, and BAM 20 grams protein.  It's pretty cool.
  • The Taste - I didn't mind the taste at all, and If you like whole wheat bread I don't think you will either.  Sure, it's not the best bread or bagel I've even tasted in my whole entire life but when you consider the nutrition you're getting, I think it tastes pretty darn amazing.
  • The Texture - I've never had any other brands of high protein baked goods, but for some reason I have this feeling that texture could be an issue.  It's not with P28.  The texture of both the bread and bagel is very nice and spongy, much like the "normal" product.  One thing that may be worth mentioning is that it you freeze the bread (which I did) and then reheat it in the microwave it get's really spongy, and sort of floppy.  If you lightly toast it, it firms up fine though.
  • The Versitility - Much like regular bread, P28 can be used for a variety of things, not just sandwiches.  It doesn't taste funny or anything if you have it with eggs, as french toast, or as a mini pizza with cottage cheese and salsa (my favorite).
I made the Pumpkin Cranberry Bread Pudding recipe on this blog with P28 bread.  It worked great! 
And now...

The Bad:
  • The Size -  Each slice of bread is big (the bagels are just normal so this isn't a problem with them).  I guess this could be considered a good thing, but when trying the bread I ran into a couple problems because of the size.  When I eat sandwiches, I prefer to have them with very thin bread, unless they're really substancial.  When you make a sandwich with P28  bread slices, there'a a lot of bread.  Some people don't mind this, but personally, I do.
  • The Taste -  Yes, taste is also in the "good" catagory.  This is because I liked the taste, but some others didn't.  If your not used to healthy foods, you may be one of the people who does not.  It does have a bit of that "healthy" taste that can be undesirable for some.  Another possible problem is that the bread has a bit of a fermented taste.  My guess is this comes from the protein source in it, but I'm not sure.  Again, though, I didn't find this as a problem and am only quoting another taste tester.
One slice of bread.  Half eaten plain, and the other half toasted (see how black it is?) and topped with applesauce. Celery stalk on the side (sorry for bad picture).
The Other Things Worth Mentioning:
  • Freezing - As mentioned earlier, these products freeze very well.  Which is good because the folks at P28 were really generous and sent me way more bread than I could ever finish before it went stale or got moldy.  To reheat a frozen slice of bread or bagel, just pop it in the microwave for 30 seconds - 1 minute.  After that, it's as good as fresh, and very fluffy.  Perfect to dip into soup!
  • Toasting - It may just be my toaster acting up, but for some reason whenever I put a slice of bread or half bagel in my toaster it seems to brown really fast.  As in, I set it for level 2 of heat and it came out completely black (you can see this in some of the pictures).  I'm not sure why this happened, but it didn't make the bread taste burnt so it's not much of a problem for me.  If you want your toast to look pretty, though, you should be aware.
  • Usage - Because I didn't like to use the products I revieved to make sandwiches, I found a whole bunch of other ways to use them.  Most of these are featured in pictures throughout this whole post, but I though I'd list a couple here too.  First, my favorite way to have P28, a mini pizza.  Spread half a bagel, or one slice of bread with cottage cheese (or another type), and salsa.  Greens on top are optional.  You can also make french toast with the bread, dip some of the just reheated (and therefore super spongy) bread/bagel into a bowl of soup, or spread peanut butter on top.  Another idea is simply throwing a bagel with cream cheese into a plasic bag and turning it into a super easy lunch on the go.  I did this when I went apple picking and it made a great meal along with a juicy apple!
Another protein pizza.  This one is made with a bread slice and also topped with cottage cheese and salsa.
Overall, I think all the P28 products are really great.  At least, for my lifestyle.  If you're someone who eats healthy and mostly vegetarian, and wants to add some protein to your everday diet, then I definitely reccommend P28.  However, if you're someone who's just getting started eating healthy, or maybe someone who doesn't need to worry about their protein intake, than maybe P28 isn't the right match for you.  It's a bit different than the usual, and some people don't like that.

But... you never know.  I could be wrong!  Go by your instinct and the facts/opinions I've given you in this post, and YOU decided whether or not it's a product you'd like to try.

Oh, and one more thing.  I hope everyone who celebrated had a wonderful Christmas!

*I was sent bread and bagels to review by the P28 company, but all opinions are not affected and are entirely my own.

Revisited Recipe of the Day:

 5 Minute Bread Pudding (could probably be made with P28)


Pin It!

Tuesday, December 11, 2012

Double Decker Chocolate Cake

Oh.  My.  God.


Unreal.

This cake is unreal.  Just look at it.


2 layers of rich chocolate cake.  The bottom one a decadent chocolate cake filled with secret ingredients that will do your body good.  The top a creamy chocolate mousse with a protein boost.

Together they creat an amazing dessert, fit for the table of anyone, whether they're health conscious or not.


I made this cake for my moms birthday a couple weeks ago.  I knew it had to be something extra special because my mom didn't deserve anything less.

This cake delivered.  Big time.  She loved it, and I couldn't have been happier.


Double Decker Chocolate Cake

For Bottom Layer (cake):
  • 120 g canned beets (about 2/3 cup)
  • 130 g frozen cauliflower, thawed (about heaping 1/4 + 1/3 cup)
  • 1 tsp vanilla extract
  • 2/3 cup milk
  • 2-4 tbsp maple syrup
  • 2/3 cup cocoa powder
  • 1 cup spelt flour
  • 1 tbsp cornstarch
  • 1 tsp baking soda
  • 1 1/4 tsp baking powder
  • 1/4 tsp salt
  • 2 tbsp ground flaxseeds
For Top Layer (mousse):
  • 1 12.3 ounce package mori-nu silken firm tofu
  • 1/2 cup cocoa powder
  • pinch salt
  • 2 tbsp milk
  • 2 tbsp maple syrup
  • 1/2 cup chocolate chips, melted
Directions for Bottom Layer:
  1. Preheat oven to 350F.
  2. Combine wet ingredients (this included beets and cauliflower) in food processor and procees until very smooth.  No clumps should remain.
  3. In another bowl mix together dry ingredients.
  4. Pour wet into dry and mix until a thick batter has formed.
  5. Scoop batter into a well greased 10 inch pan.  Bake for 18 minutes in preheatved oven, or until a toothpick inserted comes out clean.  Remove from oven and let cool.
Directions for Top Layer:
  1. Combine all ingredients in food processor, (you don't need to totally wash processor between uses, just quickly rinse and dry) and blend until very smooth and creamy.  
  2. Scoop mousse over baked cake layer and spread into an even layer.  You can swirl the mousse a bit for presentaion.
  3. Chill cake for at least 8 hours before slicing into 10 slices and serving
  4. Enjoy!

Just make this.

For christmas, for your birthday, for breakfast.  It doesn't matter.  You just need to taste it.  And how can you say no when you take a look at the nutrition label below?  Answer:  You can't.


*Nutrition information is for 10 slices.

Revisited  Recipe of the Day:

Pumpkin Chocolate Mousse Pie


Pin It!

Sunday, November 18, 2012

Pumpkin Chocolate Mousse Pie

Your future Thanksgiving dessert is staring at you.  Or rather, you're staring at it.


Even if you think you've already decided what dessert to make for Thanksgiving, please please please consider making this pie instead.  You will not regret it.


Just look at it.  So rich, so creamy, so decadent.  It just screams "make me!", doesn't it?  And you should always listen to a pie.  Pie does not lie.  That's a fact.


What this (talking) pie fails to mention, however, is it's extreme healthful-ness.

Don't laugh!  I swear it's true!  That incredibly delicious looking pie you see in the pictures is actually healthy.  I find it a bit incredible myself, and I'm the one who made it.   But, nutrition facts don't lie either, and the ones for this recipe are amazing.  One slice of this decadent tasting pie has 5 grams of fiber, 8 grams of protein, and under 200 calories!  Is that incredible or what?  And you cannot taste anything but delicious-ness!

Now, if that doesn't convinve you to at least give this recipe a try, I don't know what will.


Pumpkin Chocolate Mousse Pie
(serves 8)

For Pumpkin Layer:
  • 2 1/2 tsp cinnamon
  • 1/4 tsp ginger
  • 1/8 tsp allspice
  • 1/4 tsp salt
  • 2 tsp baking powder
  • 1/3 cup spelt flour (others should work too, but I haven't tried it)
  • 3 tbsp brown sugar
  • 1 3/4 cup pumpkin puree (1 15-oz can)
  • 1 scant cup milk
  • 1 flax "egg" (1 tbsp ground flaxseeds mixed with 3 tbsp water, and allowed to sit for a couple minutes)(a real egg would probably work too)
  • 2 tsp vanilla extract
  • 1 tbsp date paste (or more sweetener of choice)*
For Chocolate Mousse Layer:
  • 12.3 oz tofu (1 package Mori-nu silken firm)
  • pinch salt
  • 2 tbsp milk
  • 1/2 cup cocoa powder
  • 2 tbsp maple syrup
  • 1/2 cup chocolate chips (semi-sweet if possible)
Directions for Pumpkin Layer:
  1. Preheat oven to 350 degrees.  
  2. Mix together spices, salt, baking powder, flour, and sugar in a large bowl.  
  3. In another bowl, stir together pumpkin, milk, flax egg, vanilla, and date paste.  
  4. Add wet ingredients to dry and mix well to combine.  
  5. Pour into greased 10 inch round pan and bake for 35 minutes.
Directions for Chocolate Mousse Layer:
  1. Melt chocolate chips, either in microwave or on stovetop, until smooth and creamy.
  2. Combine all ingredients, including melted chocolate chips, in bowl of food processor and blend until smooth.
Finishing Steps: 
  1. Once pumpkin layer is done baking, let cool for a couple minutes.
  2. Then, scoop chocolate mousse over pumpkin and spread evenly.
  3. Chill pie in fridge for at least 6 hours, then slice and serve.
  4. Store any leftovers in the fridge.
* dates soaked in water overnight and then blended until they form a thick paste


I can honestly say that this pie is one of the best desserts I've made.  Ever.  If, for some completely crazy reason, you can't make this for Thanksgiving, you have to make it another time.  This pie must enter your life, and soon.  It's as simple as that.


Revisited Recipe of the Day:


Pin It!

Monday, October 15, 2012

Protein Carrot and Ginger Soup

Now that the weather has dropped below 50, and raindrops are sliding down the windows, I think it's fair to say that soup season is upon us.

You have no idea how excited that makes me.


I can't say that I enjoy all soups, but the ones that I do like, I really like.  As in, I can inhale the whole bowl is less than 2 minutes.  Perhaps love is the better word...

Either way, the recipe that I'm sharing today is definitely one that I absolutely adore.  It's actually something that I've been making (and loving) for quite a while, but recently I decided to add a bit of a twist to it.


It was a sort of kitchen experiment.

You see, my absolute favorite types of soup are the ones that are made of pureed vegetables.  You know pumpkin, butternut squash, carrot.  The only problem is, those soups are usually very low in protein.  And, as I've mentioned before sometimes protein is something I struggle to get enough of.

So, in an attempt to get some more protein into dinner one night, I blended some silken tofu into this carrot ginger soup.  Best.  Idea.  Ever.


Not only does the tofu add an awesome protein boost, it also made the soup deliciously creamy and thick.

Yum!

It may seem sort of silly, but I'm actually pretty proud that I thought up the idea of adding tofu to soup.  Because of it's very subtle flavor and somewhat spongy texture, it blended in perfectly and resulted in no recognizable flavor change to the dish.  I have a feeling that it's a technique that will come in handy on more than a couple occasions.


Protein Carrot Ginger Soup*
  • 3 tbsp unsalted butter
  • 1 large yellow onion, chopped
  • 1/4 cup finely chopped fresh ginger
  • 3 cloves garlic, minced
  • 7 cups chicken or vegetables stock
  • 1 cup dry white wine
  • 1 1/2 pounds carrots, peeled and cut into 1/2" pieces
  • 2 tbsp lemon juice
  • salt and pepper to taste
  • 1 package mori-nu silken firm tofu (If you are unable to find this I think regular silken tofu would probably work, too)
Melt the butter in a large pot over medium heat.  Add the onion, ginger, and garlic and saute for around 15 minutes.  Add in the stock, wine, and carrots.  Heat to boiling, then reduce heat and simmer uncovered over medium heat until the carrots become tender.  This should take about 45 minutes.  Puree the soup in a food processor until smooth.  Add in tofu and process again until it is fully incorporated.  Season with lemon juice, salt, and pepper.  Serve while still warm.

Click for Printable Recipe


Though this recipe may not be exactly what you're used to when you think of the ingredient, tofu, it's something I encourage you try, especially if, like me, you're a big fan of thick and creamy soups.

But, really, anyone who's in the mood for some delicious food should give it a try!


Revisited Recipe of the Day:

Chickpea "Meatballs"


*By posting this recipe I am entering a recipe contest sponsored by The Soyfoods Council and am 
eligible to win prizes associated with the contest. I was not compensated for my time.


Pin It!