Showing posts with label peanut butter. Show all posts

Wednesday, January 29, 2014

Peanut Butter and Jelly Thumbprint Cookies

Growing up, I skipped the peanut butter and jelly faze.  I went through a pasta faze and a chicken nugget faze and I even went through a frozen corn faze, but a PB&J faze?  Not once.

I was never the kid with a smushed sandwich in their lunch everyday, or the kid who survived solely on the jar of peanut butter and grape jelly in the fridge.  In fact, to this day, I've never had a typical Peanut Butter and Jelly sandwich.


I can't really say I mind, though.  Sure, I may get some weird looks when I tell people, but it's not like I missed out by not eating that stereotypical sandwich.  White bread, Jiff peanut butter, and grape jelly?  Eh, I think I'll pass.

But take the classic flavors of a PB&J and turn them into a healthy, natural, and delicious cookie and you've got me drooling.


These cookies disappeared in under 24 hours.  I ate three in a row without even stopping for air.  I would make them again in a heartbeat.

Subtly sweet, hearty, and 100% healthy, these cookies are a triple threat.  PB&ampJ lover or not, you will adore them.


Peanut Butter and Jelly Thumbprint Cookies
Cookies:

  • 1 1/2 cups spelt flour
  • 1 cup rolled oats
  • 1 tsp baking soda
  • 1 tsp cinnamon
  • 1/2 cup + 2 tbsp peanut butter
  • 1/2 cup applesauce
  • 1/3 cup maple syrup
  • 1/4 cup milk
  • 1 tsp vanilla
Filling (can also be replaced with your favorite jam or jelly):
  • 1 1/2 cups wild blueberries, frozen (feel free to try another frozen fruit, but I can't guarantee the results)
  • 2 tbsp chia seeds
  • 2 tbsp maple syrup
For Cookies:
  1. Preheat oven to 350F.  Line a baking sheet with parchment paper or a nonstick baking mat, or grease a baking sheet.
  2. In a large bowl, combine flour, oats, baking soda, and cinnamon.  Mix together.  Add peanut butter, applesauce, maple syrup, milk, and vanilla and mix well until completely incorporated.  Dough will be sticky.
  3. Take about 11/2 tbsp of dough and form into a ball.  Place on baking sheet.  Continue until all dough has been used.  You should have 10-12 large dough balls.  There's no need to place them far apart on the baking sheet because these cookies will not spread in the oven.
  4. Using your thumb or the back of a spoon, press down in the middle of the cookies to create an indent for the jam to go in.
  5. Bake in preheated oven for 8-10 minutes.  Cookies will look under baked at first, but that's OK.  They continue to cook as they cool, so by the time the cookies have cooled down they will be fully baked.
For Filling:
  1. Combine blueberries, chia seeds, and maple syrup in a cereal bowl and give them a quick stir to incorporate.
  2. Microwave the bowl for about two minutes, or until the blueberries have melted and the mixture is juicy.  Microwaving times may vary depending on your microwave. (You can also do this on the stovetop, although cooking times will change)
  3. Remove from microwave and place in fridge to firm up for about 30 minutes.  You will know the filling is ready when it has a jelly-like consistency and is no longer juicy.
  4. Use about 1 tsp of filling to fill each cookie.  Once cookies are done, store in fridge until serving time.  Recipe makes 10-12 large cookies.


Enjoy your Wednesday everyone!
Pin It!

Monday, January 27, 2014

Chocolate Pretzel Tarts with Caramel

Here's the full title for this recipe: Chocolate Brownie Tarts with Peanut Butter Pretzel Crust and Peanut Butter Caramel On Top.

A bit of a mouthful, huh?  But tell me it doesn't sound delicious.


This recipe was born when my mom accidentally bought too many pretzels.  I'm not quite sure what she was thinking, but she came home from the grocery store with two huge bags.  I don't want or need that many pretzels, so recipe ideas immediately began flying through my head.

What goes well with pretzels?  Peanut butter, chocolate, peanut butter and chocolate, yogurt, more chocolate... the list goes on and on.  In the end, I decided to combine a whole bunch of delicious pretzel combinations into one amazing recipe.  And hence, these tarts were born.


Please don't be intimidated by this recipe.  Please, please, please.  I promise you, it's really not that hard.  In fact, despite the three different parts to it, there are only ten different ingredients.  That's really not too much.  Aaannd, none of the ingredients are really outlandish or anything.  The weirdest it's gonna get is  special dark cocoa power, and even that can be subbed in for another high quality cocoa of your choice.

So really, no chickening out and convincing yourself this recipe is too much work.  It's not!  It'll all be worth it once you take the first bite....


Chocolate Pretzel Tarts with Caramel
Crust:

  • 60 g (about three cups, un-crushed) pretzels
  • 3/4 cup milk
  • 2 tbsp peanut butter (or another but butter of your choice)
Brownie Filling:
  • 2 cups rolled oats
  • 1/2 cup special dark cocoa powder (or another good quality cocoa powder)
  • 1/2 cup applesauce
  • 1/3 cup honey
  • 1/2 tsp baking soda
  • 1/3 cup milk
  • 1/2 tsp baking powder
  • 2 tsp vanilla
Caramel:
  • 2 tbsp honey
  • 1 tbsp peanut butter
  • 1/3 cup milk
To make crust:
  1. Preheat oven to 350F. Grease a muffin tin or line with 12 silicone cupcake liners.
  2. Place pretzels in the bowl of a food processor.  Process until the pretzels have turned into fine crumbs.  
  3. Add milk and nut butter and blend again until completely mixed.
  4. Take crust mixture and press into prepared pan.  You should have enough to make 12 "cupcakes"
  5. Set aside.
To make filling:
  1. Quickly rinse and dry bowl of food processor.
  2. Add all ingredients of filling to the bowl of food processor.  Process until completely combined, with the oats completely broken down and the batter smooth.
  3. Scoop about 1/4 cup of batter into each prepared crust so that the crust is full.
  4. Place pan in preheated oven for 18-20 minutes until filling is firm and crust has browned.
  5. Remove from oven and let cool.
To make caramel:
  1. While tarts cook, make caramel.  In a small saucepan, whisk together honey and peanut butter.  Cook in high until mixture has reduced by about half.
  2. Once reduced, remove from heat and add milk.  
  3. Turn heat to low and continue to mix until mixture has thickened into a caramel.  Remove from heat and let cool.
  4. Once cool, spread onto cooked starts.
  5. Store in fridge until serving time.  Recipe makes 1 dozen tarts.

Make.  These.  Now!!
Pin It!

Sunday, November 17, 2013

Chocolate Caramel Cake Bites

I've always loved caramel.


Twix bars, caramel apples, caramel dip, caramel sauce.  Pretty much everything containing caramel is guaranteed to be gobbled up in seconds.

Since I made my diet a bit healthier, my caramel consumption has reduced significantly.  There's still the occasional treat, of course, but caramel is far from a staple in my house.

That is, it wasn't until I stumbled into this recipe for Crazy Caramel Sauce.  It's from the blog The Fit Foodies, and guys, it really is crazy.  The recipe replaces butter with nut butter, sugar with maple syrup, and cream with milk for a resulting caramel that tastes, dare I say it, even better than an original caramel sauce!

Click that link and try it!


Anyway, after finally discovering a healthy caramel sauce (that's not made with dates!), I immediatly started brainstorming recipes to use it with.  I had some leftover Chocolate Avocado Frosting in the fridge and both recipes together spurred the creation of these bad boys:

Chocolate Caramel Cake Bites!  They taste even better than they sound.


Chocolate Caramel Cake Bites
Caramel (recipe slightly modified from this recipe):
  • 1 tbsp peanut butter
  • 2 tbsp maple syrup
  • 1/3 cup milk
Cake:
  • 1/2 cup oat flour
  • 2 tbsp honey
  • 2 tbsp sugar
  • 1/2 tsp baking powder
  • 1/2 tsp baking soda
  • 1/2 cup milk
  • 1 tsp vanilla
Frosting:
To Make Caramel:
In a small saucepan (non-stick if possible), whisk together peanut butter and maple syrup until combined. Heat on high, stirring constantly, until mixture has thickened and reduced to about half it's original volume. Lower to low heat and add milk.  Stir constantly until mixture has thickened to a caramel like consistency. Let cool and then transfer to a small container.  Set aside for now.
To Make Cake:

Preheat oven to 350F.  Grease a loaf pan.  Mix together dry ingredients in a medium to large bowl.  Add milk and vanilla and mix until a smooth batter forms.  Pour into loaf pan and spread into an even layer.  Bake in preheated oven for 8-12 minutes, until firm and a toothpick comes out clean.  Let cool.  Once cooled, spread the caramel you just made into a layer on top.  Spread the pre-made Chocolate Avocado Frosting on top of that.  Chill in fridge for at least an hour before slicing into small squares.  Store in an airtight container in the fridge.


Revisited Recipe of the Day:

Date Caramel + Chocolate Caramel Cookies


Pin It!

Sunday, October 20, 2013

Chocolate Peanut Butter Granola Bars

I'm gonna let you in on a not-so-secret: I've been super busy lately.


It's not really a secret because if you so much as look around this blog you can probably tell.  How many posts have there been in October so far?  Not nearly enough.  How many recipes are missing from the recipes page? Like 4 months worth.  I'm falling behind on here, and I want to say one thing all you readers:

I'm so sorry!


I really wish I could do everything, but sometimes I'm forced to put one thing before the other.  I'm sad to say that this blog doesn't always take priority.

However, I'm pretty sure things will be slowing down within the next month, so fingers crossed everything goes back to normal around here!


How does this translate into today's recipe?

Well, these Chocolate Peanut Butter Granola Bars were a super helpful during days when I was rushing all over the place and didn't have time to grab a proper snack.  Instead of a grumbling belly, I got to snack on a delicious homemade granola bar!  Big, big help, I tell you.  Plus, they're no bake, so they even with the busiest schedule, you can fit in time to make them.


Chocolate Peanut Butter Granola Bars
  • 2 cups rolled oats
  • 1/2 cup uncooked quinoa
  • 2 tbsp chia seeds
  • 1/3 cup whole wheat pastry flour
  • 1/3 + 1/4 cup peanut butter
  • 1/4 cup honey
  • chocolate, melted (I didn't measure it, just know you'll need enough to dip all the bars in)
Mix together oats, quinoa, chia seeds, and flour in a large bowl.  Place peanut butter and honey in another bowl.  Microwave in 15 second intervals until drippy.  Mix together.  Add peanut butter honey mixture to dry ingredients and mix until completely incorporated.  Form into bars (I made small squares) and place in fridge to firm (about an hour).  Once firm, remove from fridge and prepare melted chocolate.  Line a plate/pan with parchment paper.  Dip one side of bar in chocolate and place chocolate side up on parchment paper.  Repeat with all bars.  Return to fridge to let chocolate form.  Store in fridge.  Makes about 15 bars, but it changes based on size.


Pin It!

Wednesday, August 28, 2013

Peanut Butter Banana Balls

It's snack time!


Snacks are super important, especially with back-to-school time just around the corner. There are times when I come home from school absolutely starving and all I can think is FOOD!  During those times it's nice to have healthy snacks to reach for instead of the chips, candy bars, and cupcakes others are eating at the time.  Some of my after school snacks include: yogurt/cottage cheese with fruit, toast with peanut butter and banana, a slice of some homemade healthy dessert, and as long as these Peanut Butter Banana Balls are around, they make a perfect afternoon pick-me-up.


This is one of the simplest recipes on this blog.  All you need is peanut butter, a banana, applesauce, kashi go lean cereal (or another favorite), and rolled oats.  Yep, that's it.  Mash the banana with the peanut butter and applesauce.  Measure the cereal and oats.  Mix it all together.  Stick it in the fridge for a bit and then roll into cute little balls.  Pop 'em into your mouth and enjoy the deliciousness.


Yay for Peanut Butter Banana Balls!  You so want these as your afterschool/afterwork snack!


Peanut Butter Banana Balls
  • 1 1/2 cups kashi go-lean cereal (or try your favorite type)
  • 1 cup rolled oats
  • 1 large bananas (1/2 cup mashed)
  • 1/4 cup peanut butter
  • 1/3 cup applesauce (you may need slightly more or less depending on size of bananas)
Measure cereal and rolled oats into a large bowl.  In another bowl, mash banana.  Add peanut butter and applesauce and mix until incorporated.  Add banana mixture to dry ingredients and mix until combined.  Place mixture in a container and chill in fridge for at least an hour.  Once chilled, roll into balls.  Store in fridge until serving time.  Recipe makes about 25 small balls.


Revisited Recipe of the Day:

Chocolate Peanut Butter Sandwiches


Pin It!

Sunday, August 4, 2013

Chocolate Layer Cake with Peanut Butter Banana Frosting

It's Sunday, tomorrows Monday, and do you know what will make your Monday like a billion times better?  This cake.


Early last week I got back from vacation.  It was a great break from normal life, and I loved lounging around outside without a care in the world.  The only problem was that at the place we were vacationing, it was significantly harder to bake, and even harder than that to take decent pictures.  I did bake one thing during the trip, but by the time we arrived home, I was itching to get back in the kitchen.

Naturally, the first thing I made had to be spectacular.


And what's more spectacular than a gorgeous Chocolate Layer Cake?  Not much, I can tell you that.

I took my Chocolate Beet Cake recipe, and modified it so that it didn't use beets. I added in some banana as well.  Once that was baking I made a quick frosting out of tofu, banana, and peanut butter.  Gah, so good!


If you decide to make this, which you totally should, I can guarantee that you won't be able to tell at all that this cake is healthy.  Nope, it looks and tastes like anything from a bakery, without the butter, without the oil, and without the multiple cups of sugar.

Yay!  How's that for a great start to the day?


Chocolate Layer Cake with Peanut Butter Banana Frosting
For Cake:

  • 1 1/4 cup spelt flour
  • 1/2 cup cocoa powder
  • 1/4 cup arrowroot starch/flour (or cornstarch)
  • 1 tbsp baking powder
  • 1 1/2 tsp baking soda
  • 1/2 tsp cinnamon
  • 1/2 tsp salt (don't skip)
  • 1 3/4 cup applesauce
  • 3/4 cup buttermilk
  • 3/4 cup egg whites
  • 2/3 cup date paste
  • 1/2 cup yogurt
  • 1/2 banana, mashed
  • 1 tsp vanilla
For Frosting:
  • 1 package shelf stable tofu (can buy ar trader joes or online as Mori-nu tofu)
  • 2 large bananas
  • 2 tbsp salted peanut butter (if you don't use salted, add some salt)
  • 1 tsp vanilla
For Cake:
  1. Preheat oven to 350F.  Grease 2 8-in circle pans, and line a muffin tin with 3-5 cupcake liners.
  2. Combine dry ingredients (flour, cocoa, arrowroot, baking powder and soda, cinnamon and salt) in a large bowl.
  3. In another bowl, mix together remaining ingredients for cake.  Add wet ingredients to dry ingredients and mix until a smooth batter forms.
  4. Fill both greased 8-in circle pans a little less than 3/4 full with batter.  Distribute the extra batter betweem prepared cupcake liners for some extra cupcakes
  5. Bake in preheated oven for 20-22 minutes, until a toothpick inserted into the center of the pan comes out clean.  The cupcakes may require a bit less baking time.
  6. Remove cakes from oven and let cool in pan completely.
For Frosting + Preparing Cake:
  1. Place tofu, bananas, peanut butter, and vanilla in the bowl of a food processor.  Blend until completely smooth, with no banana or tofu clumps remaining.  It may look thin, but thats ok as the frosting will firm up once it's on the cake.
  2. Prepare serving dish for cake (keep in mind that the cake must be stored in the fridge).  Once (8-in) cakes have cooled completely, flip one of them onto the prepared serving dish.  Spread a layer of frosting on top.
  3. Carefuly flip the other cake out of the pan and on top of the layer of frosting.  Use remaining frosting to cover the outside of the cake.  Again, it may seem thin, but it will firm up in the fridge.
  4. Place cake in fridge until serving time.  When it's time to serve, cut into 8-10 pieces and garnish with chocolate chips or chunks.  Extra cupcakes can be eaten with another frosting of choice (I don't reccommend eating them plain, because it won't be quite sweet enough without a frosting)
  5. Store leftovers in fridge.


Revisited Recipe of the Day:

Chocolate Beet Layer Cake - another great recipe for chocolate cake!


Pin It!

Friday, June 14, 2013

Peanut Butter Honey Banana Boats

Row, row, row your Banana Boat, gently down the stream.  Merrily, merrily, merrily, merrily, life is but a dream.


As it turns out, that song holds true for Banana Boats as well as actual ones.  With one of these Peanut Butter Honey Banana Boats on your plate, life seems to good to be true.  Probably because they taste way too good to be true.

So you may be wondering: How on earth do you make this thing called a Banana Boat?  It's actually quite simple.

First, grab a couple ripe bananas.  For this recipe we're using two.  However, you can modify the recipe to fit any crowd.


Now you're going to use a knife to gently make a slit the long way across the banana.  Pell apart the peel, and use a spoon to scoop out a bit of the banana to make a little gorge.  It sounds a bit complicated, but it's really not.


You probably saw this one coming.  Fill the gorge with round 1 tsp peanut butter and 1 tsp honey.  This is when things really get fun!  The honey combines with the banana and peanut butter to make everything super gooey and delicious.  And, as you must know, honey is amazing with peanut butter and banana.  In addition to that, it helps to sweeten the whole dish.

Idea:  For when you're entertaining, lay out a whole table of bananas, along with your desired filling (Peanut Butter and Honey in this recipe).  Let people fill them up themselves, and then cook them right then and there so they're still warm when it's time to eat.  Super easy and super fun!


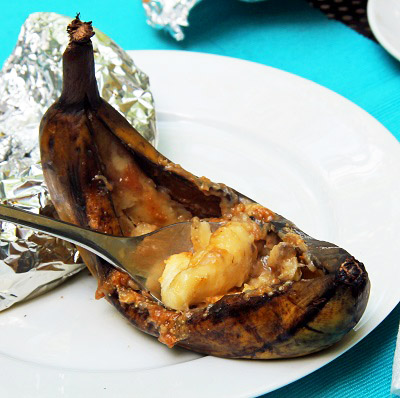
At this point, you're less than 10 minutes away from the most delicious snack ever.  Hoooray!  Wrap each Banana individually in aluminum foil and throw it on the grill.  Grill on medium for 7-10 minutes, flipping halfway through.  You'll want to grill until they're nice and mushy.

After that, you get this:


It might not look so good, but I can tell you with complete honesty that these Banana Boats are ab-sol-lute-ly delicious.  Try them!!!


Peanut Butter Honey Banana Boats
  • 2 ripe bananas
  • about 2 tsp peanut butter
  • about 2 tsp honey
  • aluminum foil
Cut through the banana peel the long way.  Dig out a small bit of banana to create a small gorge. Fill the gorge with 1 tsp of peanut butter and 1 tsp honey.  Wrap each banana with aluminum foil.  Set the grill at medium, and grill each banana for 7-10 minutes, flipping halfway through.  Grill until the bananas are soft and mushy.  Unpeel aluminum foil and eat warm!  (For pictures on how to do the above steps, see the pictures above.)

Disclosure: By posting this recipe I am entering a recipe contest sponsored by National Honey Board and am eligible to win  prizes associated with the contest. I received a gift card to offset the expense of my ingredients.


Revisited Recipe of the Day:

Peanut Butter Glazed Cookies


Pin It!

Wednesday, April 10, 2013

Peanut Butter Granola


So here's the thing, peanut butter is sort of my new obsession.  And by obsession, I mean OBSESSION.  


I bought this two pound jar of it like two weeks ago, and then when I tried to dig out a spoonful yesterday I found it empty.  What?  That's a pound of peanut butter a week!  I swear that's not good for me, even with the healthy fats.

So anyway, I decided something needed to be done.  And then I decided that "something being done" includes using the new jar of peanut butter I got to make a recipe thing so that instead of eating the peanut butter straight from the jar, I would eat it at least in a civilized way.


I gathered my ingredients, measured out some peanut butter, mixed everything together, and made some awesome Peanut Butter Granola.  I put it in a jar, took some pictures, ate a handful or two, and then proceeded to dig my finger into the peanut butter jar and shove it into my mouth.

Well, so much for being civilized.  At least the granola was good.


Peanut Butter Granola
(see note below)

  • 2 cups rolled oats
  • 1 1/2 cups puffed kamut
  • 1/3 cup salted natural peanut butter (of you don't have salted, just add some salt)
  • 2 tbsp chia seeds
  • 1/3 cup applesauce
  • 1 tsp vanilla extract
  • 1/2 tsp cinnamon
  • 2 tbsp peanut flour or PB2
  • 2 tbsp milk
  • 1/4 cup water
Preheat oven to 350F.  In a large bowl, combine oats and kamut.  Set aside.  Place peanut butter in another bowl and microwave until drippy.  Add chia seeds, applesauce, vanilla, cinnamon, peanut flour/PB2, and milk.  Mix together.  Add wet ingredients mixture to oats and kamut measured in bowl, and mix.  Mixture will be dry.  Add water and mix again until all dry ingredients have been coated.  Spread granola onto a lined baking sheet ad break into clumps.  Bake for 15 minutes, remove from oven and toss, then bake another 10 minutes.  Let cool a couple minutes then transfer to an airtight container.  Makes about 3 cups.

Note: This granola is not a sweet one.  If you prefer to have sweet granola, add some honey or agave, and reduce water accordingly.


Who else has a peanut butter obsession?

Revisited Recipe of the Day:

Peanut Butter Cookie Sandwiches


Pin It!

Saturday, April 6, 2013

Peanut Butter Swirl Brownies

Today I give you the fudgiest, most decadent brownies I've ever made.  You're gonna want to cut the squares small because these guys are rich.


It seems like everyone has been making Peanut Butter Swirled Brownies lately.  Let me tell you, there's a good reason.  They are so so so so good.  Trust me on this one.

There's something about a dense chocolate brownie swirled with sticky peanut butter that's really just amazing.


Despite how incredibly decadent these brownies taste, they're still much healthier than your typical brownie.  I made them without melted chocolate, oil, or butter.  I promise you can barely tell, though.

Also, this is one of the easiest brownie recipes you find.  It's made entirely in a food processor!

So please tell me you're going to make these.  After all, there is chocolate and peanut butter.  I'm not sure I know anyone who can resist that!


Peanut Butter Swirl Brownies

  • 1 cup rolled oats or quick oats
  • 1/2 cup cocoa powder
  • 1/2 tsp baking powder
  • 1/4 tsp salt
  • 1/2 cup silken tofu
  • 1 banana
  • 1/4 cup applesauce
  • 1/4 cup milk
  • 1 tsp vanilla
  • 2 tbsp brown or turbinado sugar
  • 1/2 tsp instant coffee
  • 1/4 cup natural peanut butter
Preheat oven to 350F.  Place oats in food processor and process until ground into a flour.  Add all ingredients except peanut butter to food processor and process until a thick batter forms.  Make sure everything is well incorporated.  Spread better evenly into a greased 8x8 pan.  Place peanut butter in a small bowl, and microwave 15-20 seconds, (time may vary) until drippy.  Drizzle peanut butter over brownie batter and use a knife to swirl.  Bake for 12-15 minutes, then chill at least 2 hourse before cutting brownies into 16 squares.  Store in fridge.


Here are some other peanut butter swirled brownies floating around the blog world:

Revisited Recipe of the Day:


Pin It!