Showing posts with label summer. Show all posts

Monday, September 2, 2013

Tropical Green Smoothie

It may be after Labor Day, but summer is not over.


I know Labor Day is considered the unofficial ending of summer, but can we just forget about that?  'Cause summer is very much still here and that's why you should make a cool, refreshing Tropical Green Smoothie and then sip it while out in the sunshine.

Don't try to tell me that it's out of season and that what I should be posting is some pumpkin thing because pumpkin is for fall and it's summer right now.  Smoothies are for summer, not pumpkin.


As you can, summer is very much still here in my mind.  I'm not accepting that it's fall until it's actually fall, and that will be on the 22nd of September.  Until then, I'm going to be throwing plenty of summer recipes at you, and they're awesome recipes so you're gonna be plenty happy.

Just forget about that pumpkin for a couple days, k?  I love pumpkin too, god knows I do, but I'm doing my best to keep it to a minimum until the actual season begins.  Buuuut maybe I'll throw in some pumpkin earlier too.  We'll see.


Back to the smoothie.  I've had a love-hate thing going on with green smoothies for a while now, I've had some really bad ones, and I've had some really great ones.  So, ya know, I was on the fence.  But that I just had to make one for myself and it was so pretty and delicious that I've decided green smoothie are my new best friend.  Plus, I just got a vitamix (!!!!!) so there's gonna be some intense smoothie making going on now.

As for this recipe, it's sweet and just slightly sour from the lemon juice.  It's got a gorgeous green color and it's super easy to make.  Here's a tip:  If you don't have a high power blender, blend the water and spinach first and then add everythign else.

Get blending!


Tropical Green Smoothie

  • 1 cup water
  • 1/2 cup frozen pinapple
  • 1/4 cup frozen mango
  • handful of fresh baby spinach
  • juice of up to 1/2 lemon (use more or less based on how sour you want it)
Combine all ingredients in a blender and blend until smooth.  If you don't have a super powerful blender, add just the water and spinach first.  Blend until the spinach is completely broken down and then add remaining ingredients.  Pour into a glass and serve right away.  Makes one serving, or two smoothie "shots".


Revisited Recipe of the Day:

Strawberry Blueberry Protein Smoothie
Pin It!

Wednesday, August 21, 2013

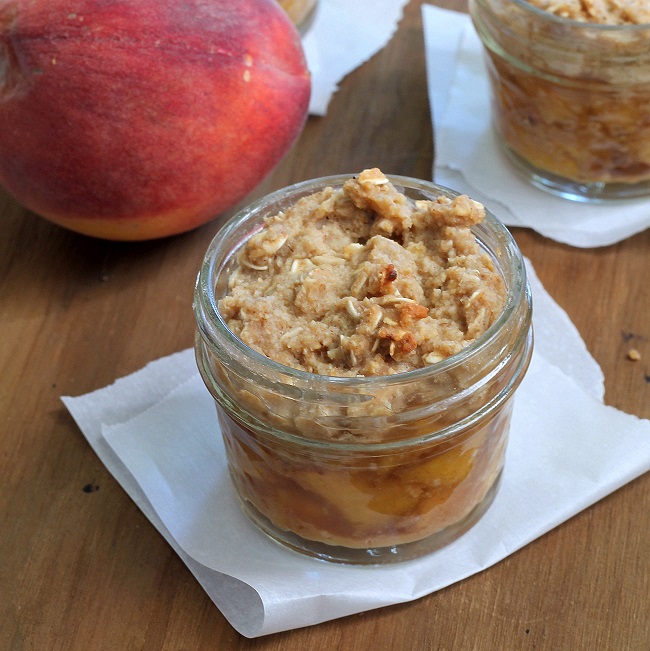
Peach Ginger Crumbles in a Jar

Two of my favorite things are featured in this post: peaches and jars.


It's recipe redux time yet again, and I was super excited about this months theme, so I can't wait to share my recipe with you guys.

First things first, let me tell you about the theme.  It was, and I quite, "raising the bar on food in a jar".  How fun and catchy is that? Basically, the idea was to take anything people put in jars to the next level.  Jams, sauces, portion controlled desserts, you know what I mean.  Like I said, I loved the idea and was determined to make a great recipe for y'all.


It's mid August (where has summer gone??), so peaches are in full swing, at least where I live.  Everywhere I go, it seems we pick up more.  I'm not complaining though, I adore peaches and love how abundant they become this time of year.  If only it could be like that year round.

With peaches coming out of our ears, it seemed perfect you make a peach dish for this months Recipe ReDux.  I decided to go with a simple peach crumble, but I made it extra special by lightening it up and adding ginger to the peach filling.

Baked into small jars and bursting with juicy peach, this is one recipe that is sure to please.  It's cute, tasty, and perfect for summer!


Peach Ginger Crumbles in a Jar

Filling:
  • 3 large, ripe peaches, pitted and chopped
  • 2 tbsp oat flour
  • 1 tsp ground ginger (if you want a less strong ginger flavor, use only 1/2 tsp)
  • 1 tsp cinnamon
  • 2 tbsp honey
Crumble:
  • 1/2 cup oat flour
  • 1/2 cup rolled oats
  • 1/4 tsp salt
  • 1/2 tsp cinnamon
  • 3 tbsp honey
  • 1/4 cup + 2 tbsp applesauc
Preheat oven to 325F.  Grease the insides of 6 small mason jars.  In a large bowl, combine all ingredients for filling.  Divide evenly between prepared jars.  In another bowl, mix together oat flour, rolled oats, salt, and cinnamon,  Add honey and applesauce and mix until completely incorporated.  Again, divide mixture evenly between jars, creating a layer above peach filling in each jar.  The jarss should be full, or almost full.  Bake in preheated oven for 16-20 minutes, or until oat mixture is firm and baked through.  Serve warm or cold, with whipped cream if desired.  Makes 6 individual sized servings.  Store leftovers in fridge.


Pin It!

Thursday, August 1, 2013

Lemon Blueberry Crumble Bars

I look forward to fresh blueberries all year.


When someone asks me my favorite food, blueberries are usually the answer I give them. Of course there are many other foods that I love (salmon, cherries, chocolate, figs, peanut butter), but blueberries are definitely up there on the list.

I find it so incredibly annoying that fresh blueberries are only available for a short part of the year, at least where I live.  If it where up to me, blueberries would be like apples, available all the time for a relatively good price.  But, alas, that is not so, so I've just got to make the best of blueberry season each year.


Last week we went blueberry picking.  I love love love blueberry picking and, as you might imagine, I was quite excited.  It's honestly like paradise to walk through row after row of blueberry bushes that are filled with sweet, juicy blueberries. The sign at the farm we picked at said to limit yourself to 2-3 berries to taste.  That was so totally not going to happen.  I ate to my hearts delight, and then gave them a big tip when we payed for the berries we had picked.  See?  Things even out.

Anyway, we ended up picking 12 pounds of blueberries that day, and guess how many are left.  Not one berry.  We've got a very blueberry heavy diet at my house, in case you didn't know.


Ironically enough, I made these bars during the time where we had heaps of fresh blueberries, but I used frozen berries instead.  This was because I was too busy shoving the fresh blueberries into my mouth.

Also in these bars: lemon and a yummy oatmeal crumble.  They're great and you should make them.  Because summer is the time for blueberries, is it not?

(pciutre_
hjjhj

Lemon Blueberry Crumble Bars
For Crumble:
  • 2 cups quick oats (make your own by quickly pulsing rolled oats in a blender or food processor)
  • 1/2 cup oat flour
  • 1 tsp cinnamon
  • 1/2 cup applesauce
  • 1/4 cup + 1 tbsp maple syrup
  • 2 tbsp lemon juice
  • 1 tbsp lemon zest
  • 1 tsp vanilla
For Filling:
  • 2 cups frozen blueberries
  • 3 tbsp lemon juice
  • 2 tbsp arrowroot starch/flour or cornstarch
  • 2 tbsp maples syrup
  • 1 tbsp lemon juice
For Crumble:
  1. Preheat oven to 350F.  Grease an 8x8 square pan.
  2. Combine oats, oat flour, and cinnamon in a large bowl.  Add applesauce, maple syrup, lemon juice and zest, and vanilla to bowl.  Mix until a thick dough forms.
  3. Press all but 1/2 cup of crumble dough into the bottom of prepared pan to create a crust.  Make sure the dough covers the entire area of the pan.
  4. Set aside to remaining 1/2 cup of dough for later.
For Filling:
  1. Place all ingredients in a small saucepan.  Bring to a boil over high heat.  Reduce heat and let simmer a couple minutes until a sort of jelly has formed.  Remove from heat and let mixture cool.
  2. Once cooled, pour over prepared crust, and spread into an even layer.  Sprinkle remaining 1/2 cup of crumble on top.
  3. Bake in preheated oven for 15 minutes, until crumble has browned slightly.  Let cool completely before cutting in squares and serving.
  4. Makes 16 small squares. Store in fridge.
------------------------------------------------------------------------------------------------------------

Enjoy! And eat some blueberries for me, will ya?

Revisited Recipe of the Day:

Peach Blueberry Breakfast Crumble


Pin It!

Tuesday, July 16, 2013

Watermelon Juice


I'm going to tell you something weird about me, and you have to promise not to laugh.  It's about watermelon.  See?  Weird.  I bet you're laughing already.  

But anyway, I've always had this weird preference when it comes to that red fruit.  In fact, I have lots of weird fruit habits, but now is not the time for all of that (If there's ever a recipe with grapes though, I'm sure you will hear more).  Basically, my favorite part of watermelon is the white part that's right next to the rind.  I know, I know, I'm a weirdo. (Look at the bowl in that picture below.  Those pieces with the rim of white = my absolute favorite)

The thing is, watermelon is just so much better when it's partly white.  When you eat that bright red stuff right in the middle it has seeds and is mealy, but when you eat the watermelon near the rind it's all crisp and crunchy and almost like flavored water that you can chew.

Does that make any sense at all?  It does to me, but I'm not so sure about you.  Whatever, I like what I like.


Just thought I'd share that fun fact with you.  Now you know I'm crazy and like the white part of watermelon more than the red.

Moving on to today's recipe...

I'm not sure I can really call it a recipe.  It's more like a 3 minute I'm-so-thirsty-I'm-gonna-die drink.  Made with only two ingredients (you read that right, TWO), this beautiful juice is simply the best way to cool down on a summer day, while still being healthy, of course.  I call it Watermelon Juice, and it's totally delicious, whether you use the white part of the watermelon or not.


Watermelon Juice
  • 1 1/2 cups watermelon, cut into cubes
  • 1 tbsp fresh lime juice
Place watermelon and lime juice in a blender.  Blend until a thin juice forms.  You will not have to add any extra liquid.  Pour into glasses and serve.  Recipe makes one large serving, or two smaller ones.  To make a larger amount at one time, you can easily double, or even triple, the recipe.


I bet everyone will be jealous of you and your fancy shmancy Watermelon Juice.  You just watch.
Pin It!

Friday, June 21, 2013

Banana Soft Serve with Blueberry Chia Jam

... and a honey drizzle.

Whew!  Did you get through all that?

Despite the very long title, this is actually a super easy dish to prepare.  It's got only four natual ingredients and there is almost no hands on time.  This is also my Recipe ReDux recipe for this month.


The theme this month was to add some sort of seed to a dish that reflects the current season in the place you're living.  I thought this was a great oppurtunity to play around with some chia seeds.  I bought them a while back and so far I've only used them in two or three things.  It was time they get some use again!

The creaton of this dish was centered completely around the Chia Seed Jam I wanted to make.  I'd seen the concept all over, and I couldn't wait to try myself.  Guess what?  It worked perfectly!  With only blueberries and chia seeds I was able to make a thick jam.


I then swirled the jam into some banana soft serve.  I'm sure you've heard of this before, it's just frozen banana blended until they reach an ice cream like consistency.  My plan wasn't to reinvent the wheel with this dish, it was just to put together delicious flavors to create an awesome dish.  The whole thing was topped off with a quick drizzle of honey.  See?  Totally simple.

And that's not to mention, it was sooooooo good.


I served it up for Father's Day dessert, as it's the kind of dessert my dad loves, and every family member devoured it!  They couldn't believe there was no milk, and that only four ingredients were in the whole thing.

With the first day of summer officially being today (!!!), what better way to celebrate than with some completely clean ice cream?


Banana Soft Serve with Blueberry Chia Jam and Honey Drizzle
  • 3 ripe bananas
  • 3 cups frozen blueberries
  • 3 tbsp chia seeds
  • honey
  1. Peel and slice your bananas, put them in a plastic bag or container, and stick them in the freezer until they're frozen.
  2. In a large saucepan, bring blueberries to a boil.  Once the juice starts to bubble, reduce heat and add chia seeds.  
  3. Continue to cook, stirring often, until mixture has thickened to a jam-like consistency, about 15 minutes.  If desired, stir in a bit of honey.  Transfer jam to a container and place in fridge.  The longer you keep the jam in the fridge, this thicker it will become.
  4. As close to serving time as possible, place frozen banana slices in the bowl of a food processor or high power blender.  Blend until mixture is smooth, and reaches an ice cream like consitency.
  5. If you will be serving right away, scoop Banana Soft Serve into 3 or 4 bowls to be served.  If not, place in a a large container and freeze until serving time. Place soft serve in 3 or 4 bowls when time to seve.  This will make it a bit firmer, but it still tastes good. 
  6. Take a dollop of Blueberry Jam and place it on top of the soft serve.  Swirl it in if desired.  Add a drizzle of honey and it's time to eat!
Notes:
  • You will definitely have leftover jam.  Use it as you would any other jam.  If you like things pretty sweet, I reccommend topping it with a drizzle or two of honey as well
  • This recipes makes enough for 3-4 people.  This is because it only uses 3 bananas.  To make more servings, simply freeze more bananas.  Easy peasy!
  • To make this entire recipe vegan, simply replace the honey with agave.

Revisited Recipe of the Day:

Banana Split Bowl


Pin It!

Friday, June 14, 2013

Peanut Butter Honey Banana Boats

Row, row, row your Banana Boat, gently down the stream.  Merrily, merrily, merrily, merrily, life is but a dream.


As it turns out, that song holds true for Banana Boats as well as actual ones.  With one of these Peanut Butter Honey Banana Boats on your plate, life seems to good to be true.  Probably because they taste way too good to be true.

So you may be wondering: How on earth do you make this thing called a Banana Boat?  It's actually quite simple.

First, grab a couple ripe bananas.  For this recipe we're using two.  However, you can modify the recipe to fit any crowd.


Now you're going to use a knife to gently make a slit the long way across the banana.  Pell apart the peel, and use a spoon to scoop out a bit of the banana to make a little gorge.  It sounds a bit complicated, but it's really not.


You probably saw this one coming.  Fill the gorge with round 1 tsp peanut butter and 1 tsp honey.  This is when things really get fun!  The honey combines with the banana and peanut butter to make everything super gooey and delicious.  And, as you must know, honey is amazing with peanut butter and banana.  In addition to that, it helps to sweeten the whole dish.

Idea:  For when you're entertaining, lay out a whole table of bananas, along with your desired filling (Peanut Butter and Honey in this recipe).  Let people fill them up themselves, and then cook them right then and there so they're still warm when it's time to eat.  Super easy and super fun!


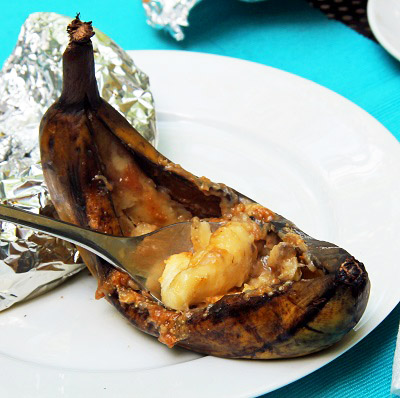
At this point, you're less than 10 minutes away from the most delicious snack ever.  Hoooray!  Wrap each Banana individually in aluminum foil and throw it on the grill.  Grill on medium for 7-10 minutes, flipping halfway through.  You'll want to grill until they're nice and mushy.

After that, you get this:


It might not look so good, but I can tell you with complete honesty that these Banana Boats are ab-sol-lute-ly delicious.  Try them!!!


Peanut Butter Honey Banana Boats
  • 2 ripe bananas
  • about 2 tsp peanut butter
  • about 2 tsp honey
  • aluminum foil
Cut through the banana peel the long way.  Dig out a small bit of banana to create a small gorge. Fill the gorge with 1 tsp of peanut butter and 1 tsp honey.  Wrap each banana with aluminum foil.  Set the grill at medium, and grill each banana for 7-10 minutes, flipping halfway through.  Grill until the bananas are soft and mushy.  Unpeel aluminum foil and eat warm!  (For pictures on how to do the above steps, see the pictures above.)

Disclosure: By posting this recipe I am entering a recipe contest sponsored by National Honey Board and am eligible to win  prizes associated with the contest. I received a gift card to offset the expense of my ingredients.


Revisited Recipe of the Day:

Peanut Butter Glazed Cookies


Pin It!

Wednesday, September 5, 2012

Peach, Arugula, and Ricotta Pizza with (Optional) Balsamic Reduction

Oh look, more peaches.


I told you they'd be coming, gave them to you 2 days ago, and now here they are again. What can I say?  They're delicious!

Although, today, the delicious-ness of peaches isn't the only thing that caused me to share this recipe. The daily food holiday also inspired me.

It's Cheese Pizza Day!


Of course, this isn't exactly your classic cheese pizza.

But, then again, I don't often do classic.  I like to stick to uniquely delicious instead.  And in case you had any doubt, yes, this pizza is definitely uniquely delicious.


Juicy peaches, creamy ricotta, and a just a bit of arugula make it one of the best of it's kind.  The fluffy and easy homemade dough is just the cherry on top, or, bottom, I suppose.


Peach, Arugula, and Ricotta Pizza with (Optional) Balsamic Reduction - original recipes can be found here and here
(serves 4 people)

Dough:

  • 1/2 cup warm water
  • 1/2 tsp active dry yeast
  • 1 tbsp olive oil
  • 1 1/2 cups flour
  • 1 tsp coarse salt
Place warm water in a medium sized bowl and sprinkle yeast on top.  Stir to dissolve, then set aside 5 minutes, or until yeast is foamy.  Add olive oil, flour, and salt to yeast mixture.  Mix to combine.  Turn dough onto well floured surface, and knead for 2 minutes or until elastic.  Place dough in oiled bowl, cover with plastic wrap, and let stand in warm place for at least 30 minutes.  When ready to make pizza, turn dough onto lightly floured surface and roll out to about 1/4 inch thick.


Pizza:

  • 1 recipe pizza dough (from above)
  • around 2/3 cup ricotta cheese, or enough to generously coat your whole pizza
  • 3 ripe peaches, sliced (not peeled)
  • 1/2 cup arugula
  • Optional:  Balsamic reduction, to drizzle on top
Heat up grill until hot.  Evenly (and generously) coat your already rolled out pizza dough with the ricotta cheese, leaving about 1/2 inch empty around the sides.  Arrange peach slices (I did mine in flowers) around the whole pizza.  Cook pizza, on the back of a sheet pan, in grill for around 15-20 minutes, or until the edges of the dough have browned and the cheese begins to bubble and melt.  Remove pizza from heat.  Sprinkle arugula evenly over top and drizzle with a bit of the balsamic reduction, if using.  Then, slice and serve.


I'm telling you, this pizza is the way to celebrate Cheese Pizza Day.

All your friends, with their "classic" greasy mozzarella cheese pizzas with be begging for a slice.  But don't worry, if you decided this pizza is too good to share, I won't tell anyone.  I promise.


Revisited Recipe of the Day:

Greek Pasta Salad


Pin It!

Friday, August 24, 2012

Ginger Peach Sorbet

I have a confession.


I may be the slightest bit obsessed with peaches.

At first I thought my newly found love was just because of all the perfect peaches available this time of year, but, then, when I automatically reached for peach tea over every other flavor, I knew that, maybe, that wasn't it.

Let me explain.


A couple days ago, I received a whole bunch of tea samples for the awesome folks at Celestial Seasonings (seriously, they're so nice).


There were tons of different teas to try, and I immediately began brainstorming up different ideas on how to use them in new and unique ways.

Smoothies, muffins, ice cream.  I had tons of ideas, all of which could have used any one of the tea flavors.  But you know which one I decided to try first?  That's right, peach blossom.


So, you see, I might have a teensy-tiny problem.

I think I can come to terms with it, though.  I mean, there are worse obsessions than peaches.  What if I was obsessed with mushrooms?  Now, that would be weird.


Now that I think about it, it's actually a good thing that I decided to use the flavor tea I did, because my peach blossom tea choice resulted in a really delicious Peach Ginger Sorbet.

It's light, with a subtle peach flavor, and a hint of ginger.  This is not a sorbet that's going to smack you in the face, but one that has just a enough flavor to make you want more... and more... and more.

Yeah, it's that good.


Ginger Peach Sorbet
(makes about 3 cups)
  • 3 cups water
  • 3 bags Celestial Seasonings Peach Blossom Green Tea (you could probably also use another brand of peach flavored tea)
  • 1/4 cup sugar (or to taste)
  • 1 1-inch cube fresh ginger root, sliced into small pieces
  • 1 peach, fresh
In a small saucepan, boil ginger in water.  Once water has boiled, turn off heat, and add tea bags and sugar.  Let cool to room temperature, then transfer to a jar, or other container, and refrigerate at least overnight so that as much flavor can come from the tea bags as possible.  When your tea mixture has been sitting for long enough, cut up one peach (leave skin on).  Blend your peach in a blender.  Once blended add the tea mixture, but make sure not to include the tea bag or any ginger pieces.  Blend until smooth.  Next, transfer your "juice" to an ice cream maker and let the machine do it's thing.  Once the sorbet is done, freeze for at least and hour, and enjoy!

Note: If you don't have an ice cream maker, you can try just freezing your sorbet without churning it first, and then blending in a blender or food processor once it's frozen.  I haven't tries this, however, and am not sure how well it would work.


Just a warning:  This is not the last peach recipe you'll be seeing.  I've still got lots coming (pizza and ice cream to name a few).  So, if you're a peach lover like me, you'll want to keep a look out.

And you know what else you should keep your eyes peeled for?  A chance to win some tea!  That's right, there's a giveaway coming soon.  Stay posted!


Revisited Recipe of the Day:

Chili Glazed Cod (to have for dinner, before this sorbet)


Pin It!