Showing posts with label vegetables. Show all posts

Friday, January 3, 2014

Craft Time - Vegetable Art

How about something a little different today?  I don't know about you, but where I live the snows coming down hard and school is closed for the day.

Pefect craft weather!


Lately I've been getting more into DIY projects.  I think they're really fun for the winter and I've been pinning craft projects like crazy over on Pinterest.

I finally decided to actually try something out (yes, I have the dreaded pin and then never try syndrome), and it came out pretty well if I do say so myself.


I call this Vegetable Art.  And yes, vegetables are necessary in the creation of the piece.  I don't call myself a food blogger for nothing ;)

Basically, it's a super fun and easy way to create unique and fun wall art.  I made mine for my room, so it's fit for a teenage girl, but you could easily change the feel of the painting based on colors and how you decide to polka-dot your canvas.

Inspiration for the project came from from this pin.


What Do You Need?
  • 1 blank canvas of any size
  • 4 paint colors of your choice (I went to a pain store, picked out a color swatch that I liked, and asked for a sample in each other.  It's cheap and gives you a lot of paint; enough for many more projects than this)
  • Potatoes, carrots, and any other root vegetable of your choice
How Do You Make It?
  1. Prepare a clean work place.  Set down your canvas and prepare your paints by pouring each one into a shallow container with a large surface area.  I used the lid of the paint containers  (see first picture)
  2. Slice your vegetables into round disks.  Try to be mindful of how the shape will come out after you cut it.  Your painting will come out best if there are multiple sizes and shapes of your circles.
  3. Start painting!  It's your choice as to whether you want to paint with any design in mind or just go crazy.  At first I tried to do big circles to small, but then I gave up and polka-dotted in random places.  I think it'll look pretty good no matter what you do.  The important thing to remember is not to use too much paint.  You want each stamp not to be solid, because that what makes it so cool to look at.
  4. Let it dry and hang it up.  Currently, mine is sitting on my dresser, but I hope to have it up on the wall soon.  Maybe I'll post a picture once it's up.

I'll be back with the usual recipe post in a couple days.  Happy new year everyone, and here's to an awesome 2014!

Pin It!

Monday, September 2, 2013

Tropical Green Smoothie

It may be after Labor Day, but summer is not over.


I know Labor Day is considered the unofficial ending of summer, but can we just forget about that?  'Cause summer is very much still here and that's why you should make a cool, refreshing Tropical Green Smoothie and then sip it while out in the sunshine.

Don't try to tell me that it's out of season and that what I should be posting is some pumpkin thing because pumpkin is for fall and it's summer right now.  Smoothies are for summer, not pumpkin.


As you can, summer is very much still here in my mind.  I'm not accepting that it's fall until it's actually fall, and that will be on the 22nd of September.  Until then, I'm going to be throwing plenty of summer recipes at you, and they're awesome recipes so you're gonna be plenty happy.

Just forget about that pumpkin for a couple days, k?  I love pumpkin too, god knows I do, but I'm doing my best to keep it to a minimum until the actual season begins.  Buuuut maybe I'll throw in some pumpkin earlier too.  We'll see.


Back to the smoothie.  I've had a love-hate thing going on with green smoothies for a while now, I've had some really bad ones, and I've had some really great ones.  So, ya know, I was on the fence.  But that I just had to make one for myself and it was so pretty and delicious that I've decided green smoothie are my new best friend.  Plus, I just got a vitamix (!!!!!) so there's gonna be some intense smoothie making going on now.

As for this recipe, it's sweet and just slightly sour from the lemon juice.  It's got a gorgeous green color and it's super easy to make.  Here's a tip:  If you don't have a high power blender, blend the water and spinach first and then add everythign else.

Get blending!


Tropical Green Smoothie

  • 1 cup water
  • 1/2 cup frozen pinapple
  • 1/4 cup frozen mango
  • handful of fresh baby spinach
  • juice of up to 1/2 lemon (use more or less based on how sour you want it)
Combine all ingredients in a blender and blend until smooth.  If you don't have a super powerful blender, add just the water and spinach first.  Blend until the spinach is completely broken down and then add remaining ingredients.  Pour into a glass and serve right away.  Makes one serving, or two smoothie "shots".


Revisited Recipe of the Day:

Strawberry Blueberry Protein Smoothie
Pin It!

Wednesday, August 14, 2013

Zucchini Raisin Muffins

You know what's weird?  I'm crazy about putting weird stuff in my desserts, but when it comes to vegetables that are commonly used in sweets (zucchini, carrots, etc), the recipes on this blog are seriously lacking.


I'm 90% sure the absence of carrot cake and/or zucchini bread has to do with my aversion to grating vegetables.  It's just so annoying.  If I had that handy-dandy shredding blade for a food processor then everything would be super easy, but I lost that thing so now I'm stuck doing everything by hand.

It really throws a damper in dessert baking.


But anyway, with zucchini in abundance this time of year, I decided to suck it up and make some zucchini muffins.  And... they were really yummy!

It's been a while since I posted a recipe that's specifically meant for breakfast (as supposed to a dessert that's healthy enough for breakfast, I mean), so I'm glad to present you with some muffins that will definitely spice up your mornings.


Things you should know about these muffins:

  • They're hard-core muffins.  They're not petite little muffins that won't keep you full.  Nope, these guys are whole wheat, dense, and packed with zucchini and raisins.
  • This isn't one of those recipe where you can't believe it's healthy.  After all, you've got whole wheat flour staring you in the face.  Instead, this recipe is one that makes you rethink how delicious healthy can taste.  Like "Oh my god, even though these are whole wheat and have a vegetable in them, they taste super duper good!"
  • Just 24 hours after making these muffins, only 4 were left.  They. Were. Devoured!
  • Minimal vegetable grating is required.  Yay!!
Basically, this is an awesome use for zucchini and you should make these muffins this instant.


Zucchini Raisin Muffins

  • 1 cup spelt flour
  • 1/2 whole wheat flour
  • 1 tsp cinnamon
  • 1 tsp baking soda
  • 1/4 tsp salt
  • 2 cups shredded zucchini, drained of excess liquid
  • 4 egg whites (12 tbsp if using egg whites from a carton)
  • 1/4 cup maple syrup
  • 2 tbsp applesauce
  • 1 tsp vanilla
  • 1/3 cup raisins
Preheat oven to 350F.  Grease a muffin tin.  Mix together dry ingredients in a large bowl.  In another bowl, combine zucchini, egg whites, maple syrup, applesauce, and vanilla.  Add wet ingredients to dry and mix until a thick batter forms.  Do not overmix.  Gently mix in raisins until incorporated.  Distribute batter between grased muffin tins untiul all batter has been used.  Bake in preheated oven for 10-15 minutes, until muffins have browned and a toothpick comes out clean.  Store in fridge.  Recipe makes 10-12 muffins. 


Revisited Recipe of the Day:

Mini Carrot Cake for One


Pin It!

Saturday, July 13, 2013

Asian Avocado and Snap Pea Salad

Well, would you just look at this bowl of summer deliciousness.


Who else loves sugar snap peas in the summer?  They're one of my favorite veggies ever this time of year.  'Cause when snap peas are good, they're really good.

I swear, it's like candy that grows on a vine.  Crunchy and sweet and just all around perfect.  I could eat them for dessert!  I guess they don't call 'em sugar snap peas for nothing, huh?

A few days ago I decided to take some of my wonderful sugar snap peas and throw together a quick salad with them.  It was a very good choice on my part.


  The creamy avocado compliments the crunchy snap peas, and the tomatoes add a nice pop of color.  I threw together a quick dressing with soy sauce, vinegar, and sweet chili sauce.  Oh, how delicious it was.

Summer is the time for light meals, fresh produce, and no use of the oven at all.  This salad delivers all of that.  Use it as a side at dinner or the main focal point during the lunch.  It's even easy enough to prepare as a quick snack.


Last but not least, how beautiful is this thing?  My mom was looking at the un-edited pictures and she asked if I had brought up the saturation.  No, mom.  That's just nature being all beautiful and amazing.

It's crazy what nature can do!


Asian Avocado Snap Pea Salad

  • 1 small, ripe avocado
  • large handful sugar snap peas (about 15 peas)
  • large handful grape tomatoes (about 10 tomatoes)
  • 1 tbsp soy sauce
  • 1 tsp sweet chili sauce
  • 1/2 tsp white vinegar
  • 1/2 tsp orange champagne vinegar or orange juice
Slice avocado into small chunks.  Place in a medium sized bowl.  Chop snap peas and add to bowl.  Cut tomatoes in half and add to bowl as well.  Measure all remaining ingredients into a small bowl.  Whisk together until completely combined. Add dressing (soy sauce mixture) to chopped vegetables in bowl.  Mix together to coat veggies with dressing.  Divide into two serving dishes.  Serve immediately or store in fridge until serving time.  Makes two side salads.


Revisited Recipe of the Day:

What I'm Eating: February 2013
Pin It!

Saturday, May 18, 2013

Israeli Couscous with Asparagus and Snap Peas

Spring means flowers blooming, lots of sunshine, and a whole lot of asparagus.


Since it came into season, I've tried asparagus in nearly every way known to man.  We've done sandwiches, pizza, pasta, roasted, and finally an Israeli Couscous Salad.

It was all delicious, but my favorite would have to be the recipe I'm sharing today.  It's absolutely fantastic.


Let's talk about Israeli Couscous.

Have you ever tried it?  It's not like small and beady North African Couscous (the normal kind), but instead is a bit for substancial with more of pasta mouthfeel.  We love it at my house.

But, it is possible to make it better.  And cheese, preserved lemon, and lots of veggies are how ya do it.  You're gonna love this thing.  I just know it.


Israeli Couscous with Asparagus and Snap Peas
  • 2 tbsp olive oil
  • 1 1/3 cups Israeli couscous (6 to 7 ounces)
  • 1 3/4 cups (or more) vegetable broth
  • 14 ounces slender asparagus spears, trimmed, cut into about 1 inch pieces
  • 8 ounces sugar snap peas (you can trim them if you like, but I didn't)
  • 1 small onion, chopped
  • 1 clove garlic, minced
  • 1/2 cup finely grated Parmesan cheese
Heat 1 tablespoon oil in a saucepan over medium heat. Add couscous and sauté until most of couscous is golden brown, about 5 minutes. Add broth, increase heat, and bring to boil. Reduce heat to medium-low, cover, and simmer until liquid is absorbed and couscous is soft, about 10 minutes. Add more broth if needed.  In another saucepan, heat another 1 tbsp of oil.  Add asparagus, snap peas, onion, and garlic.  Season with salt and pepper and saute until tender, but still a bit crisp.  It should take about 5 minutes.  Add vegetables to pan with cooked couscous (with heat still on).  Mix together.  Add cheese and cook until cheese is melted.  Serve and enjoy!


Revisited Recipe of the Day:

Minty Tabbouleh


Pin It!

Friday, March 1, 2013

Chocolate Quinoa Fudge Bars


On Monday, I did quinoa savory.  Now it's time for sweet.


Introducing the Chocolate Quinoa Fudge Bar...

These bars are like nothing you've ever tasted.  With an intense chocolate flavor and a texture somewhere between a brownie and a protein bar, they're great to snack on, have pre-workout, or enjoy for dessert.


Originally, this recipe was intended to be more like a cake, but as you can see, that didn't quite work out.  But you know what?  I think the recipe turned out even better this way.

Really, guys.  They are just so fudgy.  My mom was hesitant to try at first, but I coaxed one bite into her and after that she was hooked.  Like I said, they're like nothing you've ever tasted.

Fudgy, fudgy, fudgy.


Chocolate Quinoa Fudge Bars

  • 1/2 cup spelt flour
  • 1/2 cup whole wheat flour
  • 1 tsp cinnamon
  • 5 tbsp special dark cocoa powder
  • 1/2 tsp baking powder
  • 1/4 tsp salt
  • 1/4 tsp baking soda
  • 2 tbsp ground flax
  • 6 tbsp water + 1/4 cup, separated (1/4 cup water can be replaced with milk)
  • 1 cup frozen cauliflower, thawed
  • 3/4 cup applesauce
  • 1 tsp vanilla 
  • 2 tbsp maple syrup
  • 1 tbsp turbinado sugar (or white sugar)
  • 1 cup cooked quinoa
Preheat oven to 350F.  Mix together first 7 ingredients in a large bowl.  In a small bowl, combine flax and 6 tbsp water.  Let sit for 5 minutes.  Place cauliflower ad 1/4 cup water (or milk) in a blender and blend until mostly smooth, with no cauliflower chunks.  Place cauliflower mixture in a medium size bowl, and add the flax and water, applesauce, vanilla, maple syrup, and sugar.  Mix together.  Add quinoa and mix again.  Add wet ingredients to flour mixture in large bowl.  Mix until well combined.  Pour batter into a parchment paper lined 8x8 square pan.  Bake for 10-15 minutes, or until mixture has firmed and no longer looks under baked.  Store in fridge.  Makes 16.


Quinoa (and cauliflower!) in a dessert may scare you.  Don't let it.

Like, if I made these, blindfolded you, and then shoved a bite into your mouth I swear you would love them.  But I can't do that, so you'll just have to take my word for it.  K?

Alrighty then, that's all.  Go cook some quinoa and then make tater tots and chocolate bars.

(I never imagined I would use those two foods in the same sentence...)

Revisited Recipe of the Day:

Mixed Grains with Kale and Apple


Pin It!

Tuesday, January 29, 2013

Double Chocolate Cookies

I am a cookie monster.


No, really.  Every baked good coming out of my kitchen these days is a cookie.  And I bake a lot.

I'm not complaining though.  A cookie everyday is something I'm more than happy to deal with, and when each and every cookies is good-for-me, it's no crime to my health either.  A win, win situation.


But what is even better?  Chocolate Cookies!

And I'm not just talking chocolate chip.  No sir!  I'm talking deep, dark, cocoa powder loaded, deee-licious cookies with chocolate chips.  Oh, yes.


These here cookies are all that... and more.  You know, 'cause I haven't mentioned the 100% healthy part.

Loaded with milk chocolate chips, just a smidge of peanut butter, and, oh right, no gluten (!), these cookies are not something to miss out on.

And did I mention I also snuck in some spinach?  Shhhh....

Double Chocolate Cookies

  • 2/3 cup + 1/2 cup oats
  • 2 tbsp peanut butter
  • 1 tbsp yogurt (soy, greek, etc)
  • 3 tbsp milk
  • 2 egg whites (6 tbsp)
  • 1/4 cup spinach (frozen or fresh, thaw if frozen)
  • 1/2 tsp baking soda
  • pinch salt
  • 1/3 cup cocoa powder
  • 3 tbsp maple syrup
  • 1 tsp vanilla
  • 1/3 cup milk chocolate baking melts (or your favorite chocolate chip)
Preheat oven to 380F.  Place oats in food processor and process until ground into small pieces.  Place in a large bowl and set aside. Combine peanut butter, yogurt, milk, egg whites, and spinach in a food processor and process until completely smooth.  Add baking soda, salt, and cocoa powder to bowl with oats.  Mix together.  Add spinach mixture to bowl, and mix again until well incorporated.  Add in maple syrup, vanilla, and baking melts.  Stir together until fully combined.  Scoop by 1/2 tbsp onto a greased cookie sheet.  Press flat with back of spoon.  Bake for 7-8  minutes.  I like these cookies best warm, but they're good room temp as well.


So just to clarify, these cookies are gluten free, as they're made from ground oats, really yummy, and pack in some veggies.  A pretty great package if you ask me!

So mix 'em up, steal some raw dough, and grab one straight from the oven while it's hot.  Enjoy everyone!


Revisited Recipe of the Day:


Cookie Butter Cups


Pin It!

Sunday, January 27, 2013

Mixed Grains with Kale and Apple

Welcome to dinner at my house.


This is pretty much what I eat most of the time... or at least a variation of it.

I absolutely love dishes that are packed with hearty grains, delicious greens, and sweet fruit.  If it were up to me, those types of foods would be the ones served in fast food restaurants, school cafeterias, and tons of dinner tables worldwide.  We gotta show people that healthy can taste good!


For real though, sometimes I wonder why simple salads, like the recipe I'm sharing today, aren't made more often.  I mean, it's not like they're complicated dishes to make.  I'm no master cook, and I threw this together pretty easily.  All you gotta do is toss some grains on the stovetop, cut up some apples, and then saute it all together with some kale.  My desserts are harder to make!


And do not tell me that people are hesistent to make this sort of thing because they think it won't taste good.  Oh, please.

Grains = delicious.  Apples = awesome.  Kale = even better.  So, c'mon, what on Earth leads one to believe that all of that combined is anything short of fantastic?

Answer = nothing.


Mixed Grains with Kale and Apple
Salad:
  • 1/2 cup red quinoa
  • 1/2 cup pearled barley
  • 1 medium onion
  • 1-2 tbsp olive oil
  • 2 apples
  • 6 (packed) cups kale, washed and cut into bite size pieces
  • 1/4 cup dried cranberries
Dressing:
  • 3 tbsp olive oil
  • 1 1/2 tbsp apple cider vinegar
  • 1/2 tsp honey
  • salt + pepper, to taste
Place quinoa in rice cooker along with 1 cup water and let cook until ready.  Repeat process with barley.  If you don't have a rice cooker, cook according to package directions, using same amount of water and quinoa/barley.  Cut onion into thin slices.  Saute with olive oil over medium heat for 5-7 minutes, until soft.  Add kale and apples and saute for another 10 minutes, until kale is wilted.  Mix in cranberries and grains and heat until warmed.
Make dressing my combining all ingredients in a small container, and shaking or mixing until very well combined.  Toss salad with desired amount of dressing (I used about half).  Serve warm.  Makes 4-6 servings as an appetizer, or 3-4 as a main dish.


If you still don't have faith in this dish, then all I can tell you is try it.  You will change your mind.  And if you don't, well, then I've got nothing to say to you.

Revisited Recipe of the Day:

Grilled Peach and Sausage Salad


Pin It!

Thursday, January 3, 2013

Avocado Tomato Salad

Lunch Time!


I've set a couple different goals for myself, things that I'd like to start, improve, or do more of in the new year.  One of those goals, this one involving the blog, is to make, photograph, and post more savory recipes.

It's no secret that desserts are something I love to create, but I also enjoy salads, sides, and a whole bunch of other things that just don't find their way onto this blog.

It's time for that to change.


Today I'm sharing a super simple salad that has become a common lunch, snack, or side dish in my house.  It's colorful, tasty, and take a whopping (that's sarcasm) 3 minutes to prepare.

Based on this recipe, this "more savory dishes" goal is going to be a good one.


Avocado Tomato Salad
(makes 2-4 servings)

  • 2 ripe avocados, peeled and pitted
  • about 16 cherry tomatoes, cut in half (feel free to adjust amount)
  • 1 tbsp orange muscat vinegar (it's from Trader Joes)
  • salt and pepper to taste
Cut avocados into 1/2" cubes.  Then toss all ingredients together in a medium bowl.  Serve salad at room temperature, and if possible, immediately after making.


I first discovered this dish when trying to throw together a quick and easy lunch out of the random leftovers, veggies, and other stuff that I had lying around the kitchen.  Huge success!

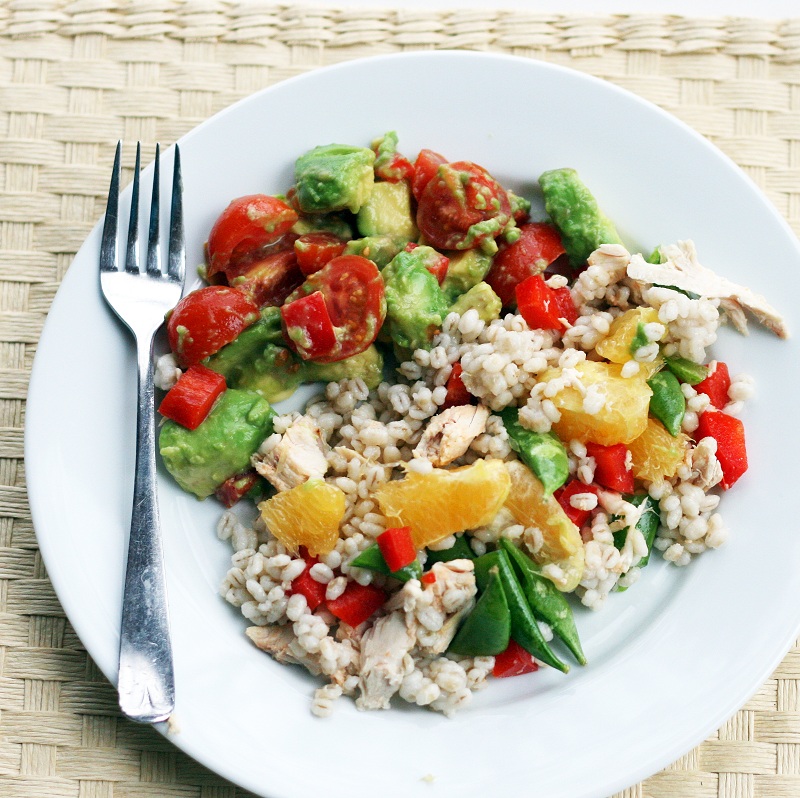
You may have noticed the pictures of what I came up with (right above and way at the top), but I'll also explain what it was to anyone interested, because it was good.


The first part was this avocado salad, throw together with the almost too ripe avocados and cherry tomatoes just begging to be used.  The seconds part, which there isnt (yet) a recipe for was a barley salad with chicken, snap peas, and orange slices.  It was super pretty and delicious, and I'm hoping to create something similar to share with you all soon.

So tell me... What wonderful creations have you created from leftovers in the fridge?

Revisited Recipe of the Day:

Greek Pasta Salad


Pin It!