Showing posts with label halloween. Show all posts

Wednesday, November 14, 2012

Kit Kat Oatmeal Cookies

The leftover Halloween candy is mocking you, isn't it?


Don't try to deny it.  You know exactly what I mean.  Those fun-sized chocolate bars, the ones the trick-or-treaters left behind, have been staring at you... calling you.  And though you've tried to resist, really you have, you've already eaten a couple... and maybe more.  But now, almost 2 weeks after that fateful sugary night, you've decided that you are done.  That those little chocolate bars, as addicting as they may be, will no longer enter your mouth.

But, come on, how many of you will actually keep that promise


Sure, you'll try.  Try very hard, I bet.  You may even make it a whole week.

But then, and don't you say I'm wrong, you'll cave.  You'll give in, and before you know it, that candy bowl will be missing four snickers bars.  Soon to be five, if the pattertn continues.

Don't feel bad.  It happens to the best of us.  Lucky for you, I've come up with a less guilt inducing way to satisfy your candy bar cravings... and it comes in the form of a cookie.


That's right, a cookie.  Please allow me to explain myself before you go off telling me that there's no way a cookie is a better solution.

First off, these cookies are bursting with crispy kit kat pieces, guarenteeing that they'll satisfy all your leftover Halloween candy cravings.

That doesn't quite make them better for you though, does it?  It's the rest of the ingredients that do that.  In addition to the candy pieces, these cookies are packed with wholesome things like rolled oats, applesauce, and banana.  Oh right, and no sugar.  So why not feed that candy bar monster inside of you one of these cookies instead?  I bet your waistline will appreciate it.
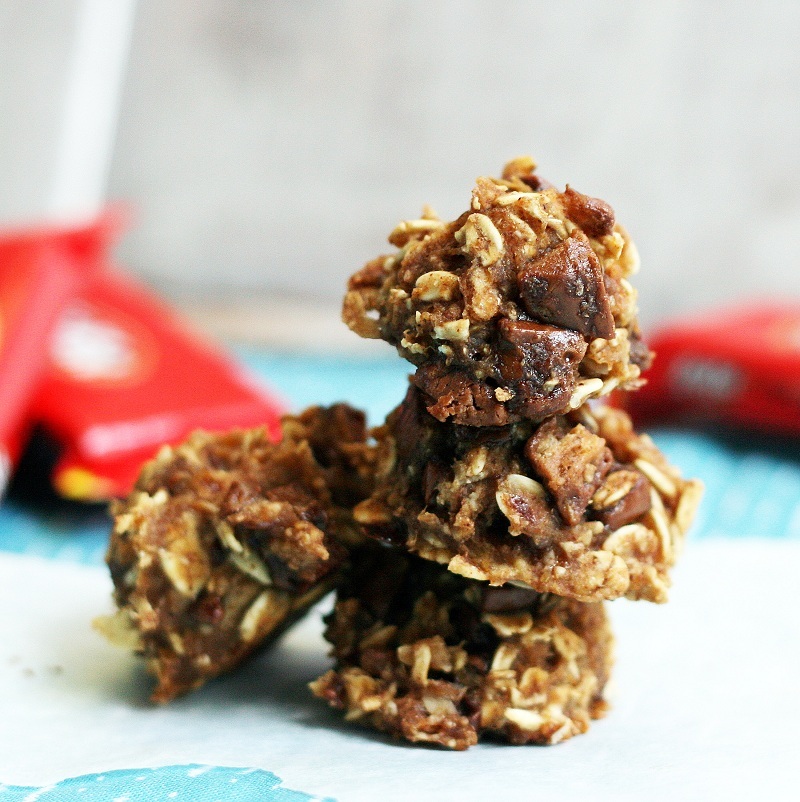

Kit Kat Oatmeal Cookies
(makes 15 cookies)
  • 1/2 banana
  • 1/4 cup applesauce
  • 1/2 cup rolled oats
  • pinch salt
  • 1/2 tsp cinnamon
  • 2 tbsp spelt flour
  • 1/2 tsp vanilla extract
  • 3 fun sized kit kat bars, chopped into small pieces
Mash together banana and applesauce in a medium bowl.  Mix in oats, salt, cinnamon, flour, and vanilla, until everything is combined.  Fold in kit kat pieces.  Scoop in 1/2 tbsp balls onto a parchment paper lined cookie sheet and freeze at least 1 hour.  Preheat oven to 350 degrees.  Bake for 15 minutes, let cool, and devour like you did all those other candy bars :)


Ok, so if I'm being honest, I had way too much fun with the intro for this recipe.  Probably because  it's near exactly what I do every year when Haloween ends.  I'm a mini candy bar theif!

And for the record, that promise that I will eat no more always gets broken.  I usually don't even last a day.  Unless these cookies are around.  In that case, the cookies don't even last an hour.


Revisited Recipe of the Day:


Pin It!

Sunday, October 28, 2012

Cookie Butter Cups

Move over Reese's...


'Cause here come Cookie Butter Cups!

That's right, the deliciously addictive spread has now been turned even more deliciously addictive, by sandwiching it between rich dark chocolate.


I ate three straight from the freezer.  Whoops.  I couldn't help myself.  These cups are just so yummy.  

Seriously, they blast Reese's right out of the water.  Soon, kids will be asking for these instead of the famous peanut butter cups on Halloween night.

Which is actually totally fine, because, unlike most popular candies on the market, these treats are made with only 5 ingredients, all of which are pronounceble.  So you see, it's a win, win.  Better nutrition, better taste.


Do yourself a favor and, whether you want to be the person to introduce Cookie Butter Cups to the world or just want to try the delicious-ness I'm raving about, get a little bit ahead of the game and throw together these delightful little treats for Halloween this year.  I swear they'll be gone in an instant.


Chocolate Cookie Butter Cups
(makes 10 mini cups)

  • 1/4 cup cocoa powder
  • 1/4 cup coconut oil, melted
  • 2 tbsp maple syrup (you can add more of you have a sweet tooth)
  • 1/2 banana
  • 1-2 tbsp speculoos cookie butter
Combine first 3 ingredients in a small bowl and stir until it turns into a smooth chocolate sauce.  Pour a thin layer into mini cupcake liners (or regular cupcake liners, or molds), making sure to leave some of the sauce for later.  Freeze cupcake liners for 10 minutes, or until chocolate has hardened.  Meanwhile, microwave the banana and cookie butte together in a small bowl until easily stirred.  Mix well.  Put a blob of cookie butter micture on top of chocolate layer in each mini cupcake liner, and cover with another thin layer of chocolate sauce.  Freeze again until hard.  Then, store in freezer or fridge until serving time (personaly, I like them more straight from the freezer).


Wow, writing this post really made me want to eat more of these.  I'm off to go grab the last one... and then most likely make more.  Oh my are they delicious.

Just a few more notes before I go off to devour a Cookie Butter Cup:
  • Speculoos Cookie Butter is, in fact, vegan.  Meaning that these Cookie Butter Cups are vegan as well.  Vegans, rejoice!
  • For the super easy version of this recipe, just melt down some of your favorite chocolate (i recommend good quality dark chocolate), and use that instead of the coconut oil chocolate sauce
  • For a lower calorie version of this recipe, you could try substituting stevia for the maple syrup.  I haven't tried this, however, and am not sure about how the taste would be or what amount would be best to use.
Without further ado, I send you off to your kitchen to mix up some of this utter yumminess.  

Enjoy!


Revisited Recipe of the Day:


Pin It!

Tuesday, October 23, 2012

Peanut Butter Pumpkins


Halloween snuck up on me this year.

I feel like it was just a couple of weeks ago that october was beginning and Halloween was still a good thirty days away.

Now it's in less than 2 weeks and, despite the fact that I've been running around like a mad-women trying to prepare some halloween themed recipes for you all, i'm excited.


Halloween is a time for costumes, parties, and, oh right, lots and lots of candy.  That's probably the part most people (or at least kids) look forward to. 

Personally, i'm not a huge fan of fruit flavored candies, but those fun-sized chocolate bars?  Well, they're another story.


I have a thing for mini desserts, and an even bigger thing for chocolate, so when the two are combined dangerous things happen at my house.  As in, some of the other family members mysteriously misplace they're candy bars... and I suddenly gain more.

I really like them, ok?  So much, in fact, that when I started to think up Halloween recipes to make, something inspired by those little guys was definitely the first idea to come to mind.

Of course, always the overachiever, I also wanted something that looked Halloween-y.  That's how these Peanut Butter Pumpkins came to be.  They're mini and contain chocolate, just like my beloved halloween bars, but, as an added bonus, they're also shaped like cute little pumpkins.

They came out quite nicely, if I do say so myself.


Peanut Butter Pumpkins
  • 1/2 cup peanut butter
  • 1 tbsp honey or agave nectar
  • 1/2 cup rolled oats
  • 1 tbsp ground flax
  • peanut butter chips, for melting
  • a couple squares of your favorite chocolate
Melt the peanut butter and honey together in a small microwavable bowl until easily stirred.  Mix until well blended.  In another bowl, combine oats and flax.  Pour the peanut butter mixture into the oat mixture and mix together.  It may seem dry at first, but just keep mixing.  Form the now combined mixture into balls and place on a plate.  Chill in freezer overnight.  The next day, melt peanut butter chips in a small bowl (I used a ramekin).  If desired, thin the mixture with a bit of milk (I did this).  Using a toothpick, fork, of your hands if you don't mind getting a bit messy, dip the frozen peanut butter balls into the melted peanut butter chip and twist a bit to coat.  Set back on plate.  Repeat with each ball before returning them to freezer to let peanut butter coating harden (about an hour or so).  Once hardened, cut chocolate pieces into rectangular chunks and place on top of balls to make pumpkins.  You may have to melt the bottom of the chocolate a bit to get it to stick on top.  Return balls to freezer until serving time.

Note:  If you want, after attaching the chocolate stems on top of the pumpkin, you can also melt down some chocolate and paint on a jackolantern face with a small paintbrush or toothpick.  As you can see in some of the pictures, I did this on a couple pumpkins.


Aren't they adorable?

I wouldn't say that these little guys are something you should serve if you want to scare your party guests, but if you want them to smile, well, then these are the perfect choice.

Just watch as everyone devours them with a huge grin on their face!

Revisited Recipe of the Day:

Chocolate Banana Cups


Pin It!