Showing posts with label kid friendly. Show all posts

Tuesday, October 23, 2012

Peanut Butter Pumpkins


Halloween snuck up on me this year.

I feel like it was just a couple of weeks ago that october was beginning and Halloween was still a good thirty days away.

Now it's in less than 2 weeks and, despite the fact that I've been running around like a mad-women trying to prepare some halloween themed recipes for you all, i'm excited.


Halloween is a time for costumes, parties, and, oh right, lots and lots of candy.  That's probably the part most people (or at least kids) look forward to. 

Personally, i'm not a huge fan of fruit flavored candies, but those fun-sized chocolate bars?  Well, they're another story.


I have a thing for mini desserts, and an even bigger thing for chocolate, so when the two are combined dangerous things happen at my house.  As in, some of the other family members mysteriously misplace they're candy bars... and I suddenly gain more.

I really like them, ok?  So much, in fact, that when I started to think up Halloween recipes to make, something inspired by those little guys was definitely the first idea to come to mind.

Of course, always the overachiever, I also wanted something that looked Halloween-y.  That's how these Peanut Butter Pumpkins came to be.  They're mini and contain chocolate, just like my beloved halloween bars, but, as an added bonus, they're also shaped like cute little pumpkins.

They came out quite nicely, if I do say so myself.


Peanut Butter Pumpkins
  • 1/2 cup peanut butter
  • 1 tbsp honey or agave nectar
  • 1/2 cup rolled oats
  • 1 tbsp ground flax
  • peanut butter chips, for melting
  • a couple squares of your favorite chocolate
Melt the peanut butter and honey together in a small microwavable bowl until easily stirred.  Mix until well blended.  In another bowl, combine oats and flax.  Pour the peanut butter mixture into the oat mixture and mix together.  It may seem dry at first, but just keep mixing.  Form the now combined mixture into balls and place on a plate.  Chill in freezer overnight.  The next day, melt peanut butter chips in a small bowl (I used a ramekin).  If desired, thin the mixture with a bit of milk (I did this).  Using a toothpick, fork, of your hands if you don't mind getting a bit messy, dip the frozen peanut butter balls into the melted peanut butter chip and twist a bit to coat.  Set back on plate.  Repeat with each ball before returning them to freezer to let peanut butter coating harden (about an hour or so).  Once hardened, cut chocolate pieces into rectangular chunks and place on top of balls to make pumpkins.  You may have to melt the bottom of the chocolate a bit to get it to stick on top.  Return balls to freezer until serving time.

Note:  If you want, after attaching the chocolate stems on top of the pumpkin, you can also melt down some chocolate and paint on a jackolantern face with a small paintbrush or toothpick.  As you can see in some of the pictures, I did this on a couple pumpkins.


Aren't they adorable?

I wouldn't say that these little guys are something you should serve if you want to scare your party guests, but if you want them to smile, well, then these are the perfect choice.

Just watch as everyone devours them with a huge grin on their face!

Revisited Recipe of the Day:

Chocolate Banana Cups


Pin It!

Tuesday, September 11, 2012

Peanut Butter Rice Crispy Treats

Simply delicious.


When I want a dessert, and I want it now, that phrase is something I've come to love.

To me, it means that a recipes is easy, fast, and still just as gratifying as one that could have taken hours to prepare.


Now, you may very well be thinking that I'm out of my mind right now, because that last sentence sounds pretty darn close to impossible.  But, trust me, it's not.

For if it was, these Peanut Butter Rice Crispy Treats would not exist.


With only 4 ingredients, all of which are probably already somewhere in your kitchen, and no baking time required these bars are pretty much as simple as it gets.  And, oh yeah, they taste amazing too.

See?  Simply Delicious isn't just a fantasy of mine, it can and has been achieved.


Peanut Butter Rice Crispy Treats - original recipe can be found here
  • 3 cups rice crispy cereal of choice
  • 1/2 cup creamy peanut butter
  • 1/2 cup honey (maple syrup or agave will also work for strict vegans)
  • 1 tsp vanilla extract
In a large bowl, measure out your cereal.  Set aside.  Next, in a small saucepan, melt together the peanut butter, honey, and vanilla over medium heat.  Once melted, pour over your cereal and mix until everything is coated and there are no dry spots.  Line a 9x9 baking pan with parchment paper.  Pour your peanut butter and rice crispy mixture into the pan and press down firmly until flat.  Place pan in freezer for half hour before cutting and serving your Rice Crispy Treats.  Store any extra bars in freezer.


Next time you need a fast and easy crowd-pleasing dessert, this should definitely be the page you visit.

The recipe can easily be doubled, or even tripled, and, that's be honest, everyone loves peanut butter.


Enjoy!

Side Note: The Giveaway is now over.  To find out who won, head over to this page.

Revisited Recipe of the Day: 

Single Serving Double Peanut Butter Cookies


Pin It!

Saturday, September 8, 2012

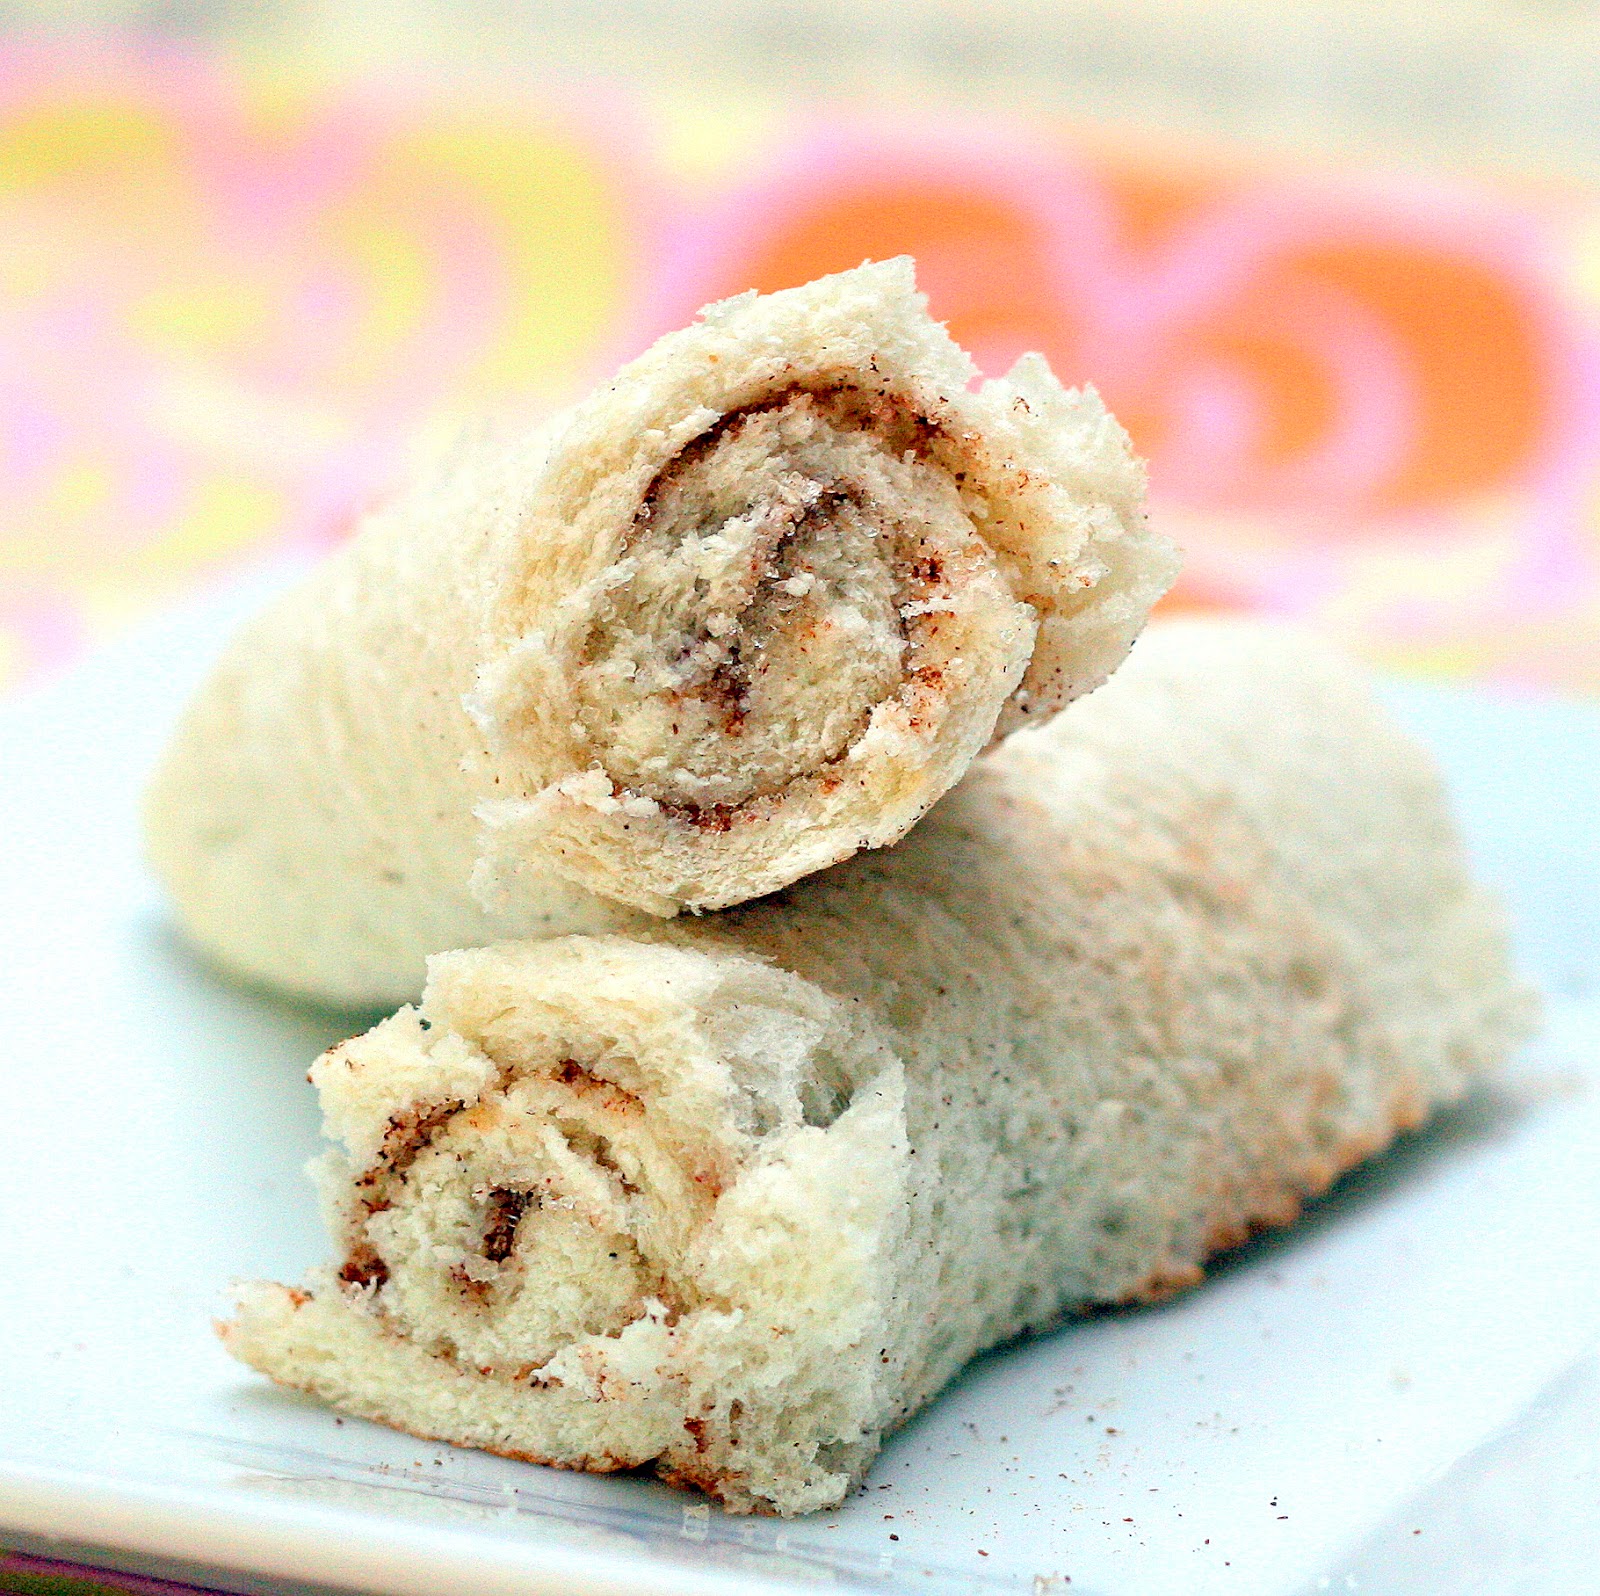
Kid-Friendly No Bake Cinnamon Roll-ups

It's that time of the year again.

Back to school.


Back to school often means busy mornings, lots of school supplies, and hungry kids that need a good afternoon snack.

I've got a great recipe today, that can help make busy mornings and afternoon snacks a lot less stressful.  It won't, however, make the absurd amounts of school supplies any more manageable.  Meaning, don't send your 6 year old to school we these instead of crayons.


Although, with that being said, you most definitely can send him/her to school with these in their tummy, for that will certainly end much better.

And when they get home?  Just throw together a couple more for a totally satisfying afternoon snack that any kid will enjoy.


In case you happened to skip over the title of this post, the amazing little treats I'm going on and on about are No Bake Cinnamon Roll-Ups.

They're fast, easy, and picky-eater approved.  I'm sure that's music to most moms' ears right about now.


Kid Friendly No-Bake Cinnamon Roll-Ups - inspired by this recipe
(makes 2 rolls, like in the pictures)
  • 2 slices white bread
  • 2 tbsp butter (or something similar, like Earth Balance), softened
  • 1 tsp cinnamon (or as much as looks appropriate) 
  • 1 tbsp sugar (again, use whatever seems correct
Cut the crust off your bread, so that it forms a neat rectangle.  Then, with a rolling pin or large cup, roll out the bread until it's as thin as you can get it.  Depending on the type of bread you use, this can be very easy or surprisingly difficult.  Once your bread is flattened, spread a generous amount of butter on each slice.  Then, sprinkle the cinnamon and sugar over, making sure to coat evenly (please note that the measurements listed above are just estimations as I usually go by eye on this step).  Roll up your bread tightly.  You may have to use a bit more butter to make it stay rolled up, and not just fall apart when you let go.  For presentation, if desired, you can cut off the edges of the rolls so that the spiral is more visible.


I promise that these will be a hit with almost any kid you offer them too.  And, when they're as simple as sprinkle, roll, and serve, it won't even be a problem if someone asks for seconds.

In fact,  these Cinnamon Roll-Ups are so easy, that, with a bit of help, any child could even make them on their own.

Hey, parents!  How's that for less stressful?

Revisited Recipe of the Day:

Cinnamon Sugar Muffins


Pin It!

Sunday, September 2, 2012

Mini Vanilla Cupcakes for Two

This is one of those recipe that tastes really really good but isn't exactly healthy... at all.


Don't you close the page yet though, all you health contious readers. There is one good-for-you thing about this recipe: portion control.

If you follow all the measurements listed below, you'll end up with only 2 servings. That means that, even if you gobble up everything this recipe yields, you won't have to feel too guilty about it.


Which is good, because everyone have those times when they truly need something unhealthy tasting.  Those days when some good ol' comfort food is the only thing that will cheer you up.

Cravings like that are nothing to be ashamed of.  We all have them at some point.  As a matter of fact, I had one the day I whipped up these cupcakes.

Lucky for me, they were just what I needed to end it.


Mini Vanilla Cupcakes for Two - originial recipe can be found here
  • 1 egg white
  • 2 tbsp sugar (you can probably get away with less, but I haven't tried)
  • 2 tbsp butter, melted
  • 1 tsp vanilla extract
  • 1/4 cup all-purpose flour
  • rounded 1/4 tsp baking powder
  • pinch salt
  • 1 1/2 tbsp milk of choice
Preheat oven to 350F.  In a small bowl, whisk together egg white and sugar until combined.  Add in vanilla extract and butter, and sir to mix in.  Add flour, baking powder, and salt.  Stir again until smooth.  Slowly pour in milk and stir to incorporate.  Divide batter between 7 or 8 mini cupcake liners (normal size cupcake liners will also work) and bake for 5-10 minutes, or until cake has set completely. If frosting, let cool completely before doing so.


So there you have it, the perfect treat to turn a bad day into a good day.  Or a good one even better! 

These fluffy and buttery cupcakes are deliciously sinful and prevent you from over-eating.  A good deal?  I'd definitely say so.

(picture)

Enjoy them!

Revisited Recipe of the Day:

Strawberry Cake


Pin It!

Monday, August 27, 2012

Baked Sweet Potato Fries

Let's face it, everyone loves french fries.


After all, it's hard not to when they're everything one wants in a snack. Crunchy, salty, crisp, and oh, so delicious. I could eat french fries by the bucketful they're so addicting.


But I don't.  Because, along with their extreme tastiness, fries are also pretty darn unhealthy.  In fact, usually when I have them at some restauran, I end up regretting it a couple hours later, when I start to feel like a big, heavy zombie.

However, that did not mean I was going to give up fries all together.  Heck no.  I was still going to enjoy my fries, just in a healthier way.


Sweet Potato Fries became that way.  I found a recipe that makes them in the oven without a drop of oil, so they're much better for you than most of the fries out there.

And the best part?  They're just as heavenly as the fast-food fries I love!  Crunchy and crisp and totally awesome.  Everything that makes a french fry, a french fry, minus the unhealthy factor.  Yum!


Baked Sweet Potato Fries - original recipe can be found here

  • 2 medium sized sweet potaoes
  • 1 egg white
  • sea salt, to taste
  • optional: herbs or other spices to season fries with (I actually only used salt when I made these)

Peel sweet potatoes and cut into strips of even thickness.  It doesn't matter how thick they are, but make sure each fry is around the same size, so none burn.
Soak your fries in a bowl of cold water for at least 30 minutes*.  Drain and pat totally dry.
Preheat oven to 425F and line 1 or 2 large baking sheets with parchment paper.
In a large bowl, whisk egg white until slightly foamy.  Add potato pieces, and any seasonings you want on your fries.  Toss around, making sure to coat every piece.  Spread potato pieces onto prepared baking sheets in a single layer with as few as possible touching.
Bake for 15 minutes in preheated oven, venting the oven around every 5 minutes or so to let steam escape (you don't have to do this if you have a convection oven).
After 15 minutes, take out fries, flip them over, and return to oven to finish cooking.  This should take around 15 minutes, but it really depends on the thickness of your fries, so keep an eye on them (mine only took 10-12 minutes).
Once fries look ready, reduce heat to 200F and let crisp for 10-20 minutes (I only did it for 10 because I was short on time).  Season with more salt (or other seasonings), if desired, and serve fries as soon as possible so they don't loose their crisp.  If you have any leftovers, store them in an airtight container.

* The potatoes can soak for up to 2 days, so, if you want the fries to come together faster, you can peel and soak your potatoes the day (or morning) before and leave them in the fridge soaking until your ready to continue on with the recipe.


Believe me when I sat that being able to shove french fries into your mouth without feeling guilty is one of the best feelings in the world.

It's something you need to experience.


Lucky for you, these fries are super simple, and along with a few sweet potatoes, you probably have every ingredient needed to make them lying around your kitchen.  So, you see, a healthy french fry really isn't that hard to acheive.  I bet you could even make these in time for dinner tonight!

(P.S.  Don't forget about the giveaway!  It's coming soon, so stay tuned)

Revisited Recipe of the Day:


Cheesy Star Chips


Pin It!

Thursday, June 28, 2012

Cheesy Star Chips

Honor our country.

Make these chips for the Fourth of July.


The perfect snack.

Crunchy, cheesy, quick, fun. These chips have it all.


Throw them together for a healthy and easy food to munch on while waiting for fireworks. You can even get the kids to help you out!


Cheesy Star Chips

Flour tortillas
Sliced cheddar cheese (you can try a different type of cheese too)
Chile powder or paprika
2 star cookie cutters (one bigger than the other)

Preheat oven to 350F.  Use the bigger cookie cutter to cut out stars from the flour tortillas.  When I made these chips I used 2 flour tortillas and that made about 15 stars.  Bake stars in preheated oven for 5 minutes.  Meanwhile, take sliced cheese and use the smaller cookie cutter to cut enough small stars to cover all the bigger ones.  When the tortilla stars finish baking, place cheese stars in the center of each one and bake for another 5 minutes, or until the cheese melts.  Sprinkle chips with spice of choice and let cool before eating. Store leftovers in an air tight container (please note that the longer the chips are left out after baking, the chewier and less crunchy they get)


What to do with leftover tortilla/cheese scraps: You can make more cheesy chips by using the same process ( baking time may be less if you're using small pieces) or you can make plain salted tortilla chips (bake only once for about 7 minutes).


Snacks are always a great thing to have on hand, especially on those nights when you'll be staying up late.

These star chips are great to munch on because they're portable, easy to make, and totally something any kid would love.

So, why not add them to your Fouth of July snack table?


Pin It!