Showing posts with label yogurt. Show all posts

Thursday, February 27, 2014

Mixed Berry Cake


I've been on a fresh strawberry kick.  Also, a cake kick.  It was only logical to combine them together, right?


I give you…

Mixed Berry Cake.  

It's a dense cake filled with yogurt, honey, and frozen fruit.  (No, I didn't use my beloved fresh strawberries in the cake.  I'd much rather eat those!).  Perfect for breakfast, brunch, or an afternoon snack!


Mixed Berry Cake

  • 2 cups spelt flour
  • 2 tsp baking powder
  • 1/2 tsp cinnamon
  • 1/2 cup honey
  • 1 egg
  • 1 tsp vanilla
  • 1 cup yogurt, plain or vanilla
  • 1/3 cup milk
  • 1 cup frozen mixed berries
Preheat oven to 350F.  Grease an 8in round pan.  In a large bowl, mix together flour, baking powder, and cinnamon.  In another bowl, combine honey, egg, vanilla, yogurt, and milk.  Add wet ingredients to dry and mix until a smooth batter forms.  Add frozen fruit and mix to incorporate.  Pour batter into prepared pan and spread into an even layer.  Bake in preheated oven for 40-45 minutes, until a toothpick comes out clean.  Allow to cool completely before slicing.  Recipe makes 8 servings.


Pin It!

Thursday, November 7, 2013

Chocolate Strawberry Brownie Sandwiches

Do you ever have kitchen fails?


Times when something goes utterly wrong?  When you have a picture in your head and the result looks nothing like it?

The brownie part of this recipe was one of those times.  I had mixed up my batter, taste-tested it and everything, only to realize that I just plain didn't have enough.  When I poured it into the pan, it was only about 1/4 inch thick.  I don't know about you, but I like my brownies thick.

What to do?


When you end up with a kitchen failure, there are usually two logical next-steps.  One, you decide that whatever you made is beyond saving and throw it in the trash, or, two, you think long and hard about an ingenious way to save the food.

Luckily, the brownies I made were eligible for the latter.


My solution happened to be using the super thin brownies as the "bread" part of a sandwich.  I can't say I had super high expectations, but the results blew me away.  As it turns out, brownies made into a sandwich with a strawberry yogurt filling beat plain old brownies by a long shot!  The whole batch was gone in less than a day.

Thank you, kitchen failure.


Chocolate Strawberry Brownie Sandwiches
Brownie:

  • 2/3 cup rolled oats
  • 1/2 cup special dark cocoa powder
  • 1 tsp baking powder
  • 1 tsp coffee granules
  • 3/4 cup yogurt (plain or vanilla)
  • 1/2 cup date paste
  • 1/4 cup milk
  • 2 tsp vanilla
  • 1/3 cup chocolate chips
Filling:
  • 5 oz (1/2 cup) strawberry yogurt (I used Fage)
  • 2-3 strawberries, chopped (optional)
  • 1/2 tsp vanilla
  • 2 tbsp flour
Preheat oven to 350F.  Grease an 8x8 square pan.  In the bowl of a food processor, combine all brownie ingredients except chocolate chips in the bowl of a food processor.  Process until completely combined, stopping as necessary to scrape down the side of the machine.  Add chocolate chips and process quickly to combine.  Pour into prepared pan and spread it a thin layer.  Bake in preheated oven for 10-15 minutes, until firm.
To make filling, combine all ingredients in a small bowl.  Mix to combine.  When brownies have cooled, slice into 9 or 16 squares (depending on the size you want).  Spread a thick layer of filling on top of one brownie and top with another.  Continue until all brownies have been used.  Store in fridge until serving time.

Revisited Recipe of the Day:

Extra Fudgy Brownies


Pin It!

Saturday, October 5, 2013

Vanilla Spice Layer Cake

Fancy cakes are my favorite :)


They're pretty, and delicious, and people think you slaved away in your kitchen for hours making them, but, I'm gonna tell you a secret, you don't have to.

Layered cakes and cakes with multiple flavors are actually super easy.  Well, at least my recipes are.  I'm not one to get too complicated.  I just like making people think I worked really hard, when in reality, the recipe was a breeze.


This cake is like that.  Two layers of cinnamon spiced vanilla cake topped with creamy greek yogurt frosting and an onslaught of sprinkles, if you're in that type of mood.  I'm always in that type of mood.

Anyway, while this cake may seem difficult, it's totally the opposite.  The batter comes together quickly with the help of your food processor, and the frosting takes no more than 3 minutes to mix up.  After that all you gotta to is bake, assemble, and eat.  The eating part is extra easy.


Vanilla Spice Layer Cake
Cake:
  • 2 cups spelt flour
  • 1/4 cup ground flax
  • 2 tsp baking powder
  • 1 tsp baking soda
  • 1/2 tsp salt
  • 420 grams (about 4 cups) frozen cauliflower, thawed
  • 1 1/3 cup milk
  • 1/3 cup honey
  • 2 tbsp coconut oil, melted
  • 2 tsp vanilla
Frosting:
  • 2 cups plain (or vanilla) greek yogurt
  • 1/4 cup honey
  • 2 tsp vanilla
Preheat oven to 350F.  Grease two 8 in circle pans.  In a large bowl, mix together all dry ingredients.  In the bowl of a food processor, combine remaining cake ingredients in the bowl of a food processor.  Process until completely smooth with no cauliflower lumps.  Add wet ingredients to dry and mix until completely incorporated and a batter has formed. Fill prepared pans about 2/3 of the way full with batter.  If you have extra, make a few cupcakes.  Bake cakes for 20 minutes, until a toothpick inserted comes out clean.  Let cool completely.  Meanwhile, combine all frosting ingredients in the bowl of a food processor (Just rinse well from last use).  Blend until all ingredients are incorporated.  Remove one cake from pan and place on a large plate.  Spread a thin layer of frosting on top.  Add other cake on top.  Use remaining frosting to frost on top and all around cake.  Store in fridge until serving time.  When ready to serve, slice into 8-10 slices and enjoy!


Pin It!

Sunday, August 11, 2013

Chocolate Greek Yogurt Cheesecake

We had a bit of a greek yogurt mishap at my house recently.  It's a funny story, really.


So basically I went to the grocery store to pick up Chobani.  No surprise there, right?  Everyone knows I'm a big greek yogurt fan.  But guess what?  There was no chobani!  Cleary, I was no going to leave the store without my beloved greek yogurt, so I grabbed a different brand, Cabot to be exact, and rushed out of the store and headed home.

Everything seemed normal, but it wasn't.  Little did I know, our family was in for a surprise.


Boy, am I being dramatic about this or what?  Sorry about that.  I love me a good story, and I couldn't pass up the opportunity to make this just a wee bit exaggerated.  So without further ado, I shall continue.

The big discovery was made one morning when my mom decided she wanted yogurt for breakfast.  She scooped it into her bowl, topped it with berries and a drizzle of honey, and dug in.  Seconds later, her face took on a crazy expression and she was staring down at her yogurt bowl in confusion.  In all honesty, it was quite funny.  Then my mom ran over to the fridge, grabbed the container of Cabot greek yogurt, and shoved it into my face.  What percent fat is this?  She asked urgently.  I turned over the container, and when I found the answer, I realized her shock.  It was 10% fat greek yogurt!  That is way more than what we're used to at my house.  Apparently, my mom has taken one bite and then was overcome by how incredibly rich the greek yogurt was.  There was no way to eat a whole bowl of that stuff with a spoon without entering a yogurt food coma.


So what to do?

Bake with it, of course.  The first order of buisness?  Cheesecake!  I've tried making greek yogurt cheesecake before, but without the addition of tofu, it's never been as creamy as I would like.  I thought using a high fat yogurt would help solve the problem, and I was right.

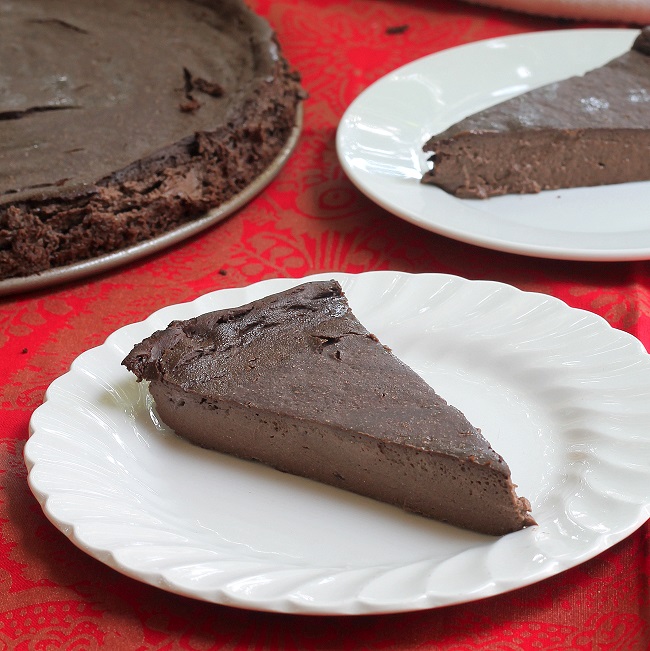
Using the greek yogurt, I baked up a super creamy Chocolate Cheesecake.  It's so rich, so chocolatey, and so darn delicious.  What a great way to use up unwanted 10% fat greek yogurt.


Chocolate Greek Yogurt Cheesecake
  • 2 1/2 cups 10% greek yogurt (I used cabot)
  • 3 egg whites (9 tbsp from the carton)
  • 1/3 cup special dark cocoa powder
  • 1/2 cup + 2 tbsp honey (you can try to replace some with stevia if you prefer)
  • 1/4 cup arrowroot starch
  • 1 tsp vanilla
  • 1/4 tsp salt
Preheat oven to 350F.  Grease a 9in round pan.  Place all ingredients in a large bowl.  Mix until completely incorporated with no cocoa powder clumps.  Scoop into prepared pan and spread into an even layer.  Bake in preheated oven for 30-35 minutes, until firm.  Remove from oven and let cool.  Once cooled, chill in fridge for at least 3 hours.  Slice into 12 thin slices (cheesecake is very rich) and serve with whipped cream, fruit, or plain.  Store in fridge.


Revisited Recipe of the Day:

Chocolate Chip Cranberry Biscotti


Pin It!

Tuesday, July 2, 2013

Banana Yogurt, Cherry, and Blueberry Parfaits

There's something you should know about me:  I'm really bad at holidays.


Not as in that I forget them, or that I don't buy presents or something.  It's just that I'm so bad at being holiday-ish.  You know, like wearing green on St Patricks Day or remembering to make up some elaborate prank for April Fools Day.  I just flat out forget that stuff.

But this year I think I may be improving!  I made Cookie Dough Eggs for Easter, and Gingerbread Cake in November, and now these gorgeous Red, White, and Blue Parfaits just in time for the 4th of July.


These are super duper simple.  Remember what I said about simple being my friend?  That continues today.  

This right here is a 5 minute recipe.  It's perfect for summer, with no oven needed and fresh cherries and blueberries joining the mix.  I love fresh fruit in the summer!


Whip these parfaits up Thursday afternoon, or simply enjoy them any other day this summer.  I know I'll be making them again!


Banana Yogurt, Cherry, amd Blueberry Parfaits

  • 1 cup plain yogurt
  • 1 tsp vanilla extract
  • 1/2 ripe banana
  • chopped cherries
  • fresh blueberries
Combine yogurt, vanilla, and banana in a blender.  Blend until fully incorporated.  Layer banana yogurt with cherries and blueberries in small glasses to make parfaits. Grab a spoon and dig in!  Recipe makes 2-4 servings, depending on size of parfaits


Revisited Recipe of the Day:

Cheesy Star Chips


Pin It!

Monday, June 10, 2013

Crustless Lemon Honey Cheesecake

Here's the thing:

I don't like cheesecake.


Yep, I said it.  It's something about the cream cheese taste and how incredibly heavy the cake is.

The good thing is, I managed to fix everything I don't like in this Lemon Cheesecake which I love.  Now I'm a downright Cheesecake Lover!


This Lemon Honey Cheesecake is made primarily with 2% greek yogurt.  It's important to use the 2% so that your cheesecake comes out nice and creamy.  I also added cream cheese to the base of the cheesecake.

Next comes lemon juice and lemon zest.  This adds a huge pop of flavor.  Lemon is a must when it comes to summer flavors.  But, of course, lemon is very sour.  The cheesecake needed a sweetener, and I knew just what to use.


As you can see from the title of this post, honey was my preferred sweetener in this recipe.  This is because it pairs great with lemon and is a liquid, and will therefore blend well into the cheesecake filling.  Honey is a great substitution for any liquid sweetener.  I've found that it's sweeter than maple syrup, which definitely comes in handy when trying to limit sugar.

In addition to this, honey enhances the flavor of tons of ingredients.  In this recipe it works very nicely with the lemon.  I adore honey and lemon together!

So next time you're entertaining and want to blow your audience away with a healthy dessert, look no further than this Lemon Honey Cheesecake.  Yes, it is that good.


Crustless Lemon Honey Cheesecake

  • 1 1/2 cups plain 2% greek yogurt (I don't recommend using fat free)
  • 1 cup non fat cream cheese
  • 1 tsp vanilla
  • 1/4 cup + 1 tbsp honey
  • 3 egg whites (9 tbsp if using the kind in a carton)
  • 1/4 cup arrowroot starch or cornstarch
  • 1 tbsp lemon zest
  • 1/4 lemon juice
Preheat oven to 350F.  Combine all ingredients in a large bowl.  Mix until all ingredients are incorporated.  It will look thin and watery, but that's ok.  Pour mixture into a greased 8x8 circle pan (a springform is best).  Bake in preheated oven for 40 minutes.  Remove from oven.  Chill in fridge overnight, or for at least 8 hours.  After chilled, cut into slices and serve chilled.  Store leftovers in the fridge.


Sorry it's been so long since I last posted.  Things have been crazy busy over here.  Hopefully everything will be back on track soon.

In the meantime, enjoy this Lemon Cheesecake.  It is sooooo yummy.

Disclosure: By posting this recipe I am entering a recipe contest sponsored by National Honey Board and am eligible to win  prizes associated with the contest. I received a gift card to offset the expense of my ingredients.


Revisited Recipe of the Day: 

Honey Banana Ginger Almond Butter


Pin It!

Sunday, May 5, 2013

Healthy Oreo Cookies

I was the Oreo kid.


Every lunchtime at school, my friends would eagerly gather around my lunch box.  Inside was sure to be a  ziplock bag full of the classic Oreo cookie.

I'm not even kidding when I say that I had at least five Oreos every single day, and usually a couple more.  Not so healthy, huh?


Well, when your in third grade healthy isn't exactly at the top of your, or your friends', list.

I loved the daily cookies, and Im sure the people I shared them with weren't about the complain either.  However, looking back on it, it probably would have been much better had I brought one or two of these Healthy Oreo Cookies to lunch.


These, my friends, are a healthier take on the Classic Oreo Cookie.

I'm not going to tell you they taste exactly like the real thing, because honestly, they don't.  In my opinion they taste even better.

With a deep, dark Chocolate Cookie on the outside, and a creamy Vanilla Filling (that is very similar to the frosting here) on the inside, these cookies are sure to be devoured in an instant.


I only wish I could go back in time and bake some for the third grade me.

Healthy Oreo Cookies
Cookie:

  • 1/2 cup spelt flour
  • 1/4 cup dutch processed cocoa powder (normal cocoa will work as well)
  • 1/4 tsp baking soda
  • large pinch salt (don't skip this, the salt helps to inhance the chocolate)
  • 1 tbsp sugar
  • 2 tbsp honey or agave
  • 1/2 tsp vanilla
  • 2 tbsp coconut oil, melted
  • 2 tbsp milk
Filling:
  • scant 1/2 cup greek yogurt
  • 1 ripe banana
  • 1/2 tsp vnailla extract
For Cookies:
  1. Whisk together dry ingredients in a large bowl.
  2. In another bowl, mix together all wet ingredients.
  3. Add wet ingredients to dry and mix until a ball of dough forms (this could take some time).  It may be sticky.
  4. Chill dough in fridge for at least 30 minutes, but longer is OK too.
  5. Preheat oven to 300F. Remove dough from fridge.
  6. Using a rolling pin, or large cup, roll the dough into a thin layer.  Don't worry about it being too thin, because the dough will rise a bit in the oven.
  7. Use a circle cookie cutter, or the cap of something (I used the cap of an old container of cinnamon; anything works), to cut out small circles of dough.  Roll out the dough and cut out circles for as long as needed, until all the dough has been used.
  8. Place circles of dough on a parchment paper or silpat lined baking sheet.  Bake 7-10 minutes.  Let cool a bit before removing from pan.
For Filling:
  1. Combine all ingredients in a food processor (a blender may work, but I haven't tried it)
  2. Blend until completely smooth and creamy.  The texture should resemble that of a normal oreo cookie filling.
  3. Spread filling on a cooled cookie and top with another cookie.  You msy have some filling left over.  Recipe makes around 1 dozen cookie sanwiches (that's 2 cookies + filling), but amount may vary depending in cookie size.  Store cookies in fridge.

Revisited Recipe of the Day:

Kit Kat Oatmeal Cookies


Pin It!

Monday, March 25, 2013

Peanut Butter Glazed Cookies

I glazed a cookie with peanut butter.  And it was one of the best decisions I've ever made.


Chocolate chip cookies are great on their own, don't get me wrong, but sometimes I'm craving just a bit more.  Enter the thought of peanut butter.

It's no secret that peanut butter is one of the most amazing flavors in the whole entire world.  It can be sweet, it can be savory, it can be paired with fruit, it can be paired with chocolate.  Today we're pairing it with a cookie.


Originally the idea for this recipe was a chocolate chip cookie with a peanut butter frosting.  However, someone, perhaps the person who is writing this right now, adding a bit too much liquid and it came out too thin.  No worries, though, I fixed it.  The peanut butter frosting was turned into a peanut butter glaze.

I think it's even better that way because you get to be messy!


These cookies are delicious, there's no doubt about that, but I don't think they're for everyone.  The chocolate chip cookies themselves are on the cakey side, and the peanut butter glaze isn't the super sweet peanut butter flavor you may be expecting.

However, if you're up for something a little bit different, you have to give these cookies a try.  No really, you have to.


Peanut Butter Glazed Chocolate Chip Cookies
Cookie:

  • 1 egg white
  • 2 tbsp applesauce
  • 2 tbsp yogurt
  • 1 tsp vanilla extract
  • 2 tbsp maple syrup
  • 1 tbsp turbinado or brown sugar
  • 1/2 cup whole wheat flour
  • 1/2 cup spelt flour
  • 1/2 tsp baking soda
  • pinch salt
  • 1/2 tsp cinnamon (If you like cinnamon in your cc cookies)
  • 2 tbsp milk
  • 3 tbsp water (or more milk)
  • 1/2 cup mini chocolate chips
Peanut Butter Glaze:
  • 1/2 cup plain greek yogurt
  • 1/4 cup peanut flour or PB2 or regular peanut butter
  • 3 tbsp milk
  • 1/2 banana
  • 2 tbsp water (or more milk)
For Cookies:
  1. Preheat oven to 350F.
  2. In a small bowl, mix together egg whites, applesauce, yogurt, vanilla, maple syrup, and sugar.
  3. Place all dry ingredients, except chocolate chips, in a large bowl.  Mix together.
  4. Pour egg white mixture into flour mixture.  Add in milk and water and mix until a thin cookie dough forms.
  5. Fold in chocolate chips.
  6. Line a baking sheet with a Silpat mat or parchment paper.  Drop cookie dough, in 1 tsp amounts, onto baking sheet.  Spread out dough to form a cookie shape.
  7. Bake for 7 minutes.  Let cookies cool a few minutes on pan before transferring to a drying rack to cool completely.
For Glaze:
  1. Place all ingredients in a food processor or blender.  Blend until completely smooth.
  2. Just before serving time, pour a bit of glaze on top of each cookie.  This can get messy :)
  3. If you have any leftovers, store them in a container in the fridge.
  4. Recipe makes 20-25 cookies.


Enjoy the recipe, guys!

Revisited Recipe of the Day:

Peanut Butter Chocolate Fudge Bites


Pin It!

Monday, March 11, 2013

Chocolate Peanut Butter Cookie Sandwiches

Does anyone remember those dunk or no dunk commericals for Oreo Cakesters?


  • Personally, the choice was a no brainer for me.  Maybe it has something to do with my dislike of milk, but I was always on the no dunk side of things.  Cake + milk just doesn't work.  Doesn't.


I'm on the no dunk side (but not the no eat side!) for these guys, too.  I think they're probably pretty similar to Oreo Cakesters (I've never had a Cakester, so I can't be sure), but better because they're healthy - with no funky ingredients - and because they have a peanut butter filling.  Peanut butter beats vanilla every time in my book.


The cake part of these is purely chocolate.  It's like an oreo cookie, only with more cake than crunch.

Though the cake part of these dessert sandwiches is definitely delicious, I think it's the peanut butter filling that really steals the show.  It's a bit different than you may be expecting (more of a tart flavor), but once you get used to it, it is downright addicting.  You may even skip some of the chocolate cakes and just eat it off a spoon.

Just don't dunk any in milk.


Chocolate Peanut Butter Sandwiches
Cake:

  • 1 cup rolled oats
  • 1/4 cup extra dark/special dark cocoa powder
  • 1/2 tsp cinnamon
  • 3/4 tsp baking soda
  • pinch salt
  • 3 tbsp raisin puree
  • 1/2 cup applesauce
  • 1/4 cup yogurt
  • 1 tbsp balsamic vinegar
Filling:
  • 1 cup plain yogurt (greek is best, but others should work
  • 2 tbsp peanut butter (note:  You may want a stronger peanut butter flavor.  If so, add 1 or 2 more tablespoons peanut butter.  Taste the filling to check)
  • 1 tbsp vanilla extract
For Cakes:
  1. Preheat oven to 350F.
  2. Place oats in a blender, food processor, or coffee grinder.  Process until broken down into small pieces, but not a fine flour.  You want it to be like a course oat flour.
  3. Mix together all dry ingredients (including ground oats) in large bowl.
  4. In another bowl, whisk together wet ingredients.  Pour wet into dry and mix until a batter forms.
  5. Drop 1 tsp of batter at a time onto a lined or greased baking sheet.  Bake for 6-7 minutes.
  6. Once done, let cakes cool a few minutes before attempting to remove from pan.
For Filling:
  1. Combine all ingredients in a food processor (a blender may also work, but I haven't tried).  Blend until  well combined and creamy.
  2. Spread a bit of filling on one piece of cake and top with another.  Repeat until all cakes have been used.  Depending on how thick you spread the filling, there may be some leftover.  I recommend you eat it :)
  3. Recipe makes around 20 sandwiches.  Store leftovers in fridge.

Revisited Recipe of the Day:

Chocolate Peanut Butter Crispy Bites


Pin It!