Showing posts with label greek yogurt. Show all posts

Saturday, October 5, 2013

Vanilla Spice Layer Cake

Fancy cakes are my favorite :)


They're pretty, and delicious, and people think you slaved away in your kitchen for hours making them, but, I'm gonna tell you a secret, you don't have to.

Layered cakes and cakes with multiple flavors are actually super easy.  Well, at least my recipes are.  I'm not one to get too complicated.  I just like making people think I worked really hard, when in reality, the recipe was a breeze.


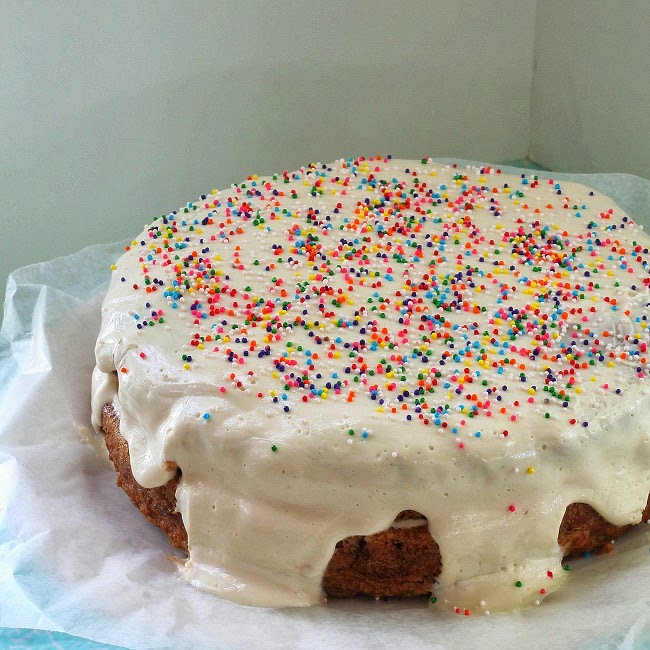
This cake is like that.  Two layers of cinnamon spiced vanilla cake topped with creamy greek yogurt frosting and an onslaught of sprinkles, if you're in that type of mood.  I'm always in that type of mood.

Anyway, while this cake may seem difficult, it's totally the opposite.  The batter comes together quickly with the help of your food processor, and the frosting takes no more than 3 minutes to mix up.  After that all you gotta to is bake, assemble, and eat.  The eating part is extra easy.


Vanilla Spice Layer Cake
Cake:
  • 2 cups spelt flour
  • 1/4 cup ground flax
  • 2 tsp baking powder
  • 1 tsp baking soda
  • 1/2 tsp salt
  • 420 grams (about 4 cups) frozen cauliflower, thawed
  • 1 1/3 cup milk
  • 1/3 cup honey
  • 2 tbsp coconut oil, melted
  • 2 tsp vanilla
Frosting:
  • 2 cups plain (or vanilla) greek yogurt
  • 1/4 cup honey
  • 2 tsp vanilla
Preheat oven to 350F.  Grease two 8 in circle pans.  In a large bowl, mix together all dry ingredients.  In the bowl of a food processor, combine remaining cake ingredients in the bowl of a food processor.  Process until completely smooth with no cauliflower lumps.  Add wet ingredients to dry and mix until completely incorporated and a batter has formed. Fill prepared pans about 2/3 of the way full with batter.  If you have extra, make a few cupcakes.  Bake cakes for 20 minutes, until a toothpick inserted comes out clean.  Let cool completely.  Meanwhile, combine all frosting ingredients in the bowl of a food processor (Just rinse well from last use).  Blend until all ingredients are incorporated.  Remove one cake from pan and place on a large plate.  Spread a thin layer of frosting on top.  Add other cake on top.  Use remaining frosting to frost on top and all around cake.  Store in fridge until serving time.  When ready to serve, slice into 8-10 slices and enjoy!


Pin It!

Wednesday, October 31, 2012

Pumpkin Whoopie Pies with Maple Yogurt Filling

Though I don't believe I've mentioned it before, I'm a big fan of whoopie pies.


But, c'mon, who isn't?

They're just so lovable!  2 pieces of fluffy cake, with creamy frosting sandwiched between, and totally portable, too.  In my opinion, whoopie pies are even better than cupcakes because you get a taste of both frosting and cake with each bite.  (Please don't tell me I'm the only one who always ends up eating all the frosting before I'm finished with the cake.)


And these paricular whoopie pies, though they're much healthier than most you'd find in a bakery, definitely live up to their name.  In fact, they came out even better than I had expected... and I had pretty high hopes for these guys.

The pumpkin cake is super moist, despite being low fat, and the yogurt filling has the absolute perfect tangy to sweet ratio.  Combined they created two little bites of heaven.  Of course I had to have seconds.


If you're still not convinced that you have to have to have to make these, what if I tell you that one of my taste-testers said that these whoopie pies were one of the best things I've ever made?  Does that help?  I don't want to sound braggy or anything, but I've made some pretty yummy stuff!

Plus, they're not even hard to make.  Or at least, not any harder than another baked good.  All you do is mix up your ingredients, then drop the batter onto a cookie sheet.  No special equipment needed.  I was sort of surprised myself with how easy it was.


So, now that you have all those awesome facts floating around your brain, I hope that you've decided to make these.  In fact, I hope you're not even reading this now because you've skipped down below to the recipe.  However, for those of you still reading, I shall not put any more distance between you and this awesome recipe.  Read on!

Mini Pumpkin Whoopie Pies with Mape Yogurt Filling
(makes about 10 whoopie pies, depending on size)
  • 1/4 cup milk
  • 1 tsp apple cider vinegar
  • 1/2 cup oat flour (grind down oats to a fine powder in a coffee grinder or food porcessor to make your own)
  • 1/4 tsp baking soda
  • 1/4 tsp ground ginger
  • 1 tsp baking powder
  • 1 tsp cinnamon
  • pinch salt
  • 1/8 tsp allspice
  • 2 tbsp brown sugar
  • 1/4 cup pumpkin
  • 1/2 tsp vanilla extract
  • 1 tbsp maple syrup
  • 1/4 cup plain greek yogurt (vegan yogurt, greek or otherwise, will work too)
  • 1/4 tsp cinnamon
Preheat oven to 350F.  Mix together milk and vinegar in a small bowl and set aside.  In another larger bowl, mix together next eight ingredients (through brown sugar).  Then add pumpkin and vanilla to bowl with milk, and stir to combine.  Pour wet ingredients into dry and mix until well combined.  Drop batter onto greased cookie sheet (or sheets, if you run out of room) in circles about the same size as each other (it doesn't have to be perfect).  Bake for 7 minutes.  While cakes bake, mix together the last three ingredients (maple syrup, yogurt, and cinnamon) in a small bowl.  When cakes come out of the oven, let cool, and then spread the yogurt mixture on 1 cake piece, and top with another.  Repeat until all whoopie pies are made.  If there's an extra side leftover, I recommend you eat it :)


Now that that's done with, I have something very important to say...

Happy Halloween!

I didn't have any more Halloween themed recipes to share today, but I do wish you all a great night of trick-or-treating and/or handing out candy.  You can bet I'll be having a whole lot of fun!

(And don't worry if you end up with 50 thousand pounds of candy, I plan on posting a whole bunch of recipes that use leftovers)


Revisited Recipe of the Day:

Peanut Butter Pumpkins


(a recent recipe, I know, but it's absolutely perfect for Halloween, so I couldn't resist.)
Pin It!

Saturday, October 27, 2012

Apple Greek Yogurt Cheesecake

Currently I'm at that stage where I've got 10 million apples lying around and nothing to do with them.


Basically, in an attempt to use them before they all turn to mush, I've been throwing them into pretty much everything I make.

Dinners, desserts, snacks, you name it.  Unfortunately, only a small handful of those experiments actually work out into something worth sharing.  This cheesecake, however, is probably worth every single failure.  It is so good.


I'm actually not really a fan of classic cheesecake.  It's a bit too heavy for me.  I know there are some hardcore cheesecake lovers out there, though, so I decided to try my hand at making something similar.

My main goal was to create something that would satisfy both me, and everyone who enjoys cheesecake, and I really think I did it.


This version of a cheesecake, made with greek yogurt and apple, is very light, but also has the rich and creamy taste that is associated with the classic dessert.  There's just a hint of sweetness from the apples and honey, and a touch of tangy from all the greek yogurt.  If you don't like your cheesecake tangy, feel free to add more honey before baking.

Oh, and I almost forgot to mention, there's another unusual ingredient in this dessert that helps to add creaminess and good texture.  Scroll down to find out what it is!


Apple Greek Yogurt Cheesecake

  • 1 1/2 cups greek yogurt (I used 0%, but for an even creamier version use 2%)
  • 9 tbsp mori-nu tofu (1/2 cup + 1 tbsp)
  • 1 cup chopped apples
  • 1 tsp vanilla
  • 1 1/2 tsp lemon juice
  • 2 1/2 tsp cornstarch
  • 1/2 tsp cinnamon
  • 2 tbsp honey, or more to taste
  • optional: 1 prepared pie crust
Preheat oven to 350F.  Combine all ingredients (not pie crust, if using) in food processor and blend until smooth.  Taste to check sweetness, and add more honey (or other sweetener) if desired.  Once flavor is just how you want it, pour mixture into parchment paper lined circular pan or pie crust.  Bake in preheated oven for 30 minutes, then turn oven off, but don't remove cheesecake.  Let cake sit in oven for at least 1 hour before taking out, and moving, uncovered, to fridge.  Allow cheesecake to firm up even more by leaving in fridge overnight (or for at least 8 hours).  By the next day, you're ready to serve... for breakfast or dessert!


As you can see from the pictures, I chose to leave my cheesecake crustless.  This was mostly because I didn't have a pie crust on hand and was too lazy to make one.

Next time I make this (and there will most definitely be a next time) I think I'll give a graham cracker crust a try.  I think the added crunch + flavor would be really nice.

However, whether or not you use a crust is completely up to you.  The one thing I can say is that if you chose no crust, then you're definitely not missing out on the awesome-ness of the recipe, because that's what I did when I made it.

So, without further ado.... Enjoy!


Revisited Recipe of the Day:


Lemon Blueberry Scones


Pin It!

Friday, October 5, 2012

Greek Yogurt Fruit Dip

Greek yogurt has a special place in my heart.


I used to not like yogurt at all.  In fact, when I was a kid, just the smell of it made me gag.

So, even when Greek yogurt started to pop up everywhere, it wasn't something I necessarily wanted to try.  That is, until I started to hear about all it's amazing nutritional benefits.  Especially the protein.

Protein is always something I've struggled to get into my diet.  I eat a mostly vegetarian diet, and eggs and nuts have never really been my favorites, so sometimes it's hard to be sure I'm getting enough of that essential nutrient.  Greek yogurt helped me fix that problem.


At first I didn't like it.  It was too tangy for me, and the only way I could even slightly enjoy it was with lots of honey and fruit.  I kept trying it different ways though.  You see, I wanted to like Greek yogurt really really bad.  And eventually that happened.

One day, something just clicked.  I'm honestly not really sure what happened, but I had a bowl of plain Greek yogurt with nothing on it at all, and then, I wanted more.  And more and more and more.

Greek yogurt went from being something I extremely disliked, to something I eat almost every day in just a matter of months.


Now, I use Greek yogurt in almost everything.  Sure, not everything works out, but the things that do are absolutely delicious.  Like this fruit dip, for instance.

It's creamy and tart with just a hint of chocolaty-goodness.  Dip in strawberries, bananas, or maybe even spread some on your morning toast!


Greek Yogurt Fruit Dip
(makes about 1 cup)

  • 1 cup plain Greek yogurt (vanilla would probably work too)
  • 2 tsp cocoa powder
  • 1 tbsp melted chocolate chips
  • 1 tbsp chocolate sauce (homemade if you like)
  • sweetener of choice, to taste (I used just a bit of date paste, because I wanted by dip to be pretty tart)
Mix all ingredients together in a cereal bowl until little to no clumps remain.  Alternately, if you want a very smooth dip, you can blend everything together in a blender.  Serve dip chilled with fruit or cookie/crackers (spoons work too :)).  Store any leftovers in the fridge.


If your a Greek yogurt newbie, I suggest this dip.  It's a good introduction to everything Greek yogurt has to offer, and on top of it all, it's really tasty.  I bet if someone had given this to me while I was in the "trying to like yogurt" stage, my love would have blossomed right then and there.

And, If you have leftovers, you can't go wrong with chocolate Greek yogurt dipped strawberries!  Just coat strawberries in already made dip and freeze.


Enjoy!

Revisited Recipe of the Day:

Peach Blueberry Breakfast Crumble


Pin It!

Monday, September 3, 2012

Peach Greek Frozen Yogurt

So simple, so nutritious, so good.


That is how you describe this frozen yogurt using only 4 different words.

If I wanted to get more descriptive, I could say that it’s creamy, rich, fruity, tangy, healthy, easy, refreshing, delicious, and perfect for your labor day plans.

But that takes more time.  Time that I could be using to eat this frozen yogurt.


And while I'm on the subject of time, I should probably inform you that to make this yogurt, you need next to none.  I'd say about 4 minutes of hands-on is all that's really required.  All you need to do is blend together you're ingredients, pour the mixture into an ice cream maker, and, BAM, you're done.  Sounds easy right?

And that's without the added knowledge that there are only three ingredients total.


That's right, only three.  Honey, Greek yogurt, and peaches.

Alright, so let's recap.  This Peach Greek Frozen Yogurt is extremely delicious, absurdly good for you, takes about 4 minutes of hands-on time, and only uses three ingredients.

Now, tell me, why wouldn't you make it?


Peach Greek Frozen Yogurt
(makes a little over 1 cup, recipe easily doubled)

  • 1 cup plain non-fat Greek yogurt
  • 2 peaches, pitted (there's no need to remove the skin)
  • 1 tbsp honey (or to taste)
Blend ingredients together in a blender until smooth.  Pour into ice cream maker.  Let mixture churn until it thickens into an ice cream like consistency.  Pour frozen yogurt into a small container and freeze for at least 1 hour or until ready to serve.  If you freeze your mixture overnight, you may have to thaw a bit before scooping.  If you don't have an ice cream maker, you could try just pouring your blended ingredients into a container and freezing.  However, I haven't tried this and am not sure how well it would work.
  

Happy Labor Day everyone!

Do you have anything fun planned?  Any way your going to celebrate what feels like the last weekend of summer?

Maybe this frozen yogurt is part of your agenda (hint, hint)?


Revisited Recipe of the Day:

Protein Vanilla Milkshake


Pin It!