Showing posts with label pumpkin. Show all posts

Monday, October 28, 2013

Crustless Marbled Chocolate Pumpkin Pie

Can you believe how fast October is flying by?  Yeah, me neither.


I'm definitely not the only one saying this, but holy cow, has the month flown by.  Halloween's less than a week away, Novembers just a day after that, and fall is in full swing.  

It's time for some pumpkin action, is it not?


Today's pumpkin masterpiece is pretty awesome, if I do say so myself.

I started with a delicious (and super healthy!) Pumpkin Pie filling.  Then a I made my favorite Tofu Chocolate Mousse.  Finally- and this is the best part- I swirled them together!

My oh my, did it turn out delicious.  You've got to bake this pie this fall season, or you will be seriously missing out.


Crustless Marbled Chocolate Pumpkin Pie
Pumpkin Layer:

  • 1 (15 oz) can pumpkin puree
  • 1 cup milk
  • 1/3 cup spelt flour
  • 1/4 cup maple syrup
  • 1 flax "egg" (1 tbsp flax + 3 tbsp water) or 2 egg whites or 1 egg
  • 2 1/2 tsp cinnamon
  • 2 tsp baking powder
  • 1 tsp vanilla
  • 1/2 tsp ginger
  • 1/4 tsp salt
Chocolate Layer:
  • 1 (12.3 oz) package shelf stable tofu (I used the brand from Trader Joe's)
  • 1/2 cup cocoa powder
  • 1/2 cup melted chocolate chips
  • 2 tbsp maple syrup
  • 2 tbsp milk
Preheat oven to 350F.  Grease a 10in round pan.  In a large bowl, combine all ingredients for pumpkin layer.  Mix until incorporated and smooth.  Set aside.  In the bowl of a food processor, combine all chocolate layer ingredients.  Blend, on and off, until everything has been combined and there are no tofu lumps.  Scrape down the side of the machine as necessary.  
To create the marbled effect:  Start with the pumpkin layer.  Take large spoonfuls and put them in the pan at random until about 1/2 the batter has been used.  Do the same with the chocolate layer.  After 1/2 the chocolate has been used, go back to the pumpkin and use the rest.  Repeat with the chocolate layer.  At this point, there should be some type of batter filling the entire pan.  Take a knife and swirl it through the top to make it look pretty.  After that, it's ready to bake.
Bake in preheated oven for 35-40 minutes, until firm.  Let chill in fridge overnight before slicing and serving.


Pin It!

Thursday, September 26, 2013

Pumpkin Squares (Version 2)

Alright folks, it's officially fall.


The autumn equinox has passed and from now on days get shorter and colder and all around more depressing.  

But before all that we get the lovely season that is fall.  Crisp air, colorful leaves, and pumpkin and apple filled foods galore.  It's time I started spreading some fall cheer, no?


There's one recipe that's get's 10x more popular as September rolls around.  It's the first recipe ever posted on this blog, and it's one of the simplest ones as well.  I love it, you love it, everyone loves it.  After all, who can resist pumpkin squares? 

Certainly not me, which is why I decided to re-do the recipe this season to make it even better. Looking back on that recipe there are some things I don't like about it.  For example, the white flour and white sugar that I used.  Back then, I didn't have all my special sweeteners and spelt flour packages.  Now I've got 'em and i wanted to healthify those pumpkin squares even more.


Behold, the delicious result.  Pumpkin squares with no white sugar, no white flour, no oil, and no butter.  Oh yeah, and they're pretty darn delicious as well.

Pumpkin Squares (Version 2)
  • 1 cup spelt flour
  • 1 tsp cinnamon
  • 1 tsp baking powder
  • 1/2 tsp ground ginger
  • 1/2 tsp baking soda
  • 1/4 tsp salt
  •  1 cup pumpkin puree
  • 2 egg whites
  • 1/4 cup maple syrup
  • 1 tsp vanilla 
 Preheat oven to 350F.  Grease an 8x8 square pan.  In a large bowl, whisk together dry ingredients.  In another bowl, mix together pumpkin, egg whites, maple syrup, and vanilla.  Add wet ingredients to dry and mix until a thick batter forms.  Scoop into prepared pan and spread into an even layer.  Bake for 25-20 minutes, until firm.  Bars will be a bit gooey at first, but if you let them sit overnight they will dry out a bit and become less gooey.  It's your choice how to eat them.  When serving time comes, cut into 16 squares.


Pin It!

Wednesday, July 10, 2013

Chocolate Pumpkin Muffins

I hope you don't mind more muffins.  I certainly don't.  After all, muffins are basically cupcakes you can eat for breakfast.  What's not to love about that?


And these particular muffins are chocolate.  Chocolate!  Are you getting all this?  So far we have a recipe that is essentially a chocolate cupcake that's ok to eat for breakfast.  Now who's complaining about two muffin recipes in a row?

But I'm not done yet.  Oh no, not even close.


As if little guys don't have enough going for them already, I also made them, you guessed it, healthy!

Instead of using all spelt flour, which is what I would normally do, I decided to switch it up with a half whole wheat, half spelt flour mixture.  Let me tell you, you cannot tell there's whole wheat in these guys.  The texture is just perfect!  None of the dense and gummy stuff that sometimes comes along with whole wheat flour.

The awesomeness continues with the fact that these muffins are 100% fat free.  There aren't even any chocolate chips it them to ruin that claim (although if you'd like to add them I won't complain).  But like with the flour, you can't tell.  PERFECT texture.


Can you tell I just love these muffins?

It's just so much fun when you find a recipe that's healthy, but doesn't taste it at all.  And it's even better when said recipe entitles you to chocolate "cake" before 9am.  Hey, these muffins do have pumpkin, whole wheat flour, and no fat.  Totally breakfast acceptable ;)


Fat Free Chocolate Pumpkin Muffins

  • 3/4 cup pumpkin puree
  • 1/3 cup honey (if you like things really sweet, you may want to add more)
  • 1/3 cup egg whites
  • 3/4 cup plain greek yogurt
  • 1 tsp vanilla extract
  • 1/2 cup cocoa powder
  • 1/2 cup spelt flour
  • 1/2 cup whole wheat flour
  • 1 tsp baking soda
  • 1 tsp baking powder
Preheat oven to 350F.  Grease a muffin tin well (!!!).  In a medium sized bowl, mix together pumpkin, honey, egg whites, yogurt, and vanilla.  In another large bowl, combine cocoa powder, flours, baking soda, and baking powder.  Min until incorporated.  Add pumpkin mixture to flour mixture.  Mix until a smooth, but thick batter has formed.  Your batter should be almost like brownie batter, it's so thick.  Scoop batter evenly between 12 muffin tin cups.  Bake for about 15 minutes, until a toothpick comes out clean.  Let cool before removing from pan and storing muffins in an airtight container.  Muffins will keep for 3-4 days on the counter, and can be frozen as well.


See that texture up there?  You must make these!

Revisited Recipe of the Day:

More muffins for you: Nutella Swirl Banana Muffins


Pin It!

Thursday, May 2, 2013

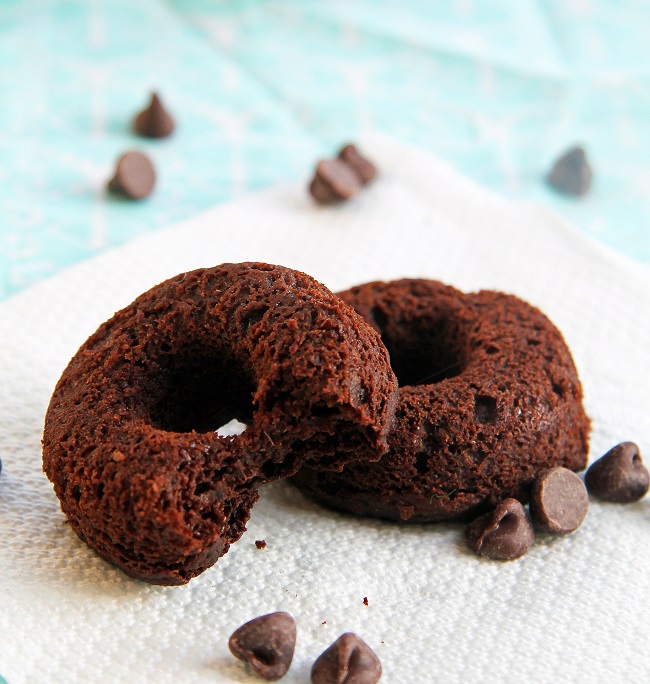
Fluffy Chocolate Donuts

These are the fluffiest fat free donuts you will ever try.  I can promise you that.


Sometimes fat free baked goods are known for being gummy and dense.  No one wants to eat something like that.  It's like eating a brick!

Today I'm proving once and for all that fat free does not mean gummy.  When done right, a fat free donut can be even better than a normal one.  It sounds crazy, but it's true.  Proof = these donuts.


I swear these Chocolate Donuts are just as good, if not better, than anything you can pick up at the chain store down the street.  They're light, they're fluffy, and they're completely delicious, all without one little teaspoon of butter, oil, or margarine.

I don't follow a low fat diet, but I find it pretty incredible.


And these guys are super easy too.  You need two bowls, a spatula, a donut pan and that's all.  No frying required!  In fact, you don't really need a donut pan at all.  A muffin tin will work just fine.

Oh, and one more quick thing.  I decided to be nice this time and not throw in any weirdo ingredients.  That means no beans, no cauliflower, and no tofu.  You may already have everything you need to make these in the house.

I'm honestly not sure why you're still reading this.  Skip right in down to the recipe folks, if you've got any common sense at all.


Fluffy Chocolate Donuts


  • ½ cup pumpkin puree
  • ¼ cup unsweetened applesauce
  • ¼ cup honey (if you like things extra sweet, feel free to ude a bit more and reduce milk accordingly)
  • ¼ cup buttermilk
  • ¼ tsp. vanilla
  • ¼ cup milk
  • 2 Tbs. ground flaxseed
  • ½ Tbs. baking powder
  • ½ tsp. baking soda
  • 1 Tbs. cornstarch
  • ¼ cup cocoa powder
  • 1/3 cup spelt flour


  1. Preheat oven to 375F
  2. In a small bowl mix together all the wet ingredients.
  3. In another larger bowl, combine the dry ingredients.
  4. Add wet ingredients to the dry, and mix until just incorporated.  Do not overmix.
  5. Scoop donuts into a greased donut pan.
  6. Bake for 10 minutes.
  7. Makes about 18 mini-donuts, but number will vary depending on the size of your pan.


Revisited Recipe of the Day:


Apple Cinnamon Bread
Pin It!

Sunday, March 17, 2013

Pumpkin Chocolate Chip Oatmeal Cookies


Is it still acceptable to eat pumpkin?  I mean, I know it's a big thing in fall, but is it still ok to eat it in March, what with the sunny days and daylight until 7pm?  I sure hope so, because these cookies aren't something you want to miss out on!


Alright fine.  So in all honesty they're just oatmeal cookies with pumpkin and chocolate chips.  BUT, they're really good oatmeal cookies with pumpkin and chocolate chips.  And who would I be if I let you miss out on a really good cookie?


Sometimes I try to make crazy desserts with a bajillion mystery ingredients, but other times a simple cookie is really what I'm craving.  Seeing as my super simple recipe for Pumpkin Sqares and my completely crazy Double Decker Chocolate Cake both make the top 5 most popular recipes on this blog, you guys seem to like both sides of my baking.

These cookies fall on the simple side of things.


Made mainly from rolled oats and pumpkin, these cookies are great for the times when you're pantry supply is running a bit low.  The weirdest ingredients you're gonna find in them is raisin puree and even then can be replaced with more maple syrup or honey.

But, and I'm sure all of you can think of something like this, sometimes the simplist things are the best ones.  I spend a lot of my time puree cauliflower and blending tofu.  It's good to take a break and make something good and simple... especially when you end up with really yummy cookies!


Pumpkin Chocolate Chip Oatmeal Cookies

  • 1/2 cup pumpkin
  • 1 flax "egg" or 1 egg
  • 1 tsp vanilla
  • 1 tbsp maple syrup
  • 1/4 cup raisin puree
  • 1 1/4 cup rolled oats
  • 3/4 cup oat flour (grind oats in a blender or food processor until they form a fine flour)
  • 1/4 tsp baking powder
  • 1/2 tsp baking soda
  • 1 tsp cinnamon
  • 1/4 tsp ginger
  • 1/4 tsp cloves
  • 1/2 cup chocolate chips
Preheat oven to 350F.  In a small bowl, mix together first 5 ingredients.  In another large bowl, combine remaining ingredients.  Mix wet ingredients into dry until a thick dough forms.  Form dough into cookie shapes on a silpat or parchment paper lined baking sheet.  Bake 10 minutes.  Let cool for 3 minutes on baking sheet before moving to a cooling rack to cool completely.  Recipes yields 16 cookies.


Revisited Recipe of the Day:

Pumpkin Cranberry Bread Pudding


Pin It!

Sunday, November 18, 2012

Pumpkin Chocolate Mousse Pie

Your future Thanksgiving dessert is staring at you.  Or rather, you're staring at it.


Even if you think you've already decided what dessert to make for Thanksgiving, please please please consider making this pie instead.  You will not regret it.


Just look at it.  So rich, so creamy, so decadent.  It just screams "make me!", doesn't it?  And you should always listen to a pie.  Pie does not lie.  That's a fact.


What this (talking) pie fails to mention, however, is it's extreme healthful-ness.

Don't laugh!  I swear it's true!  That incredibly delicious looking pie you see in the pictures is actually healthy.  I find it a bit incredible myself, and I'm the one who made it.   But, nutrition facts don't lie either, and the ones for this recipe are amazing.  One slice of this decadent tasting pie has 5 grams of fiber, 8 grams of protein, and under 200 calories!  Is that incredible or what?  And you cannot taste anything but delicious-ness!

Now, if that doesn't convinve you to at least give this recipe a try, I don't know what will.


Pumpkin Chocolate Mousse Pie
(serves 8)

For Pumpkin Layer:
  • 2 1/2 tsp cinnamon
  • 1/4 tsp ginger
  • 1/8 tsp allspice
  • 1/4 tsp salt
  • 2 tsp baking powder
  • 1/3 cup spelt flour (others should work too, but I haven't tried it)
  • 3 tbsp brown sugar
  • 1 3/4 cup pumpkin puree (1 15-oz can)
  • 1 scant cup milk
  • 1 flax "egg" (1 tbsp ground flaxseeds mixed with 3 tbsp water, and allowed to sit for a couple minutes)(a real egg would probably work too)
  • 2 tsp vanilla extract
  • 1 tbsp date paste (or more sweetener of choice)*
For Chocolate Mousse Layer:
  • 12.3 oz tofu (1 package Mori-nu silken firm)
  • pinch salt
  • 2 tbsp milk
  • 1/2 cup cocoa powder
  • 2 tbsp maple syrup
  • 1/2 cup chocolate chips (semi-sweet if possible)
Directions for Pumpkin Layer:
  1. Preheat oven to 350 degrees.  
  2. Mix together spices, salt, baking powder, flour, and sugar in a large bowl.  
  3. In another bowl, stir together pumpkin, milk, flax egg, vanilla, and date paste.  
  4. Add wet ingredients to dry and mix well to combine.  
  5. Pour into greased 10 inch round pan and bake for 35 minutes.
Directions for Chocolate Mousse Layer:
  1. Melt chocolate chips, either in microwave or on stovetop, until smooth and creamy.
  2. Combine all ingredients, including melted chocolate chips, in bowl of food processor and blend until smooth.
Finishing Steps: 
  1. Once pumpkin layer is done baking, let cool for a couple minutes.
  2. Then, scoop chocolate mousse over pumpkin and spread evenly.
  3. Chill pie in fridge for at least 6 hours, then slice and serve.
  4. Store any leftovers in the fridge.
* dates soaked in water overnight and then blended until they form a thick paste


I can honestly say that this pie is one of the best desserts I've made.  Ever.  If, for some completely crazy reason, you can't make this for Thanksgiving, you have to make it another time.  This pie must enter your life, and soon.  It's as simple as that.


Revisited Recipe of the Day:


Pin It!

Monday, November 12, 2012

Pumpkin Cranberry Bread Pudding


You know what stinks?

Not being able to eat something you want.


Whether its because if allergies, diets, tummy troubles, or just a lack of availability, when you can't or shouldn't eat something, it's not the best feeling.

Sometimes moments when that feeling shows up can increase during the holidays.  Though gathering with family and friends around the table is definitely a lovely thing to do, you're still likely at a different home where people may not be quite as accustomed to your personal dietary needs as you are, in your own kitchen.


It can get a bit annoying at times, to say the least.  Saying things like "I can't eat that" or "No thank you, is there a healthier option?" aren't things many people are totally comfortable doing.

Luckily, there are some products on the market that help us cope.  One of which being lactose free milk.


Lactose free milk is pretty much just what is sounds like: A milk that has no lactose.  It's still tasty, it still has all the nutrients of "normal" milk, but it doesn't have the lactose.  Anyone and everyone can drink it worry free!

In an attempt to make the holidays a more enjoyable time for everyone, even those with lactose intolorences, I've created a delicious holiday dessert thats entirely lactose free (thanks to lactose free milk).  It's crazy good and there's no way anyone will miss the lactose one bit.


Pumpkin Cranberry Bread Pudding*
(serves 6)
  • 220 grams whole grain bread, left out overnight and cut into 2" squares/cubes (a little over 4 cups, unpacked)(lactose free)
  • 1 1/2 cups pumpkin puree
  • 1 1/2 cups lactose free milk
  • 1 tbsp cinnamon
  • 1 tsp ginger
  • 2 eggs, lightly beaten
  • 1/2 cup dried cranberries
Combine pumpkin, milk, spices, and eggs in a large bowl and whisk gently until combined.  Fold in bread and cranberrie, and mix so that all bread is coated on all sides.  Scoop into casserole dish and pack down so that surface is flat.  Place in fridge for at least 1 hour to let bread soak up more flavor.  Preheat oven to 350 degrees.  Bake 50-55 minutes or until bread pudding is golden and crusty on top. Let cool slightly before serving, or store in fridge for later.


If you're looking for a new Thanksgiving dessert to try, this bread pudding is a great candidate.  It's tasty, "fall" themed, ok for lactose intolorances (!) and makes a fair number of servings.  It's also much healthier than most other holiday desserts, which is always a plus, at least at my house.

Heck, you could even make this for breakfast!  It does take a bit of time to put together, but reheats beautifully (and also tastes delicious cold), so it wouldn't be much of a problem to just make the afternoon before.  Also, it's plenty filling and would probably keep you going until lunch without any problems.  Especially, topped with some Greek yogurt and a sprinkle if cinnamon.

Mmmmmmm.  The more I think about it, the better it sounds.  I know what I'm having for breakfast this Thanksgiving!


*By posting this recipe I am entering a recipe contest sponsored by the Southeast Dairy Association. I am eligible to win prizes associated with the contest. I was not compensated for my time.


Revisited Recipe of the Day: 


Pin It!

Friday, November 9, 2012

Gluten Free Pumpkin Chocolate Chip Bars

I could never ever be gluten free.

Like, seriously, even if my body desided to not tolerate gluten anymore I would probably still eat it.  I just love bread and cake and cookies way too much.


However, I know that there are a lot of you out there who do follow a gluten free diet, and I totally respect that.  In fact, I want to make sure that you gluten free guys and gals don't miss out on all the fun!

And thus, I recently set out to create a delicious gluten free dessert.


Honestly, it wasn't easy.  Problems started to show up right from the get-go.  The first one being as simple as what type of flour to use.

I have zero knowledge of gluten free baking, and near zero "fancy" gluten free flours, so needless to say, this probelm was a big one.


Eventually, after much deliberation, I decided to go with chickpea flour.  Mostly because I had made a thing or two with it before (though nothing sweet) and knew it measured more or less like other flours.

Upon first tasting the (unsweetened) batter I was pretty certain that that had been an awful choice.  It tasted completely disgusting!  But, never one to waste, I pushed on, adding ingredients that I thought might fix the problem.  And, luckily, they did!  A bit of brown sugar and ginger fixed the taste up real nice, and then, just because I wanted to be sure the bars would be yummy, I threw in some chocolate chips.

The result was a gluten free dessert bursting with fall flavor and melty chocolate.  And don't worry, they don't taste like chickpeas one bit!


Gluten Free Pumpkin Chocolate Chip Bars
(based very loosly off this recipe)
  • 1/2 cup chickpea (or garbanzo bean) flour
  • 1 tsp cinnamon
  • 1/4 tsp allspice
  • 1 1/4 tsp ginger
  • pinch salt
  • 1/2 tsp baking powder
  • 1/4 tsp baking soda
  • 2 tbsp brown sugar (you may want more, taste the batter to check)
  • 1/2 cup pumpkin puree
  • 2 tbsp milk
  • 1/3 cup egg whites or 1 flax "egg"
  • 1/2 tsp vanilla extract
  • 3 tbsp chocolate chips
Preheat oven to 350F.  Whisk together dry ingredients is a medium sized bowl.  Add in wet ingredients and mix well to combine.  Fold in chocolate chips.  Pour into greased pan and bake in preheated oven for 15 minutes.  Let cool just a bit before cutting and eating.


Even if you're not currently eating gluten free, these bars are still a great thing to try.  Not only because they're delicious, but also because you cannot taste that they're gluten free at all.

The taste is spot on, the texture just right, and you won't want to stop eating them!  They're strangely addicting like that.  You think you're done, but then you find yourself reaching for another piece.

That's the sign of a great success, is it not?


Revisited Recipes of the Day:

Fall Recipe Round-up


Pin It!

Monday, November 5, 2012

Pumpkin Brownies

I haven't been posting about chocolate enough lately.  The last recipe on here whose main focus was chocolate was, like, a really long time ago.

It's time to change that...


With brownies!

And pumpkin because everyone know chocolate and pumpkin go together magically.


The pumpkin may also have to do with the fact that I'm becoming even more obsessed with fall flavors as winter approaches.  These were going to be just normal brownies, but then I saw the pumpkin staring at me from across the kitchen.  Next thing you know the can opener was in my hand and there was bright orange much staring at me.

I like to think it was just my recipe-creating genius controlling me, because, man, these brownies are good!


These will definitely satisfy any chocolate craving you've got going.  Especially if you have two.

They also sucessfully end the chocolate-free recipe period that I unconsciously started.  And thank god for that.  A blog like this is very sad without chocolate in it.


Pumpkin Brownies
  • 1/4 cup cocoa powder
  • 1/4 cup all purpose flour
  • 1/4 cup whole wheat flour
  • pinch salt
  • 1/2 tsp baking powder
  • 2 tbsp sugar
  • 1/2 cup pumpkin puree
  • 1/4 cup milk
  • 1/2 banana, mashed
  • 1/2 tsp vanilla
  • 1 tbsp date paste (blended dates) (you can omit and just use more sugar)
  • 2 tbsp water (or more milk)
  • 1/3 cup chocolate chips
Preheat oven to 350F.  Combine dry ingredients in one bowl.  In another, stir together wet ones.  Pour wet into dry and mix until well combined.  Fold in chocolate chips.  Scoop batter into a greased 8x8 pan.  Bake in preheated oven for 20 minutes.  Let brownies cool, and if possible sit out  at least overnight before eating.  (For some reason, these brownies taste better if allowed to sit for a bit)


The only thing I might change about these brownies next time I make them is baking them in a smaller pan (7x7 maybe?  Do they even make that?).  They came out a bit thin for my liking with an 8x8.  However, if you don't have a smaller pan and, like me, like your brownies a bit thicker, you could try layering two pieces on top of each other with some frosting or something between.  That sounds really good, actually.  I may have to try it.

Anyway, whether you want thick or thin brownies, please do consider this recipe and one to try.  They're really fudgy and yummy and keep you in fall spirit.  Who wouldn't want that?


Revisited Recipe of the Day:


PB's

Pin It!